
Unless your video footage was taken with extreme care, you will eventually find yourself editing clips that have a little camera shake, wobble, or roll in them.
Assuming it wasn’t intentional – e.g. a point-of-view shot of somebody running from a wild buffalo – all that excess camera movement can be subtly distracting, and make your movie feel sloppy.
After a decade of editing films, I have learned that stabilization is a bit like color correction. It is a step in the movie-editing process that you should just get used to doing because it will give a subtle but significantly more professional feel to your movies.
And – good news! – Final Cut Pro provides excellent tools to make stabilization easy. In this article, I will show you both the basics and some advanced tips.
Table of Contents
Key Takeaways
- Trim your clip to just what you want stabilized.
- Click on the clip and select Stabilization in the Inspector.
- Switch between stabilization Methods and adjust their settings as needed.
Getting Stable in Three Simple Steps
Using Final Cut Pro’s stabilization tools is simple enough, but there are a few things to keep in mind before you start.
First, when Final Cut Pro analyzes a clip for stabilization, it does it on the whole clip. So, it can help to have your clips already trimmed to the length you want or – if you just want to stabilize a range within a clip – split the clip so you can stabilize just the part you want.
Second, Final Cut Pro analyzes the entire clip to figure out what is intentional motion and what is just shaky camera work or an inconsequential bump that you want to smooth out.
Therefore, if there is part of your clip that has a lot or sudden camera movement, it may work better to split that part of the clip off and analyze it separately.
With those points in mind, here are the three steps to getting stable:
Step 1: Select the clip in your Timeline that you want to stabilize.
Step 2: Make sure you are on the Video properties tab in the Inspector as shown by the green arrow in the screenshot below.
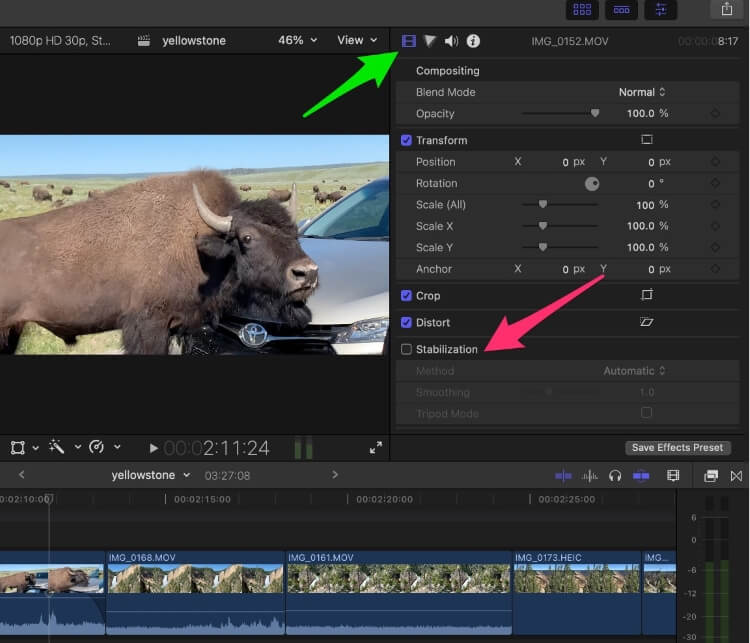
Step 3: Click the checkbox next to “Stabilization”, as shown by the red arrow in the screenshot above.
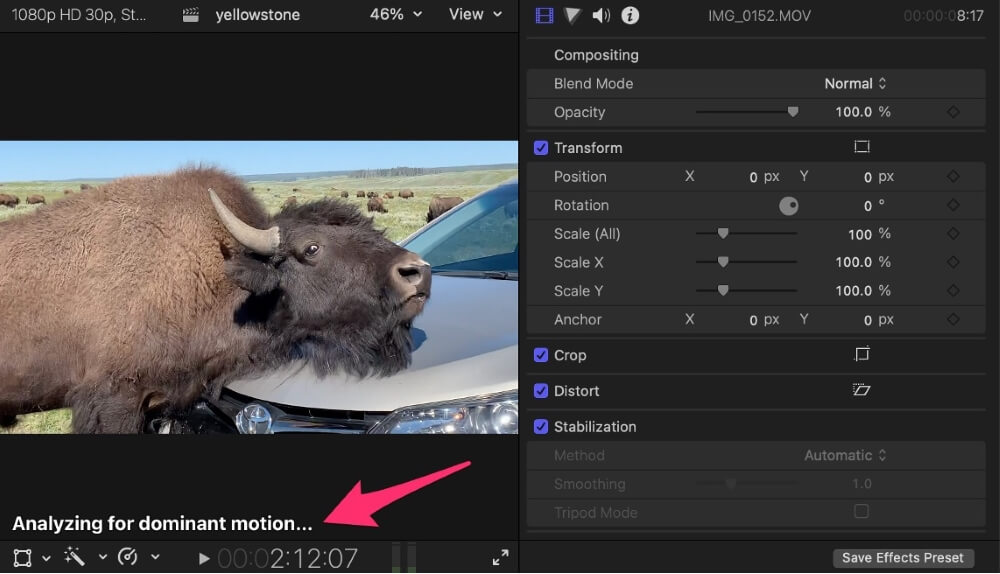
And now Final Cut Pro gets to work. Short clips will be analyzed quicker, longer clips not so quickly. But as long as you see the words “analyzing for dominant motion” in the bottom left of your Viewer window (see the red arrow in the screenshot below), you will know Final Cut Pro is still working on it.
When it is finished, you can play the clip and should notice the improvement. But by unchecking and rechecking the “Stabilization” box in the Inspector you can watch it with and without Final Cut Pro’s stabilization effect.
Tweaking the Method Settings
Final Cut Pro’s automatic stabilization is generally pretty good, but a little tweaking of its parameters can often improve the outcome.
Right below “Stabilization” in the Inspector is a setting labeled Method. What settings are below this depend on what Method you have chosen.
Final Cut Pro defaults to “automatic” which just means it chooses between the other two options, InertiaCam and SmoothCam depending on what it thinks will look best.
InertiaCam
The InertiaCam method assumes your camera already has some intentional pan or rotation or zoom going on. For example, you are driving past a wild buffalo with the camera rolling.
When InertiaCam is selected, Final Cut Pro figures out what that “dominant motion” is, then assumes any other movement is an instability you want to remove.
When you select InertiaCam the options below it will look like this:
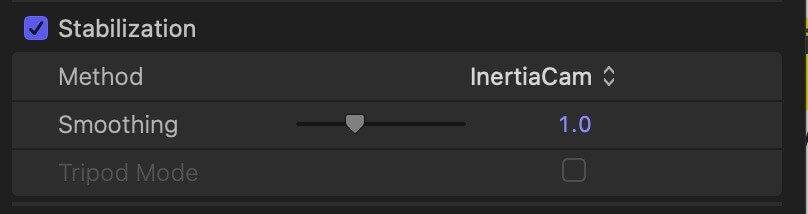
The Smoothing setting is a measure of just how much stabilization you want Final Cut Pro to do.
Generally speaking, the more the better, but only until you notice the picture starts to look a little distorted. Remember, there is a lot of fancy math behind this effect, but it is still just math. You have to decide when enough math is enough.
If Tripod Mode is an option, it will not be grayed out like it is in the screenshot above. The reason it is grayed out in my example is that my camera is (intentionally) moving as I am driving by the buffalo scratching its neck on the poor Toyota.
But if I was trying to hold the camera absolutely still, just capturing whatever action was happening in front of it even if that included a pan or a zoom, Final Cut Pro would figure that out and give me the Tripod Mode option.
With Tripod Mode selected, the shot will not move. At all. Final Cut Pro will do whatever math is required to make sure of that. Sometimes the effect is incredible, and the result is just perfect. Other times it ends up feeling a bit forced.
Luckily, you can just toggle Tripod Mode on and off and see which outcome you like better.
SmoothCam
SmoothCam is intended for moving/tracking shots where the camera itself is moving – like in my drive-by buffalo shooting. (A bad choice of words, I know, but you know what I mean…).
When you select Smoothcam, the following options appear in the Inspector:
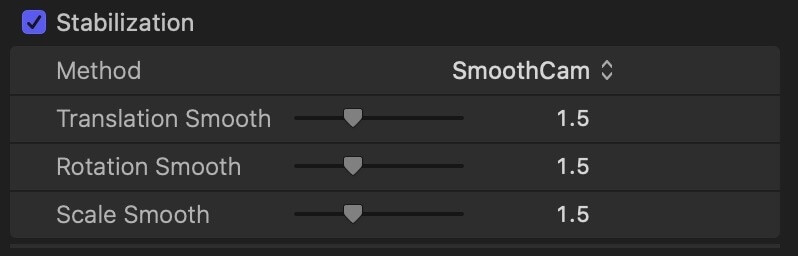
The three settings — Translation, Rotation, and Scale – can best be thought of as a series of axes in 3D space. If that’s a difficult concept to get your head around, think about it this way:
If it is moving left, right, up or down that looks off, try changing the Translation Smooth setting.
If your movement is a rotation around the center of your image and that doesn’t look right, try changing the Rotation Smooth setting.
And if the way your shot zooms in or out from the action isn’t looking stable, try changing the Scale Smooth setting.
You will need to play with these. My guess is that most shots are a combination of the three different axes so… good luck.
But remember, if none of the above tweaks are working, try splitting your clip into different segments and see if one set of settings works better on one part of your clip.
The Problem of Blank Space
When you are watching your stabilized footage, keep a look out for blank space in the corners of your clip. When the original clip has “too much” motion, stabilizing the clip can create these spaces.
If it helps to understand why, consider a shot where your camera is rotating back and forth from 3 O’clock to 9 O’clock. Now imagine you are trying to stabilize the shot, presumably at noon. As each 3 O’clock and 9 O’clock gets straightened to look like it was shot at noon, it is probably going to create some blank space in the corners.
To get rid of the blank spaces, you can reduce the smoothing parameters, but this probably will end up just reducing the effect you wanted – to stabilize the shot.
Usually, you have to crop the edges of the shot – which is essentially zooming in until the blank spaces are off screen. But if the shot was really bouncy, this could require a lot of zooming, potentially ruining the composition of your shot.
While the best solution is probably to call down to the cinematography department and tell them they have to do another take, that probably isn’t a possibility for most of us.
The next best solution is likely to be a balance of the two techniques above, keeping in mind that after Final Cut Pro has done its math, tweaking from there is an art not a science.
Final Stabilizing Thoughts
I encourage you to try “stabilizing” every shot in your next movie, just to see what kind of shots Final Cut Pro can fix instantly, and what kind of shots take a bit more tweaking.
Ultimately, I am confident that you will quickly realize the value of even moderate or occasional stabilization, and your movies are going to start looking great!
And, please, do let me know if this article helped you or if you have suggestions to improve it. All comments – particularly constructive criticism – are helpful! Thank you.