
One of the basic skills of video editing is learning how to split one of your video clips into two separate clips. Once split, you can trim each independently, stick another clip in between the split clips, change the speed of one, or even add a visual effect.
But all these creative choices first require you to know how to split the clip. And, unsurprisingly, this is very easy to do in Final Cut Pro.
I have been making home movies and professional films (and edited the occasional hockey blog) for nearly a decade. Over that time, I’ve learned how helpful it is to master the basics of editing so that I can quickly try different arrangements and find what works.
Today, I’d like to show you how easy it can be to split a clip in Final Cut Pro by showing you three different ways to do it: Using the Blade tool, splitting “on the fly” and splitting a clip by inserting another clip in the middle of it.
Each has its strengths, and all will help you be a better and faster editor!
Table of Contents
Key Takeaways
- Clips can be split in Final Cut Pro by using the Blade tool, found in the Tools menu.
- If you want to split both the video and any audio associated with the clip, hold down the Shift key when splitting your clip.
- You can split a clip anytime while watching your movie playback by hitting Command + B wherever you want a cut.
Method 1: Splitting a Clip Using the Blade Tool
In the old days, before computers and video editing programs, splitting a video clip required somebody to make a physical cut with a blade, or scissors, in a long strip of film. Because of this legacy, the primary tool to split clips in video editing programs like Final Cut Pro is known as the Blade Tool.
Step 1: Select the Blade tool from the Tools menu, which is a drop-down menu just above your timeline as shown in the screenshot below. From this menu, select Blade. The vertical red line in your timeline that you use to select clips will now show a scissors icon instead of the usual arrow icon.
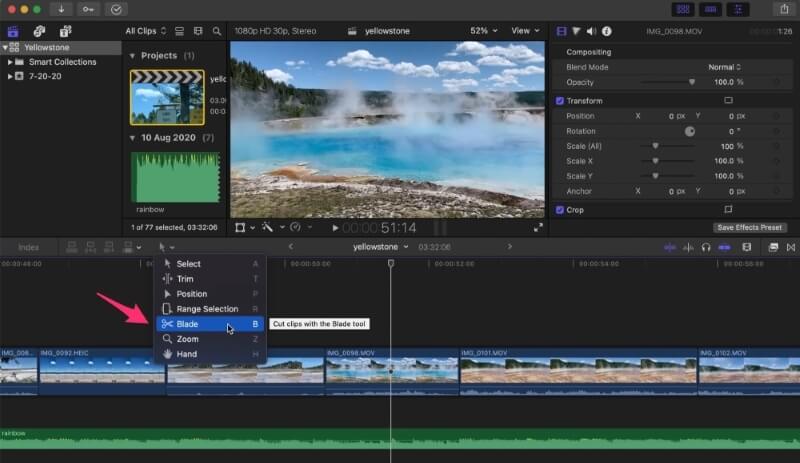
Note that in the current (10.6.3) version of Final Cut Pro the image next to the Blade tool in the Tools menu is a pair of scissors, as can be seen in the image above. But for those of you using a version older than 10.5.3, you may not see the scissors, but a razor blade instead. I honestly don’t know why they changed it. Obviously, a razor blade was appropriate for a blade tool, but perhaps it was a little aggressive?
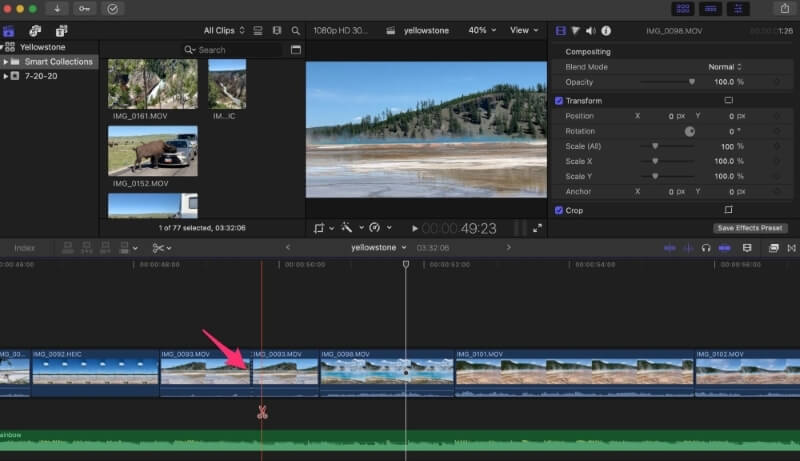
Step 2: Once you have selected the Blade tool, move the scissors to the point inside a clip that you want to split, and click. Clicking inside the clip is important – clicking above or below the video clip will not result in a cut. Once you’ve clicked, a vertical dashed line will appear where you cut, or split, the clip. In the screenshot below you can see this line marked by the red arrow.
Note that the name of the clip to the right and left of your split have exactly the same name. Which makes sense as they are the same clip, just split. But each clip can now be edited independently.
You can now trim or expand one or the other clips, or insert a new clip between them – perhaps some B-roll – or put a transition in the place you have split the clips to signify that time has passed, or some other creative idea.
The keyboard shortcut: Rather than selecting the Tools menu and clicking on the Blade option, you can just tap B to select the Blade tool.
Pro Tip: If you know you just want to make one quick cut, you can hold down the B key while you make your cut. When you release it, your pointer will go back to whatever tool you had previously. This is an incredibly quick way to make a cut but can also take a little getting used to.
Step 3: After your cut is made, it is a good idea to change back to the Select tool in the Tools menu otherwise wherever you click next will be cut! You can go back to the Tools menu and select the Select tool at the top of the drop-down menu, but the quickest way is to use the keyboard shortcut: just tap A on your keyboard and you’re done.
If you ever forget these keyboard shortcuts, have a look at the tools menu we showed you in the first screenshot — to the right of each tool in the menu is a single letter. These are the keyboard shortcuts for each tool.
One more tip: The technique above just splits the video clip where you clicked. But I can imagine you might also want to split an audio track in the same place, at the same time. Easy. Just hold the Shift key before you click to cut your video and any video, audio, titles or other effects where you clicked will also be split.
Method 2: Splitting Clips on the Fly
Using the Blade tool, particularly with the keyboard shortcuts is a quick and easy way to split clips.
But there is an even faster way. If you are watching your video play, at any time you want to cut, you can hold the Command key and press B. At the exact moment you press Command + B, while your video is playing, a cut will appear in your timeline.
This can be very handy in some situations. For example, if you have a music soundtrack and want to cut to a new clip on the beat, you can play your video, get your foot tapping to the beat, and press Command + B on each beat where you want a cut.
And note that holding the Shift key down in addition to the Command key will have the same effect as when using the Blade tool: All clips, including audio, or titles, will be cut at the point you pressed Shift + Commend + B.
Method 3: Splitting Clips by Inserting Another Clip
You are probably used to dragging and dropping clips around in your timeline so you know that when you drag a clip onto another one, Final Cut Pro assumes you want to insert the clip immediately before or after it. That Final Cut Pro makes that assumption is usually very convenient.
But what if you knew you wanted your clip to be inserted within another clip? Not before or after, but somewhere in the middle?
You can do this by using the Position tool in the Tools menu, or by tapping its keyboard shortcut P. Now when you drag a clip onto another and drop it, it will split the clip underneath it and stick your clip in between the split clips.
In the screenshot below, I have already pressed P to select the position tool. This is confirmed because the icon in the Tools menu is the short and fat arrow signifying the Position tool instead of the skinny arrow used for the Select tool.
With the Position tool selected when I drag a video clip from one area (the grey space a few clips to the right) onto another Final Cut Pro inserts the dragged right where my playhead (the vertical yellow line) is. If I let go of the clip at this stage, it will fall right into place between the split parts of the original clip.

While this approach can save you the separate steps of splitting a clip and then dragging in the clips you want to insert, it also does a couple of things that you may not like.
First, it leaves a blank space where you dragged the clip from (the gray area two clips to the right in the screenshot above). This can be deleted easily enough by clicking on the gray space and hitting Delete.
But this approach also overwrites the existing clip with your new clip. When you use the Position tool, Final Cut Pro doesn’t push the two sides of the split clip out of the way. So, you may need to “trim” the edges of your clips a bit to get the cuts exactly where you want them.
While this technique may sound a little advanced, I encourage you to play with it because when you fully understand its advantages and disadvantages you can go right to it when you know you need it.
Final Thoughts
As a long-time movie maker, I can tell you that your idea about what your movie should look like will evolve as you assemble, trim, split, and juggle around your clips. The better you know how to use Final Cut Pro, and the quicker you learn the keyboard shortcuts for tasks like splitting clips, the more you can focus on your story and the more fun you will have making movies.
I encourage you to play around with all three of the techniques I’ve shown you, practice them, and keep learning!