
Speeding up (or slowing down) a section of your movie can be effective, stylish, or just fun, and is easy to do in iMovie for the Mac.
With over a decade of making movies for personal and commercial purposes, I know that changing the speed of a clip can give your scene a jolt of energy, add a little humor, or help solve a technical problem – perhaps a slight speed increase is just what you need to shorten your video so that it better matches your music!
So below I will cover the three easy steps to modifying a clip’s speed, sprinkling some tips along the way, and then talk a bit about how to handle any audio issues that arise from changing the speed of your video clips.
Table of Contents
Step 1: Select the Clip or Range You Want to Modify
In your timeline, click the clip you want to change the speed of. Note that a yellow border will appear around the clip when it is selected.
If you want to change just part of a clip and — for whatever reason – don’t want to split the clip to make that part its own clip, you can always select a range within a clip, then change the speed of that selection.
You can select any range by moving your pointer to the spot in your clip where you want the range to start and pressing I (for the “in” point of your range). Then click wherever you want the selection to end and press O (for the “out” point of your range).
Pro Tip: The fastest way to select a range is to press the R key and hold it down. Then click where you want your range to start, drag your pointer to your desired end point, and let go of the R key. It may take a few tries to get used to this technique, but it is quick.
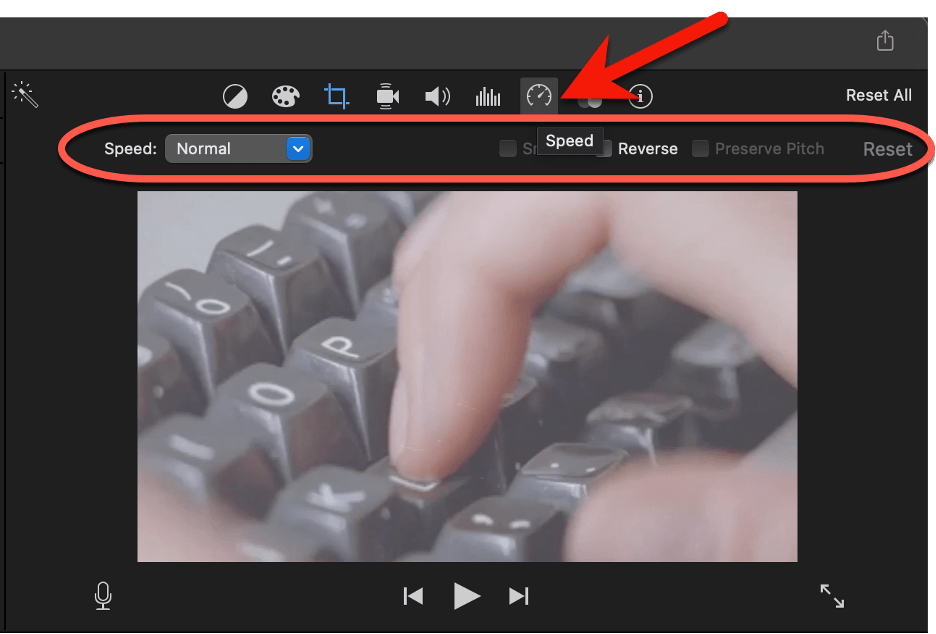
Once you have a clip or range selected in your timeline, clicking the Speed Icon (see the red arrow in the screenshot below) at the top of the Viewer will reveal a row of speed settings (highlighted by the red oval in the screenshot below.)
Step 3: Adjusting the Speed
You can increase the speed of your selected clip or range by pressing any of the 2x to 20x buttons (see the red arrow in the screenshot below) in the speed settings.
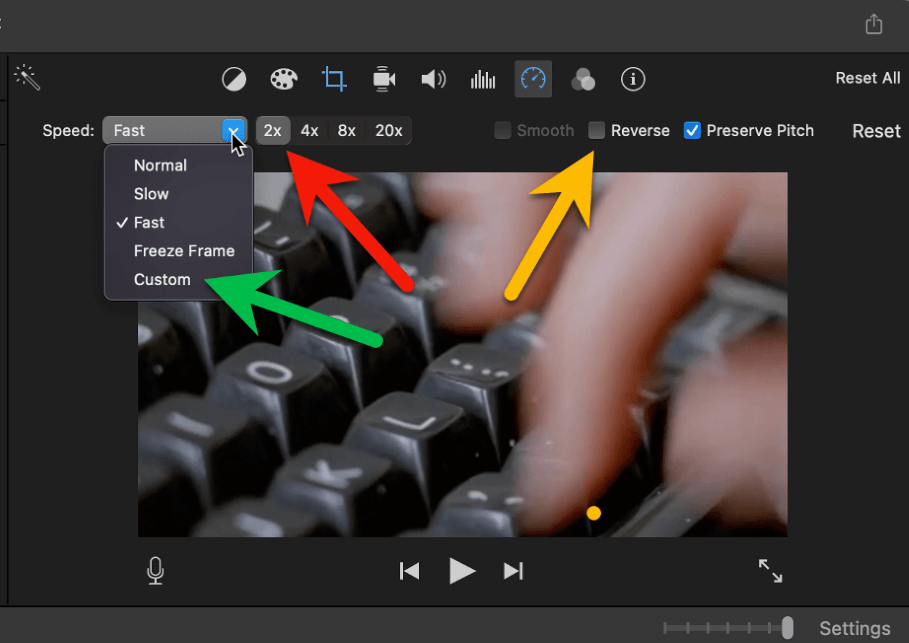
The Speed menu on the left side of the settings allows quick access to speed up (“Fast”) or slowdown (“Slow”) your clip as well as return it to normal (“Normal”), freeze a frame, or create a “Custom” speed – as highlighted by the green arrow in the screenshot above.
You can also reverse the direction of a clip (have it play backwards) by checking the Reverse option highlighted by the yellow arrow in the screenshot above.
Pro Tip: You can also access the speed settings through the Modify menu, but the Modify menu offers an additional feature the speed settings does not: Instant Replay.
If you select a clip or range, and choose “Instant Replay” from the Modify menu, the selected range will repeat at whatever speed you select, with an onscreen label that reads “Instant Replay”. Note that this feature is way more fun than it should be.
Adjusting the Speed in the Timeline
When you are done adjusting the Speed settings, you will notice a new icon will be added to the center of your selected clip in your timeline. If you sped the clip up, you get a rabbit in your clip (see the red arrow in the screenshot below), and if you slowed the clip down, you get a turtle.
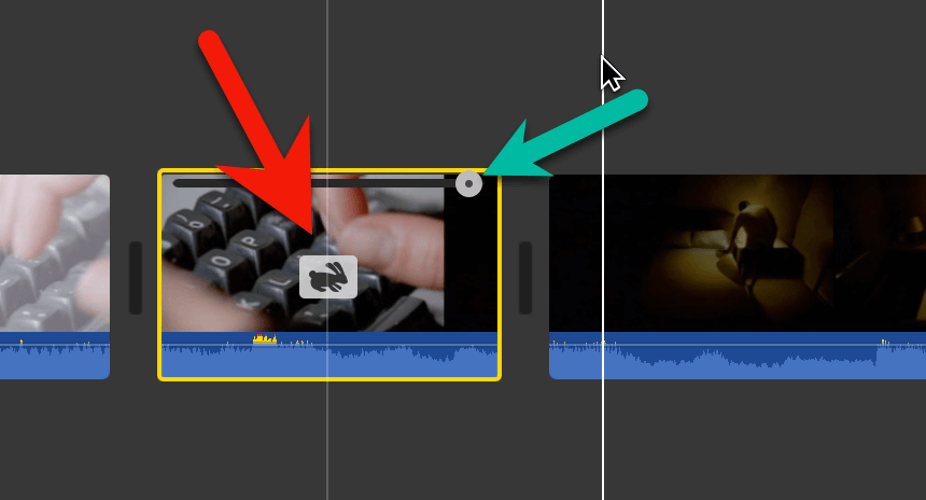
But something else has also appeared in your clip – the speed slider. This is the gray circle highlighted by the green arrow in the screenshot above.
If you click on the speed slider and drag it right or left, the speed of the clip will rise as you move left, and slow as you move right. (The clip will also shorten (as you move left) and lengthen (as you move right) because a faster clip takes less time to play and a slower clip takes more time.
Note that if you drag the speed slider on a sped-up clip far enough to the right your rabbit will turn into a turtle. This means you have slowed the clip below its normal speed and the clip will now play in slow motion – how slow depending on how far you dragged the speed slider.
The Problem with Audio and Some Solutions
When you increase or decrease the speed of a video clip that also has audio, the audio will accelerate or slow at the same rate as the video. Sometimes this is perfect – for example, the sound of footsteps in a clip of a person walking will still match the steps in the video.
But usually sped up or slowed down audio just sounds weird and/or just doesn’t work.
The easiest solution is to drop the volume of the clip to zero. But a more useful solution can be detaching the audio before you change the speed of the clip.
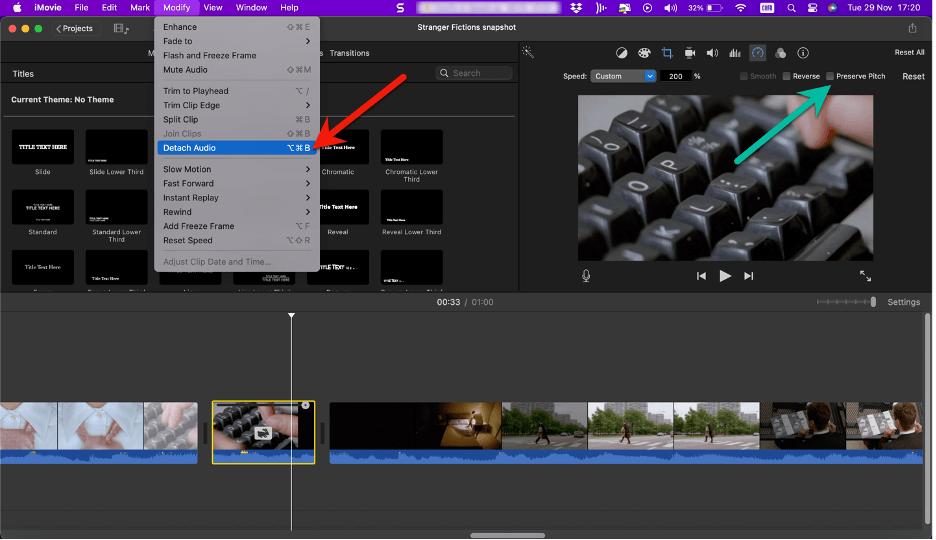
Simply select the clip in your timeline, then choose Detach Audio from the Modify menu, as shown in the screenshot below.
Now the video portion and the audio portion of your clip will be separate clips, stacked on top of each other. Because they are detached from each other, you can speed up or slow down the video and the audio will stay just the way it was.
This can be particularly useful when the audio includes narration, or when the audio includes music, as both can sound pretty bad when sped up or slowed down.
And remember, detached audio clips can be moved independently of video clips so if you want the audio to accompany the video, but need to adjust its position to better fit the sped up or slowed down video, you can move it around in the timeline just by clicking on it and dragging it to where you want it.
Finally, if you need or want to keep the audio attached – for example in a car chase scene where you want all the sound and for it to match the video perfectly, it can help to select the preserve pitch option, highlighted by the green arrow in the screenshot above.
Preserving the pitch of the audio can keep the sound from getting squeaky as it is sped up. This can be particularly helpful for clips with dialogue. Your actors will still talk fast, but they won’t sound like they just inhaled helium.
Quick Final Thoughts
Adjusting the speed of a clip in iMovie is quite simple. But the implications are huge.
Imagine combining a speed change with a transition – say an outgoing scene speeds up, dissolves, and then the incoming scene drops from a fast to a normal speed. Or you could speed up a clip, duplicate it, and then reverse the duplicated clip, creating a boomerang effect.
The possibilities are endless. So have fun! And, please, do drop a comment below if you have any questions or suggestions for making this article more helpful. Thank you.