
Final Cut Pro has long had an autosave feature that – like the Mac operating system itself – can somehow restore you to the very word you were about to type without you having to lift a finger. As such, there just isn’t any need to worry about saving your work in Final Cut Pro.
But it can be helpful to understand how and where Final Cut Pro saves your project, as well as how to change the default settings should you need to do so.
Table of Contents
Key Takeaways
- Final Cut Pro keeps all your movie’s data in a Library file.
- Backups of your Timeline are automatically created as you work.
- You can archive your entire movie project simply by making a copy of the Library.
Understanding the Final Cut Pro Library
Final Cut Pro stores your movie project in a Library file. By default, everything that goes into your movie – the video clips, the music, the effects – everything is stored in the Library.
Libraries also contain your Events, which are the folders of clips that you draw from when assembling your Timeline, and Projects, which is what Final Cut Pro calls any individual Timeline.
Why Final Cut Pro comes up with a somewhat redundant term for a Timeline may be confusing, but if you can imagine you might have multiple Timelines in your movie, say different chapters of the movie, or even different versions of a particular scene, it makes a little more sense to think of each Timeline as a Project.
In sum, everything is in the Library.
Backups
While Final Cut Pro keeps everything in your Library file, it also creates regular Backups of your Timeline. But just your Timeline – that is, just the set of instructions about where clips should begin and end, what effects should be present, and so on.
The actual video clips and other media used to generate your movie are NOT stored in these Backup files. Those are stored in the Library itself.
So, your Library file contains everything, including the very latest adjustments on your timeline, and the Final Cut Pro Backups contain only the list of the adjustments, nothing more.
An advantage of this approach to Backups is that your backup files, which are being saved at regular intervals, are quite small.
Note that Final Cut Pro does not automatically back up your Library. One could argue that it is unnecessary because it is just a collection of raw files, and all your work – the adjustments you make in your timeline – are saved in the Backups.
But just typing that feels wrong. It is a prudent idea to occasionally make a copy of your Library file and put it somewhere safe. Just in case.
Note: To restore a backup file, select your Library in the Sidebar, then select the File menu. Choose “Open Library” and then “From Backup”. A pop-up window will provide you with a list of dates and times that you can choose from. When you have selected one, it will be added as a new Library in the Sidebar.
Changing the Storage Settings of Your Library
You can change the default settings for your Library by clicking on the Library in the Sidebar (shown by the red arrow in the screenshot below).
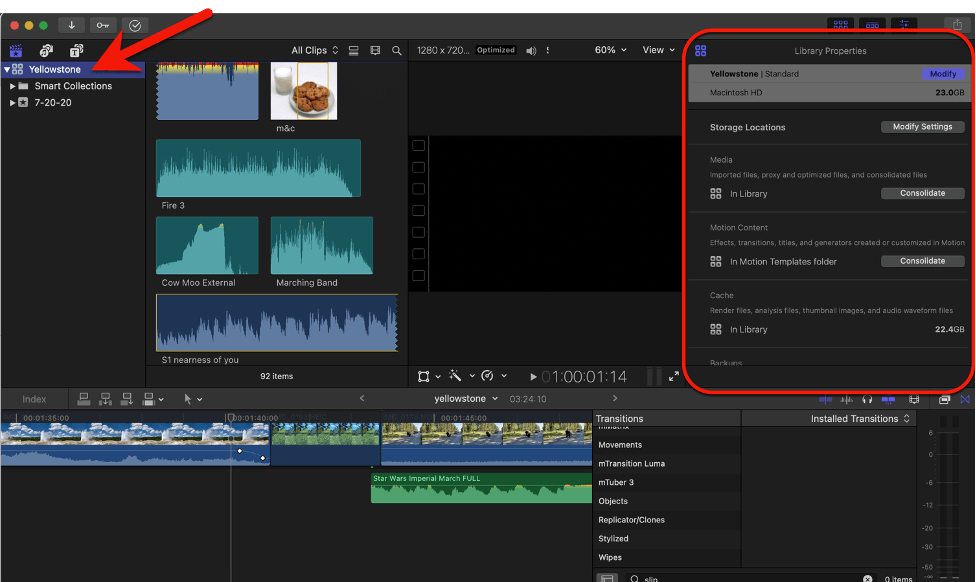
With your Library highlighted, the Inspector will now show the settings for the Library (highlighted by the red box on the top right side of the screenshot above).
The first setting you can change is near the top of the options in the Inspector and is labeled “Storage Locations”. When you click on the “Modify Settings” button to the right, the following popup window will open.
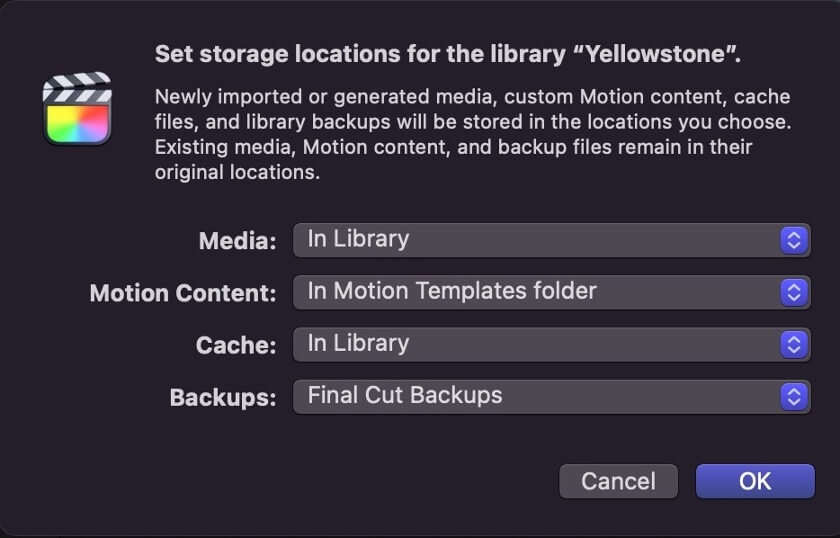
As you can see in the above screenshot, Final Cut Pro defaults to storing all your media (such as your video and audio clips) in the Library.
You can change this by clicking on the blue arrows to the right, which allows you to select a location outside of your Library to store your media.
Note as well that your Cache (the third option in the screenshot above) is, by default, stored in your Library. If you are unfamiliar with this term, your Cache is a series of temporary files that contain “rendered” versions of your Timelines. If that just begs another question, Rendering is the process by which Final Cut Pro turns your Timeline – which is really just a set of instructions about when to stop/start clips, which effects to add, etc. – into a movie that can play in real time. You can think of rendering as creating temporary versions of your movie. Versions which will change the minute you decide to change a title, trim a clip, add a sound effect, and so on.
Finally, the last option in the screenshot allows you to change the location of any Backups Final Cut Pro is making automatically.
While you can change all of the above settings and may need to do so if you have very limited hard drive space and an enormous amount of media, my recommendation is to not touch a thing until you have to.
Final Cut Pro already does a great job of organizing everything for you in your Library file while automatically creating regular backups of your Timeline.
Final Thoughts
So your movie is done, your client is thrilled, and the check has cleared. And, you have a huge Library file sitting on your hard drive, taking up valuable space.
But the client might – God knows if or when – call you and ask for “just a few tweaks”. What do you do with this huge file?
Easy: Make a copy of your Library file, put it on an external hard drive, and delete the version on your computer. Just remember, this easy solution only works if you did not change the Library storage settings!
I hope all of the above makes sense to you and you are reassured that you do not need to take any action to save your movie projects. But do let me know if you have questions, or suggestions to make this article clearer or more helpful. Thank you!