
Losing work because you didn’t save a file is one of the most frustrating feelings on earth.
Maybe you forgot to save the file, and your computer crashed. Maybe you clicked the wrong button as you were closing Excel and instructed it to not save your work.
We all know that sinking feeling—it’s happened to all of us.

These days, most programs have auto-save. That can be great, but it gets us in the habit of not saving our work when using software that doesn’t have this feature. If you’re caught off-guard and lose a file, then a stressful afternoon might result.
Table of Contents
Can I Recover My Data in Excel?
So, if you delete data from Excel by accident, can you get it back?
It’s hard to give a definite answer. If you lost it because of an unexpected shutdown or user error, though, there’s a chance you can get most or all of it back.
Excel does have an autosave feature that runs in the background. It saves temporary copies of your file in a different location at regular intervals. This autosave/auto recover feature is usually enabled by default when the software is installed.
The best way to keep your data safe is by preventing loss in the first place. Near the end of this article, we’ll take a quick look at some things you can do to avoid losing data.
But first, let’s see how to recover changes or edits you may have lost from your spreadsheet.
How to Recover Unsaved Workbooks in Excel
Excel has an option to recover unsaved workbooks. There are a couple of caveats, though: first, AutoRecover must be turned on—which, again, is normally done by default. Second, AutoRecover is set only to save a backup every ten minutes (you can change this setting, however).
It’s a healthy practice to verify if AutoRecover is enabled in your version of Excel. We’ll show you how to do that later in this article. Since it only saves a backup once every ten minutes, you may not get all of your work back. It’s worth a try, though—recovering some data is better than recovering none at all.
Another note on AutoRecover: that ten-minute save interval can be changed. We’ll also show you how to do that in the next section.
Follow these steps to recover changes to your spreadsheet.
Step 1: Open Microsoft Excel.
Step 2: Open a new blank workbook (if it does not open one automatically).
Step 3: Click on the “File” tab to go to the file menu section.

Step 4: Find where your backed-up files are saved by clicking “Options.”
Step 5: Click on “Save” on the left side of the screen. You will see the “AutoRecover File Location.” You should also see the AutoRecover option checked. If it isn’t, then your file was probably not backed up—which unfortunately means you will not be able to restore it.
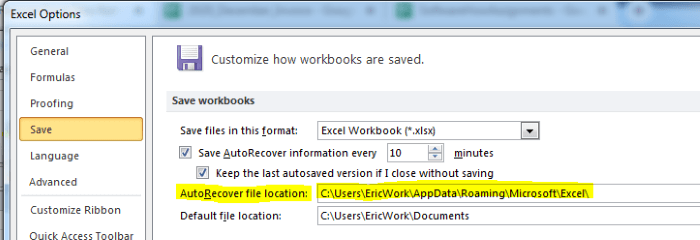
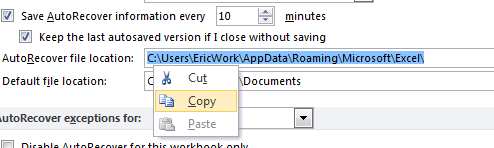
Step 6: Use your mouse to select the file path in the auto recover field. Right-click, then copy it to your buffer. You may need it to find your recovery file.
Step 7: Close the options window by clicking on the “Cancel” button.
Step 8: Go back to the “File” tab.
Step 9: Look for the “Recover Unsaved Workbooks” link. Different versions of Excel will have it in different places, but it will be somewhere on the “File” menu screen. In this particular version, the link is on the bottom-right side (see the image below). Once you find it, click on it.
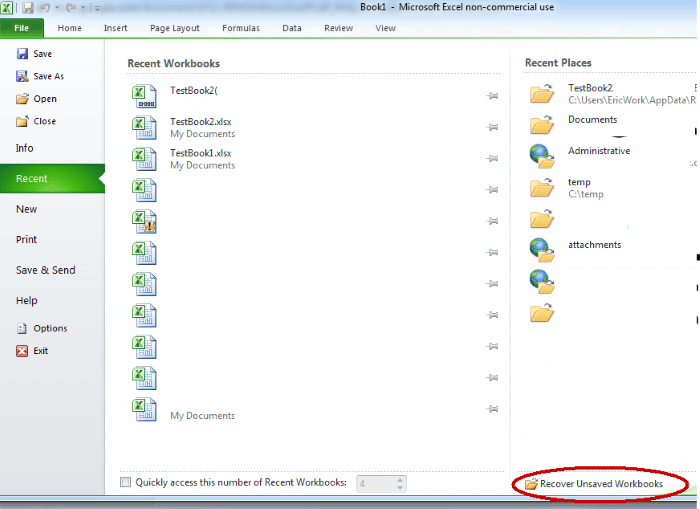
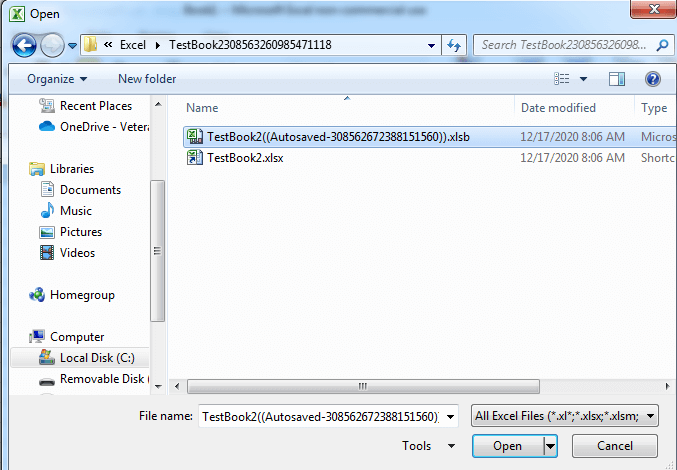
Step 10: This will open a file explorer window. See if your file’s there. If it isn’t, you’ll need to paste the path you copied to your buffer from the options menu into the file location and hit enter.
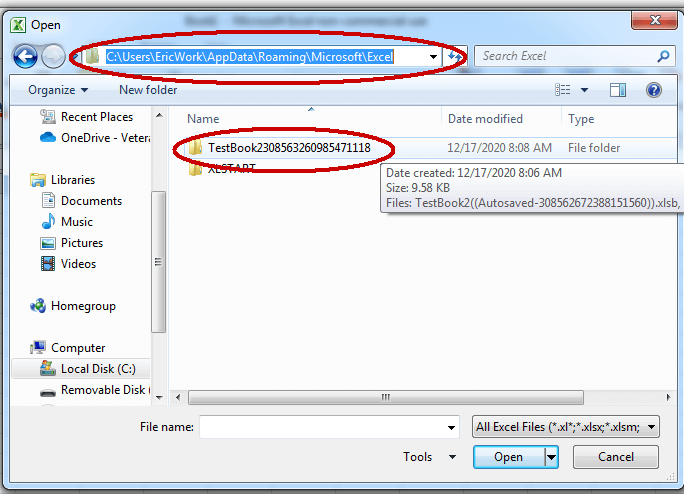
Step 11: You’ll see another folder. Its name should begin with the same name as the file you want to recover. Double-click on that folder to open it up.
Step 12: There, you will see a file that begins with the same name as your missing file. Its extension should be “.xlsb.” Select it, then click on the open button.
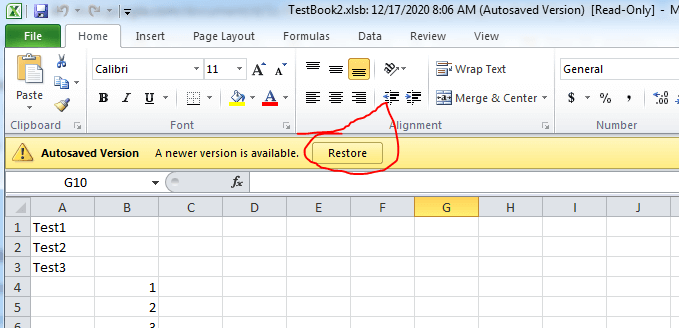
Step 13: This will open up the last auto-saved version of the file. You will see a button at the top that says “restore.” If this looks like it has the data you want to get back, click on the “restore” button.
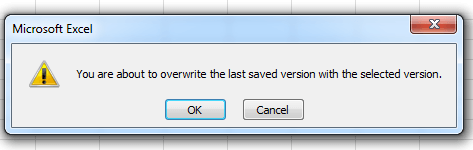
Step 14: You will then see a pop-up window asking if you want to overwrite your current version. Click “Ok” if you wish to continue.
Step 15: Your file should now be restored to the last auto-saved version.
How to Prevent Data Loss in Excel
No one wants to go through the frustrating process of losing data and trying to recover it, so it’s best to try and prevent data loss in the first place.
Getting into the habit of saving your work often is good practice. The more often you save, especially after big changes or additions, the less you have to worry.
Modifying a large spreadsheet may also put you at risk of removing or changing things you don’t intend to. Because of this, it’s not a bad idea to make backup copies of your file before editing it.
You never know when you will want to go back to a previous copy before you made changes. While Excel does have some ability to do this, it’s better to have it under your own control so you know at what point important changes were made.
You should ensure that Excel’s Auto Recover feature is turned on. You may also want to change the default setting of backing up every ten minutes to something like every five minutes.
You can make plenty of changes in ten minutes—you might lose a significant amount of work if your computer crashes before that interval is up.
On the other hand, be careful not to set the backup to run too frequently. If you set it for once a minute, you can see performance problems while running the app. Play around with the setting and see what works best for you.
To verify Auto Recovery is enabled and change the time interval, you can use the following steps.
Step 1: In Excel, click on the “File” tab in the upper-left corner of the screen.
Step 2: Click on “Options” on the menu on the left side of the screen.
Step 3: Click on “Save” in the menu on the left of the Options window.
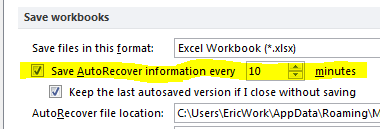
Step 4: Here, you will see the “AutoRecover” settings, just as you did in the above section. Make sure that the check box beside “Save AutoRecover Information every 10 minutes” is checked.
Step 5: If you wish to change the time interval in which it saves the backup information, use the up/down arrow for the text box to change the time.
Step 6: Click “ok” to save your changes.
Another helpful tip is to start saving your files to a virtual or cloud type drive such as One Drive or Google Drive. Storing your work to a cloud drive ensures that if your computer crashes or your hard drive dies, it’s still available from another computer.
In fact, most of the time, you can open those files on your smartphone or tablet as well. This option might allow you to go back to earlier versions of your file and make restoration less painful.
If you do extensive work with different files and are required to save specific versions of them, you may want to use a version control system such as GitHub.
Version control systems are most commonly used by software developers to store and version source code. These systems can also be leveraged to version documentation files such as Excel spreadsheets.
Final Words
If you have lost data in an Excel spreadsheet due to an unexpected computer shutdown, or you have mistakenly closed the application without saving your changes, then you may be in luck.
Because of Excel’s AutoRecover feature, there is a chance you can revive your lost work. We hope the steps above help you to do just that.