
While many of us are still chasing the “paperless office” dream, there are moments when you absolutely need a printed copy of a document.
Your Mac’s Preview app is a great way to view documents and images on-screen, but it can also communicate with your printer to print any of the files it can display. It’s a simple process once you know how it works!
In this tutorial, you will learn how to print from Preview and learn more about the print settings.
Table of Contents
3 Quick Steps to Print from Preview
It only takes three steps to print a document from Preview and here are the quick steps.
- Step 1: Open the file you want to print in the Preview app.
- Step 2: Open the File menu and click Print.
- Step 3: Customize your print settings and click the Print button.
That’s all there is to it! If you want to learn more about the printing process, read on for more info and some helpful troubleshooting tips.
Customizing Print Settings in Preview
While the basic process of printing from the Preview app is very simple, the Print dialog has a number of useful settings that allow you to customize how your prints turn out, but they’re not always visible by default.
This means that you start with a nice streamlined interface for basic prints, but you can also dive a bit deeper for extra options if you need them.
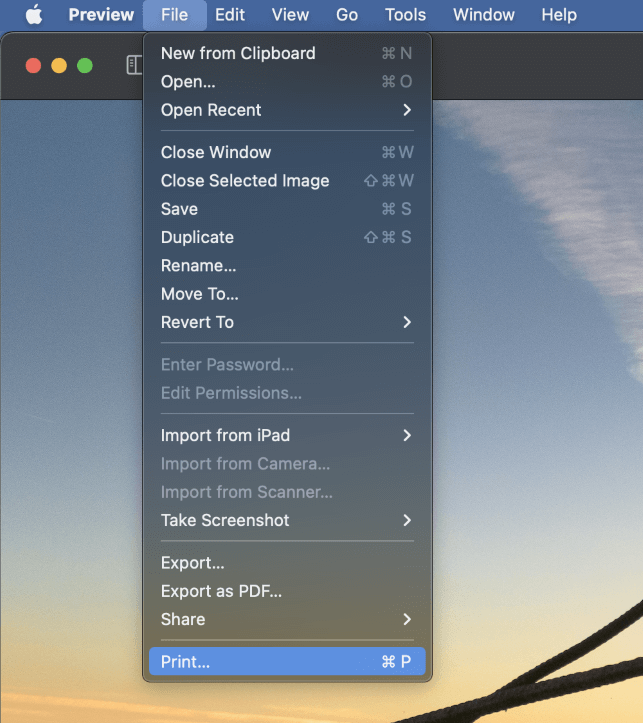
To open the Print dialog window in the Preview app, open the File menu and select Print.
You can also use the helpful keyboard shortcut Command + P.
Even if you don’t use many keyboard shortcuts, Command + P is associated with the Print command in almost every app that can print files, so it’s a good place to start learning.
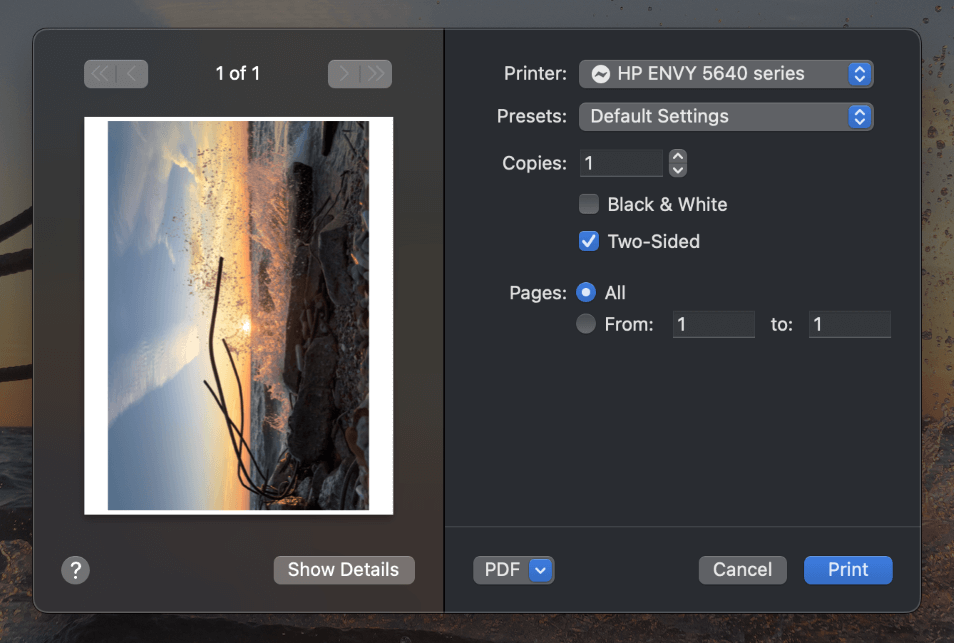
The Print dialog window will open (as shown above), showing you a preview of what your print will look like with the current settings. This preview is just a rough approximation of your print, but it has enough detail to show you placement, scale, orientation, and other essential details.
Before you go any further, click the Show Details button to display all the different printing options that are available in the Preview app.
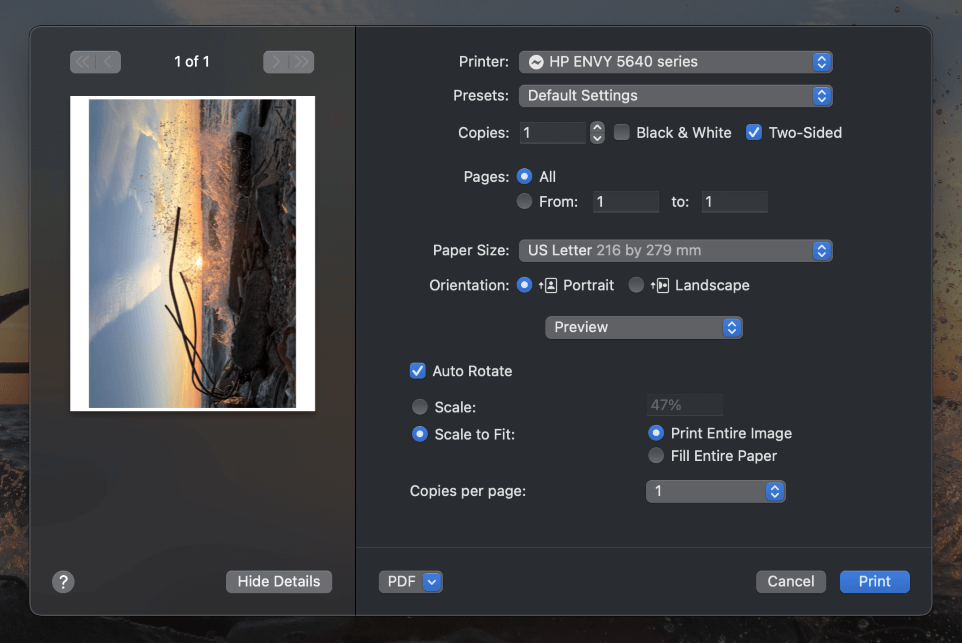
As you can see in the screenshot above, the expanded version of the Print dialog has much more to offer than the default version! Let’s take a quick look at some of the most important options.
The Printer setting allows you to select which printer you want to use. While most home users will probably only have one printer available, if you’re printing at the office or on campus, there might be a few available to choose from.
The Presets menu allows you to create, save, and apply preset combinations of settings. This allows you to create a preset for basic text documents, another for fancy photo printing, and so on.
To create a preset, customize all your other settings, and then open the Presets menu and select Save Current Settings as Preset.
The Copies option sets the number of complete prints you want to make, while the Pages setting allows you to print all pages in your document or just a selected range.
The Black and White checkbox will prevent your printer from using any colored inks, but don’t be tempted to use this option to convert photographs into black-and-white images. It will technically work, but the black-and-white image won’t look nearly as good as one that was converted using a proper image editor.
The Two-Sided checkbox allows you to create documents with double-sided pages. To make this work, Preview prints every other page of the document, and then you’ll have to take the sheets out of the printer output tray, flip the paper around, and reinsert it into your printer so that Preview can print the other half of the document.
(Note: the Two-Sided option will only be visible if your printer supports two-sided printing.)
The Paper Size dropdown menu allows you to specify which paper size you have loaded into your printer, and you can also set custom sizes if you’re working on a unique project.
Finally, the Orientation setting determines whether your document will be in Portrait or Landscape orientation.
Sharp-eyed readers will note that there are still a few more settings, but there is a bit of a usability hiccup in the Print dialog layout at this point.
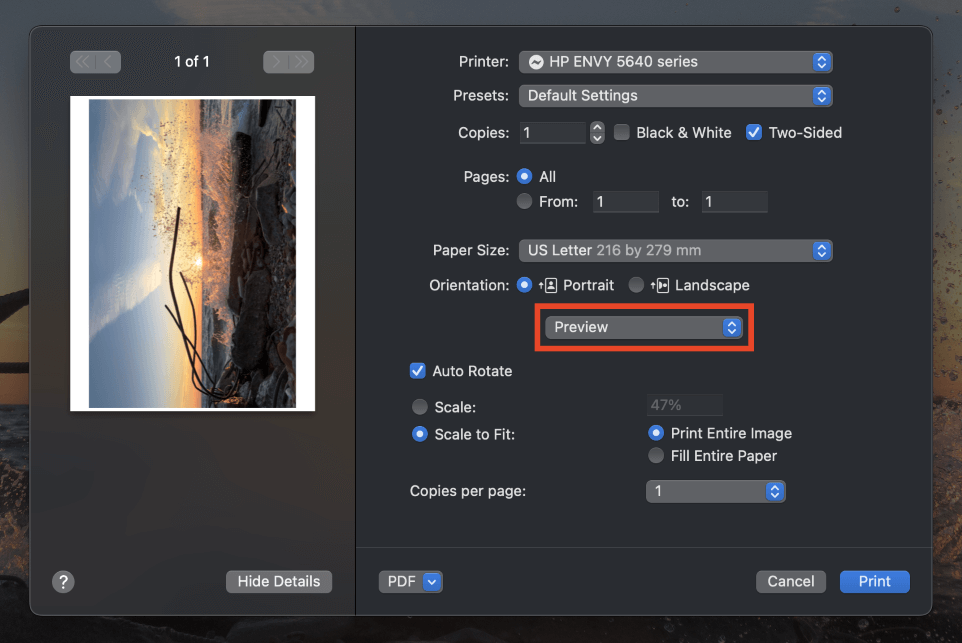
It’s not immediately obvious, but the dropdown menu highlighted above allows you to navigate between five additional pages of settings: Media & Quality, Layout, Paper Handling, Cover Page, and Watermark.
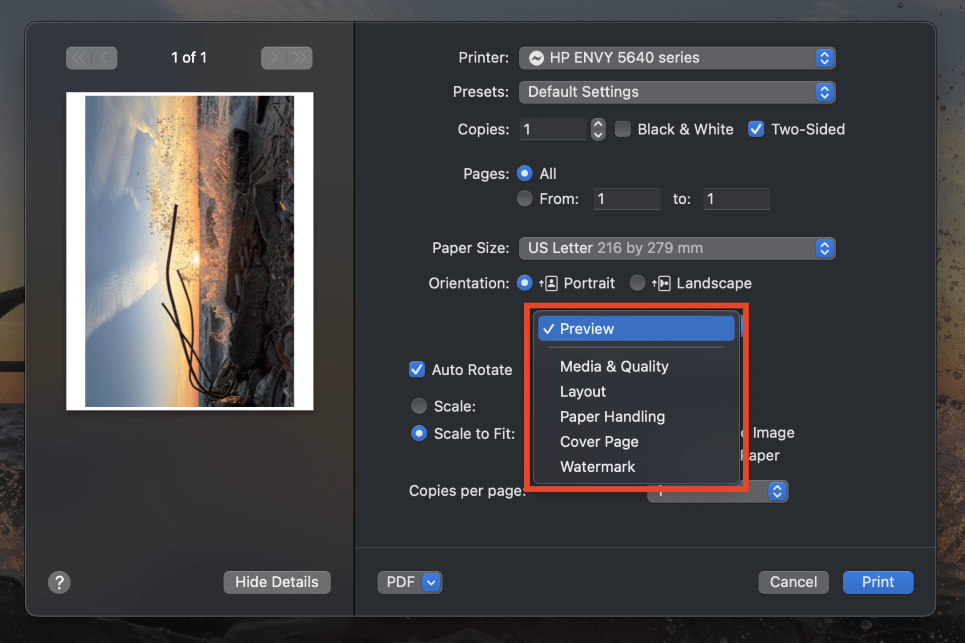
These advanced settings give you the ultimate degree of control over how your print will look, but we don’t have space to explore all of them here, so I’ll just pick out a few of the most important.
The Media & Quality page allows you to configure specially coated papers for printing photos and other high-quality imagery.
The Layout page gives you a few extra options for Two-Sided printing.
Having Trouble Printing?
Even though printers are a mature technology by this point, they still seem to be one of the most significant sources of frustration in the IT world. Here’s a quick checklist you can use to help you troubleshoot any problems that you run into while printing from Preview on Mac:
- Make sure your printer has power, ink, and paper.
- Check that the printer is actually powered on.
- Make sure that the printer is connected to your Mac through a cable or your WiFi network.
- Double-check that you have selected the correct printer in the Preview app’s print settings.
Hopefully, that quick list has helped you to isolate the problem! If not, you might want to try looking for additional help from your printer’s manufacturer. You can also get your teenage kid to try fixing it, although they might wonder why you want to print anything in the first place 😉
Final Word
Printing used to be one of the most common functions of a computer, but now that digital devices have completely saturated our world, it’s becoming a lot less common.
But whether you’re a first-time printer or you just needed a refresher course, you’ve learned everything you need to know to print from Preview on Mac!
Happy printing!