
Instagram has changed a lot over the years, growing from a small platform to a sleek and modern powerhouse. It’s not just for individuals anymore.
Instead, it’s a place where businesses generate traffic, influencers make a living, people consume media and information, and regular users enjoy sharing with their followers.
With all this versatility, it’s kind of crazy that Instagram has yet to release official and fully operational versions for all platforms.

In the meantime, if you want to post from your Mac or PC instead of from your phone (or want special, unofficial features), you’ll need to make use of one of the methods we’ll explain below.
Note: there are a lot of different ways to post photos to Instagram from your computer, so don’t worry if one doesn’t seem to work for you right off the bat.
Table of Contents
Method 1: Install the Instagram App on Your PC (Windows)
- For: Windows
- Pros: The app is identical to the one used on your phone, and you don’t have to do anything special to use it.
- Cons: No special features, and must have a Windows computer.
If you’re using a computer that’s on Windows 10 and supports the Microsoft Store, you can actually install the Instagram app onto your computer. It acts just like the one on your phone or tablet but runs smoothly on your computer instead.
Here’s how to do it:
Step 1: Open the Microsoft Store app (the icon looks like a small shopping bag with the windows logo). It may be on your dock, but you can also find it in the Applications list.
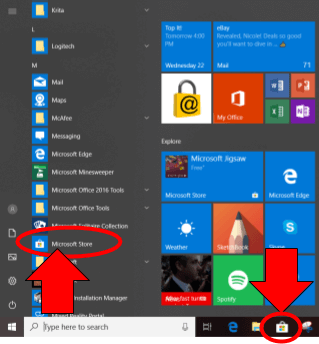
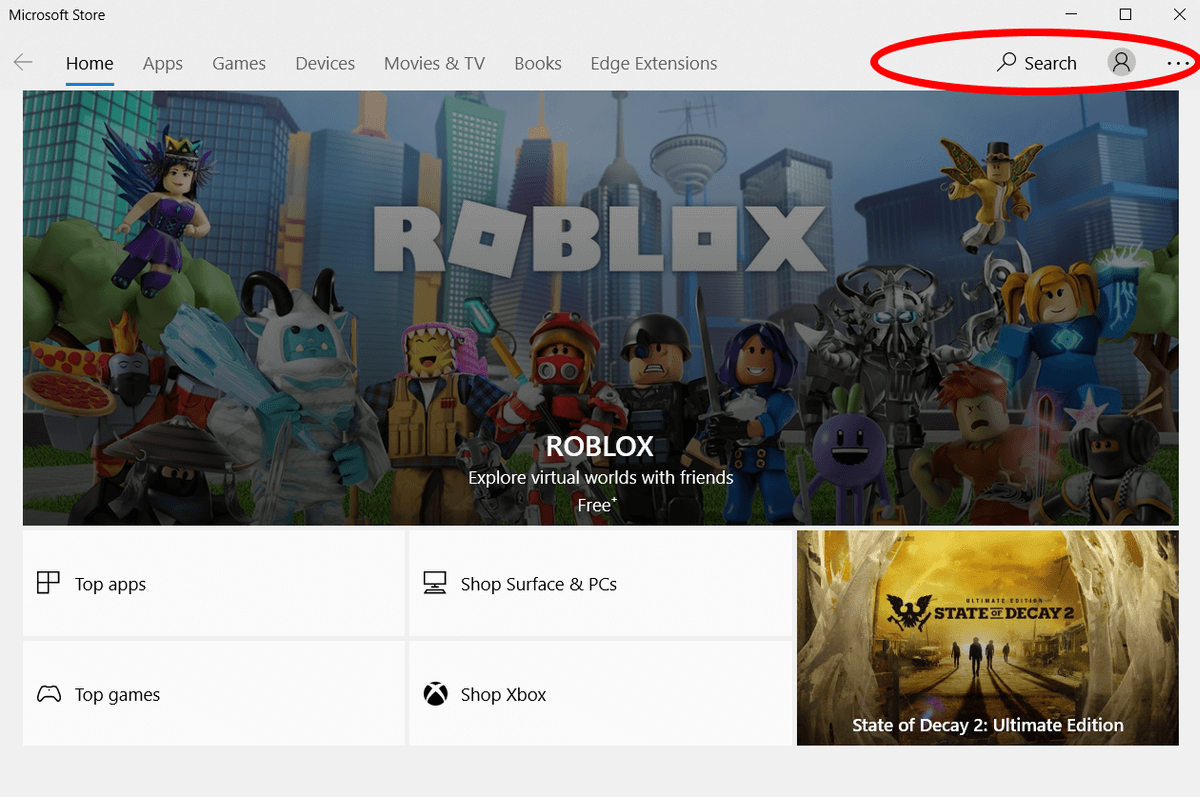
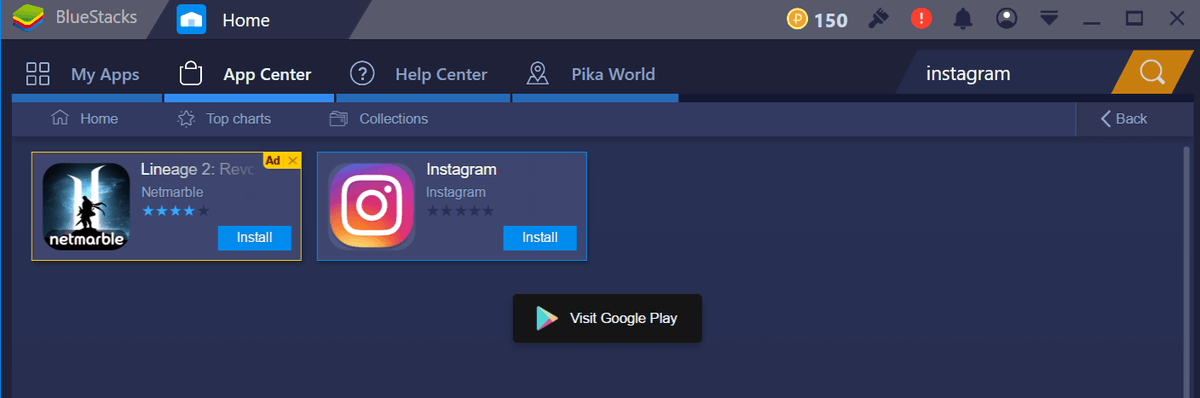
Step 2: Search for “Instagram” on the store home page using the search bar in the top right.
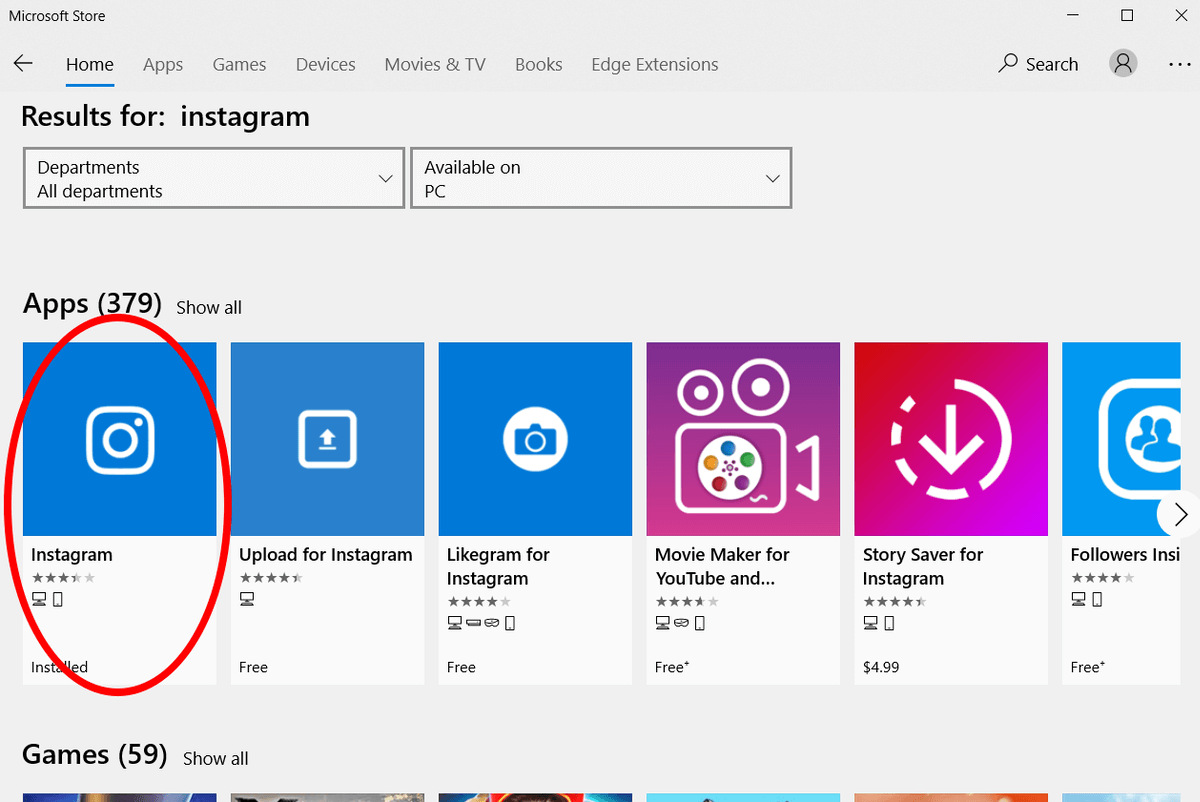
Step 3: Choose the result that is only titled “Instagram”. It doesn’t have the latest rainbow logo, but this is the legitimate app. The other apps are third-party, and will not serve the same purpose.
Step 4: Install Instagram, then launch the app and log in just like you would on your phone.
Step 5: Use the navigation bar along the bottom, and press the “+” button.

Step 6: Choose any photo from your computer, and upload it to your account. You can add filters, tags, locations, etc if you like.
This method is one of the best because it uses the official Instagram app to upload your photos. It doesn’t require any third-party software, and the process is exactly the same as on your phone. However, this method will only work for some users.
This is because while there are iOS, Android, and Windows versions of the app, a macOS version has not been released yet. While frustrating for Apple Mac users, there are plenty of ways around this.
Method 2: Use an Emulator
- For: Mac, Windows
- Pros: Allows you to run Instagram as if you are using a mobile device so you don’t have to learn any new programs or techniques. Can also be used to run apps other than Instagram.
- Cons: Can be difficult to get up and running. They’re not very efficient and are annoying if you’re only using them for one app. Uses the Android interface, which may be difficult for some Apple users.
If you’re a Mac user and dead set on using the official app to upload your photos, you can use an emulator (You can also use an emulator if you’re a Windows user, but it’s much easier to simply install the app as described above).
An emulator is an application that recreates the operating system of another device in a single window on your laptop. Android emulators are particularly useful here since they allow you to act as though you are using an Android phone instead of a Mac computer.
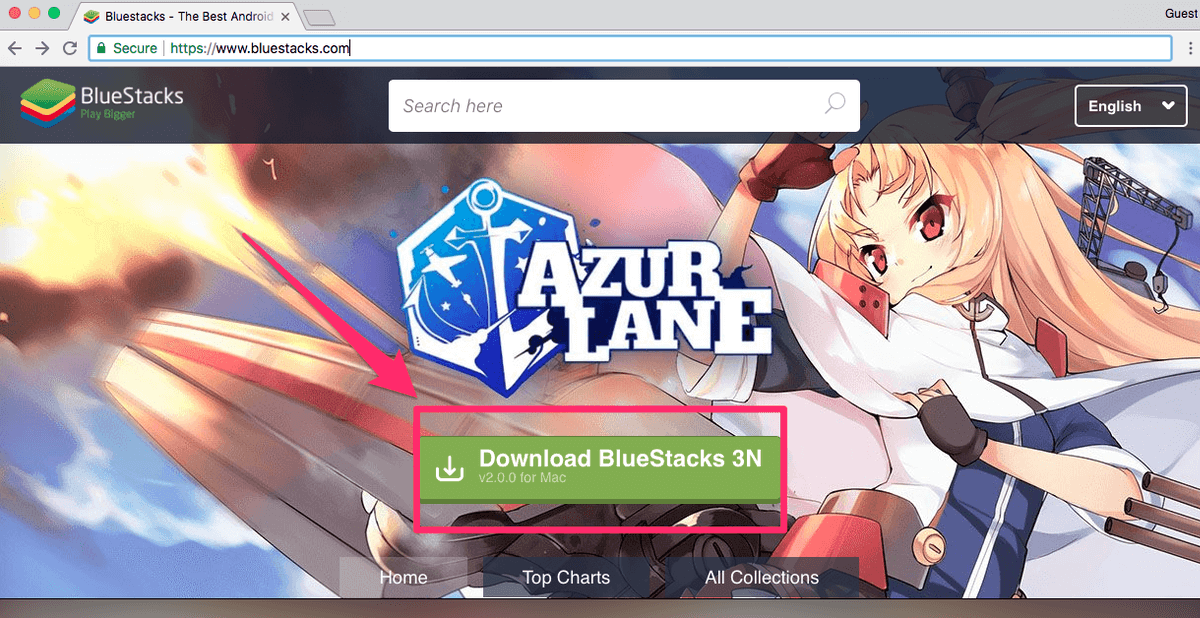
One of the most popular and stable emulators is Bluestacks. Here’s how to use it:
Step 1: Install Bluestacks on your Mac from the official website.
Step 2: Create a Bluestacks account, as well as a Google account (if you don’t already have one).
Step 3: Open Bluestacks and log into the Play Store (Android App Store) with your Google Account.
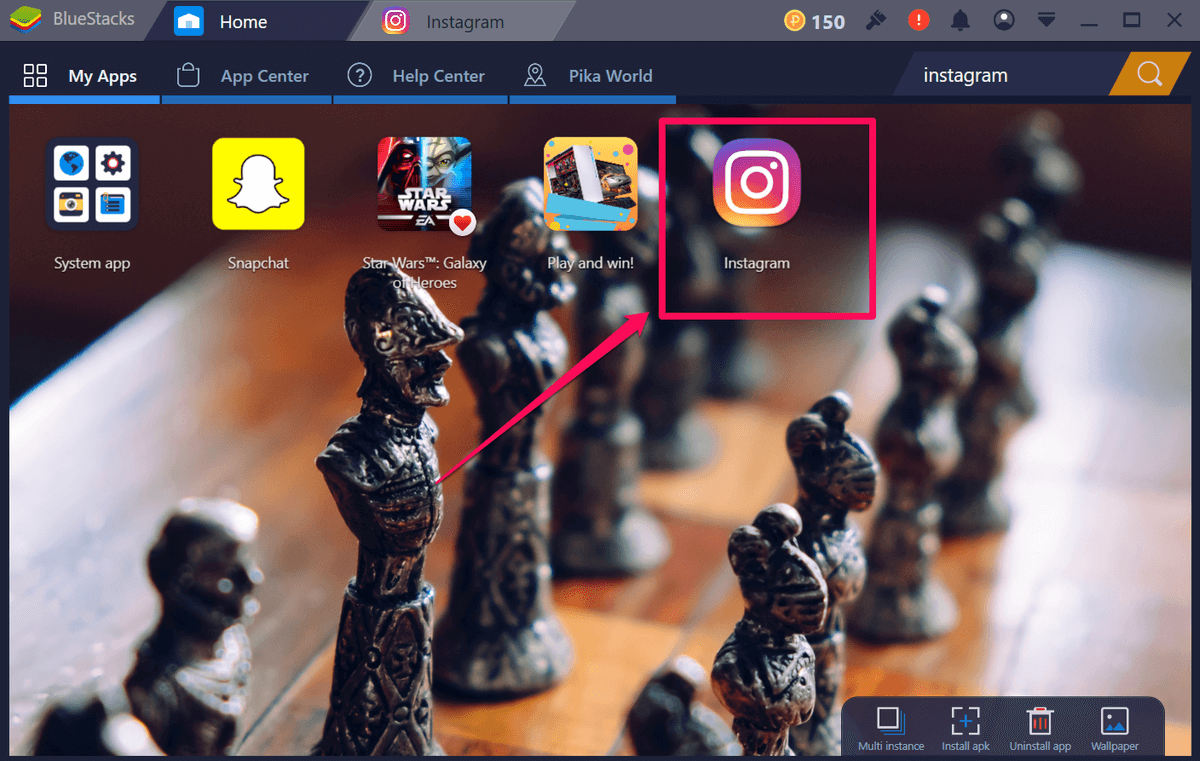
Step 4: Install Instagram from the Play Store onto Bluestacks.
Step 5: Launch Instagram inside Bluestacks.
Step 6: Log in, then upload a photo using the “+” button like you would on your phone.
Method 3: Spoof Your User Agent (Web-based)
- For: Web Browser
- Pros: Accessible on almost every browser (if you have the latest version). Completely safe, quick, and easy to do.
- Cons: The website version of Instagram may limit some features, such as filtering photos in the app or tagging people/locations.
Recently, Instagram upgraded the web version of their popular site… but only for mobile browser users. This means if you’re using your phone to browse the web, you can upload photos, but not if you’re using your computer.
However, there’s nothing actually stopping you from accessing the mobile page from your desktop. Just like when you click “Request Desktop Site” when browsing on your phone, you can do the inverse when browsing on your computer. This isn’t a feature that’s meant for normal users, so you’ll need to follow a few steps, but the method is very simple.
What you’ll be doing is called “spoofing” your web agent. It’s meant for developers who want to see what their site will look like on multiple devices, but we’ll repurpose it to access the Instagram upload feature. Normally, a website will “ask” your browser agent what type of page to load if multiple versions are available. With spoofing, your browser will reply with “mobile” instead of “desktop”.
Here’s how to spoof your web agent:
Chrome
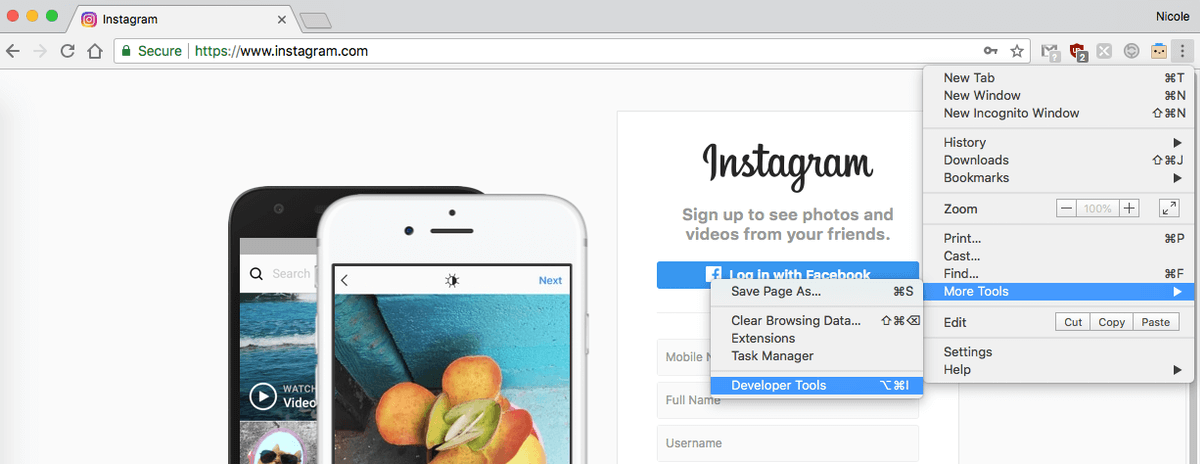
First, enable developer tools. Go to the three-dot icon on the top right, then choose MORE TOOLS > DEVELOPER TOOLS.
This will cause the inspector to open inside your page — don’t worry if it looks strange! A lot of code will show up on the top. On the header, choose the icon that looks like two rectangles (a phone and a tablet).
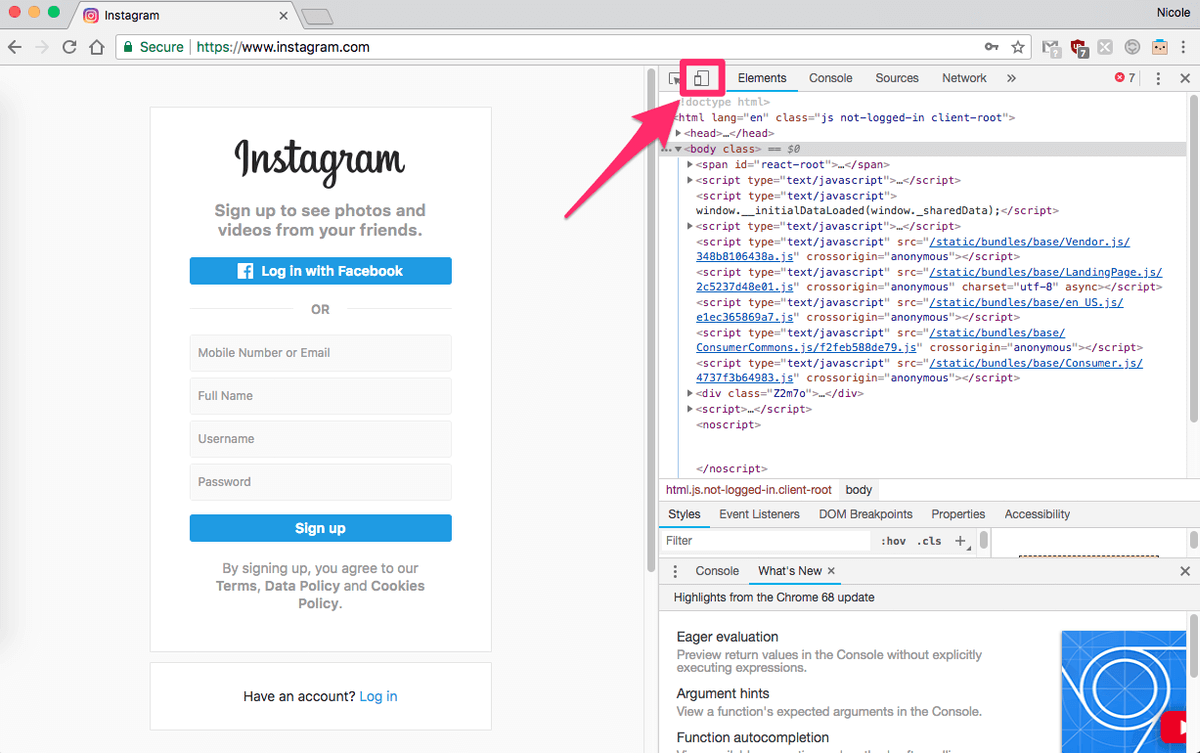
Your screen should now be resized. In the top bar, you can choose your preferred device or dimensions. Next, log in.
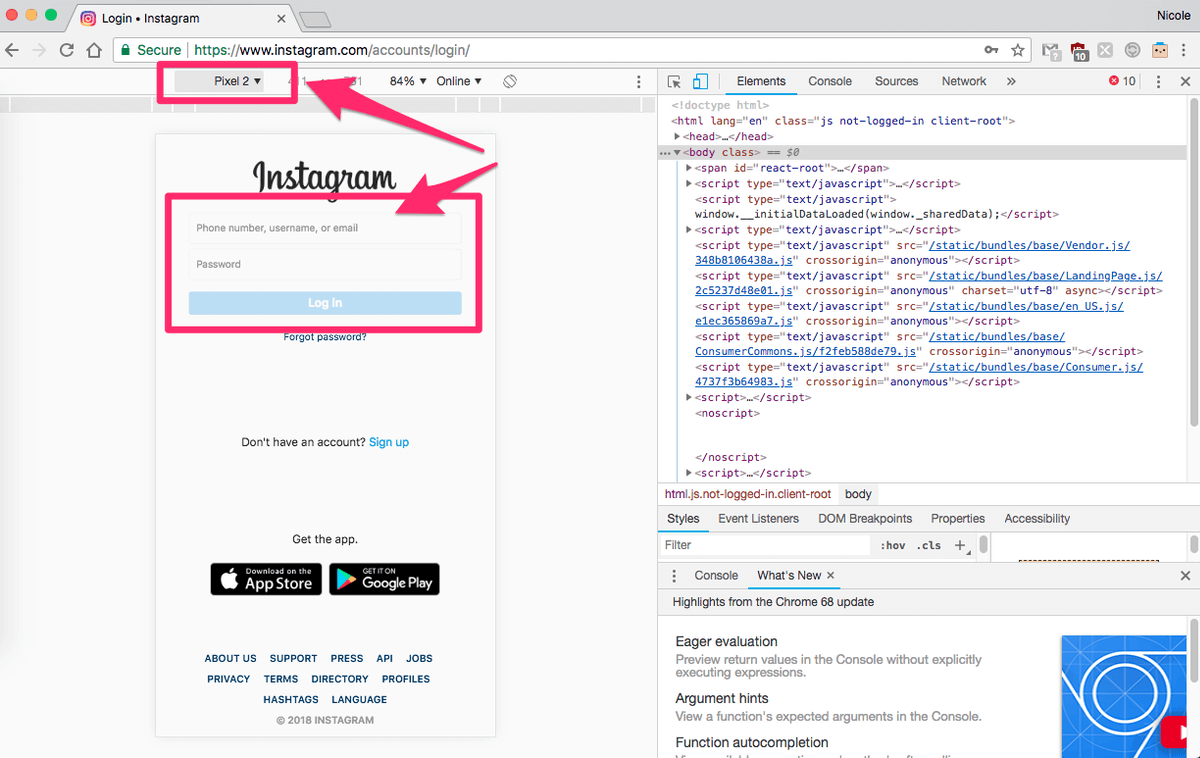
As long as you keep the developer console open, you can look at any pages you like as if on mobile. Upload any pictures to Instagram using the “+” or camera button in the bottom middle just like normal.
Safari
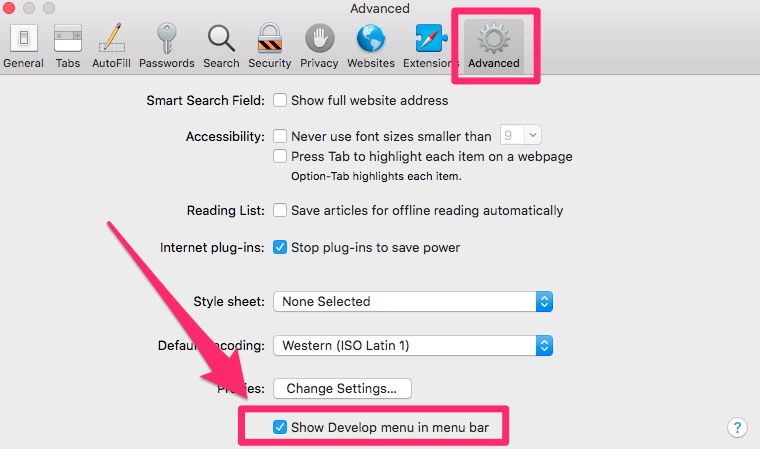
In the menu bar, go to SAFARI > PREFERENCES > ADVANCED and click the checkbox at the bottom that says “Show Develop Menu”.
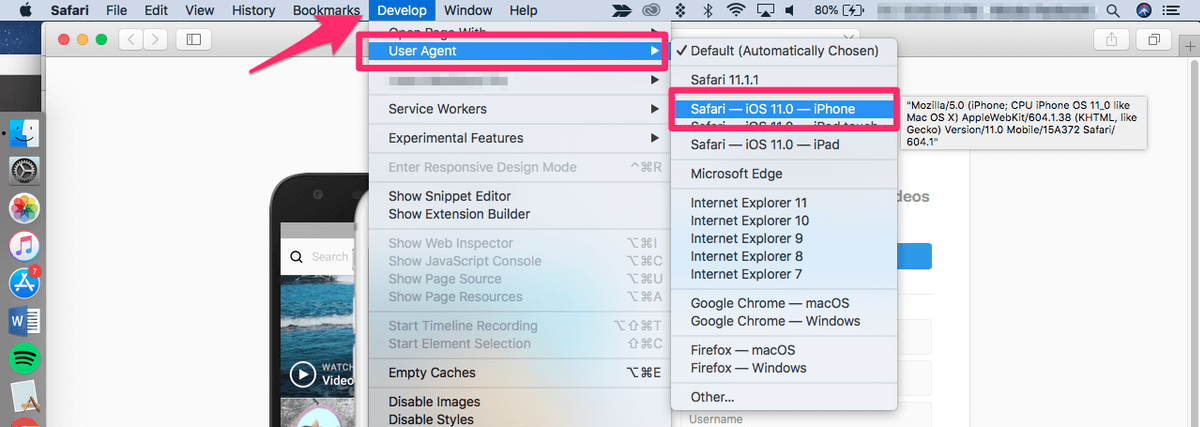
In the menu bar, go to DEVELOP > USER AGENT > iPHONE.
The page will refresh. You must log in. Then, at the top of the page, there will be a camera icon. Click it.
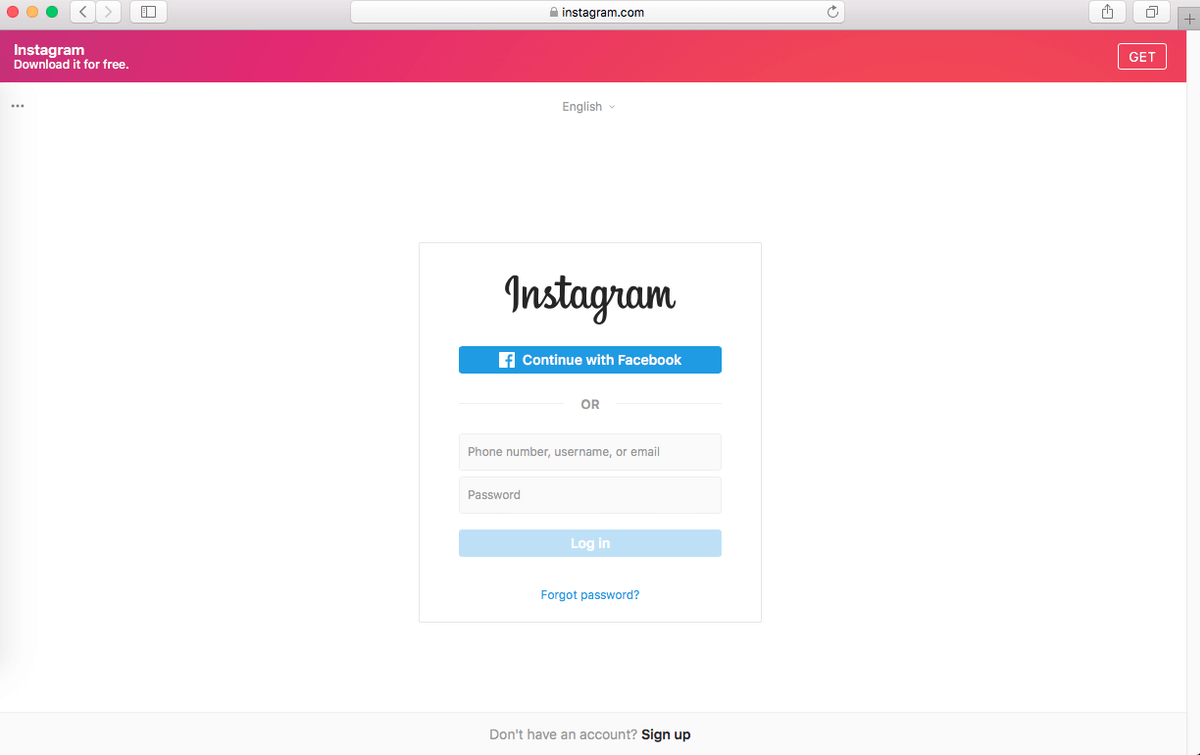
Upload your photo to Instagram!
Firefox
Note: This feature is not natively available on older versions of Firefox. Make sure you are running the latest version of Firefox, or use a different browser in order to successfully spoof your web agent.
In the menu bar, go to TOOLS > WEB DEVELOPER > RESPONSIVE DESIGN MODE.
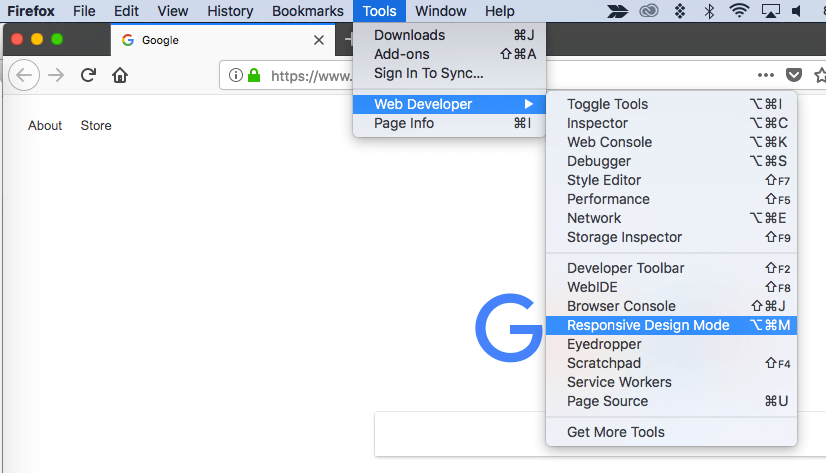
If necessary, refresh the page. It should update to look like a small smartphone screen. You can choose a different size by clicking the bar along the top and selecting a bigger screen.
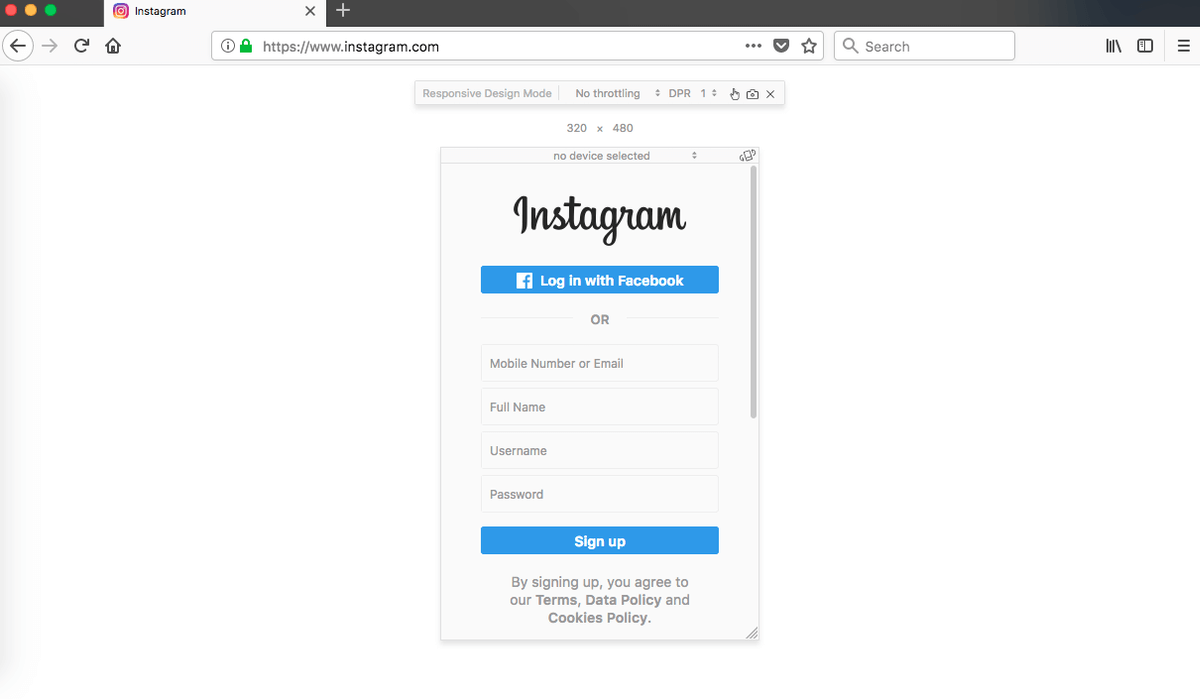
Use the “+” button to upload a photo to Instagram once you log in, just like on your phone.
Method 4: Use a Third Party App
- For: Varies, primarily Mac
- Pros: Extra features such as scheduling posts or integrations with photo editing software may be available.
- Cons: You’ll need to trust your login credentials to a third party, and Instagram reserves the ability to take action against accounts that use outside software to upload posts (although they don’t usually act unless you’re a spammer).
All of the previous methods will work just fine if you want to upload the occasional photo, but you may run into issues if you want to schedule posts, add filters, or use other special features.
In this case, you can use a third-party app to upload your photos instead. This may be less than ideal for some people because it will require you to give your login credentials to a program outside of Instagram (compromising your account security) and you may need to install a program onto your computer.
However, these tools often have benefits the standard Instagram app doesn’t offer, such as the ability to schedule posts to auto-upload, or mass post editing/uploading. This may outweigh the risks.
So which third-party program should you use?
Flume (Mac only)
Flume is one of the cleanest apps available. You can install it as a macOS app, which you can install directly from their site.
You’ll get desktop notifications, access to your direct messages, the search function, insights (business Instagram accounts only), translations, the explore tab, and almost everything Instagram has to offer.
If you want to upload posts though, you’ll need to pay $10 for Flume Pro. Flume Pro allows you to upload images, videos, and multi-image posts for a one-time fee. If you have multiple accounts, it allows you to use Flume with all of them.
Lightroom to Instagram
Do you like to process your photos in Adobe Lightroom before sharing them? It’s understandable since the program contains many professional features and is a staple in the creative community. However, it can be frustrating to either lose quality when exporting or to export the right type of file every time you want to share on Instagram.
Since Lightroom (like most Adobe products) supports plugins, you can use the Lightroom to Instagram plugin to immediately transfer photos from Lightroom to Instagram. It works seamlessly on Mac and PC and saves you a lot of hassle. The plugin is free to use, but the developers ask you to pay $10 to register if you like it.
Here’s a video that will get you started on integrating the plugin with Lightroom and uploading your first photo.
Uplet (Mac only)
Quick update: Uplet is no longer available.
Uplet is another paid uploading service that you can use to manage your Instagram posting. The service requires a one-time fee of $19.95 (Personal License) or $49.95 (Business License or Team License). You can use the app on any Mac running macOS 10.9 or higher. However, if you’ve been using a different program to upload your photos, Uplet will offer you a 50% off coupon to switch to their platform instead. If you’re not sure about buying it, you can always try the app first.
Using Uplet to upload your images lets you make use of your Mac keyboard, full resolution photo files, and access editing tools such as cropping, filtering, and tagging. However, it is not a full-fledged Instagram application. You won’t be able to browse using the explore tab, reply to DMs, or search for new accounts to follow.
You can get Uplet on their website. Once you have it installed, the software will launch with a simple upload screen. Drag any photos you would like into the box, then edit them as you would normally before posting them. It supports photos, videos, and multiple-image posts.
Deskgram
Quick update: Deskgram is no longer available.
Deskgram is one of the few apps listed here that is actually completely free. You’ll need to use the Google Chrome browser. Other than that, it works on all systems and offers a fair mix of features.
To run Deskgram, you’ll need to get their Chrome extension, and then install an API file. The process is a bit difficult to follow, but luckily they’ve made several videos that show you the process step by step.
Unfortunately, the site does contain some ads, but since it’s free (and ad blockers are abundantly available) the tradeoff is minimal.
Conclusion
Instagram took the mobile world by storm, but luckily it doesn’t have to stay on your phone. Whether you use the platform for professional purposes or for personal enjoyment, being able to access your account from your computer can be extremely helpful.
Hopefully, we’ll see an official Instagram app for Mac to match the one for PC – or maybe one that includes special features. Until then you can use any of the methods we’ve outlined here.
I heard the platform Vivaldi was a good one to use for Macs’ but I’m having trouble navigating it. Do you have any suggestions about that? Thanks, Anita
There is no + button on the mobile version of the site