
Combine the drawings that you want to create stickers with onto one layer. Create a new canvas that matches the measurements of your sticker paper. Add the layer to this canvas & save it as a PNG with a transparent background and print from your device.
I’m Carolyn and I’ve been running my own digital illustration business for over three years using the Procreate app. When I first started using Procreate, I was really into creating my own stickers. This was a fun and easy way to make an income while expanding my business.
It may seem like a daunting task, but making stickers on Procreate is actually very easy if you have the right materials. Having the means to invest in a printer and good sticker paper is the key to making your sticker business a success. Today I’m going to show you how.
Note: Screenshots are taken from Procreate on iPadOS 15.5.
Table of Contents
Things Needed:
- iPad
- Procreate app
- Apple Pencil or stylus
- Printer
- Printable Sticker Paper
- Scissors
How to Make Stickers on Procreate in 8 Steps
As I said before, the hardest part about this method is gathering the right (and sometimes expensive) materials together. Make sure you have a selection of drawings ready that you want to make into stickers. And when you have these covered, follow this method:
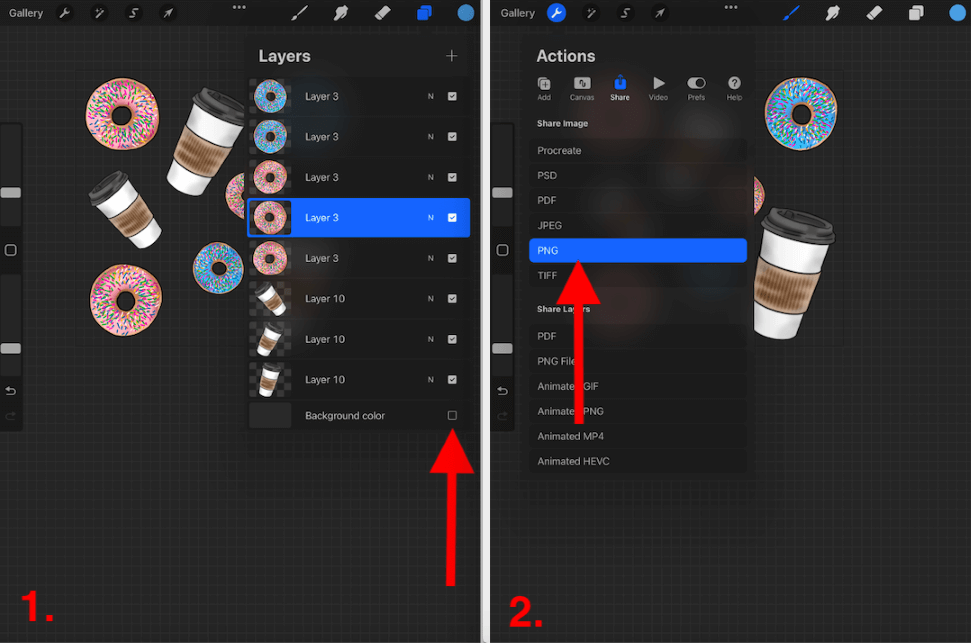
Step 1: Gather all of the drawings you want to use onto one canvas. Make sure you remove the background layer to ensure the file will be saved with a transparent background.
Step 2: Tap on the Actions tool (wrench icon) in the top left corner of your canvas. Select Share and save your project as a PNG file to your device.
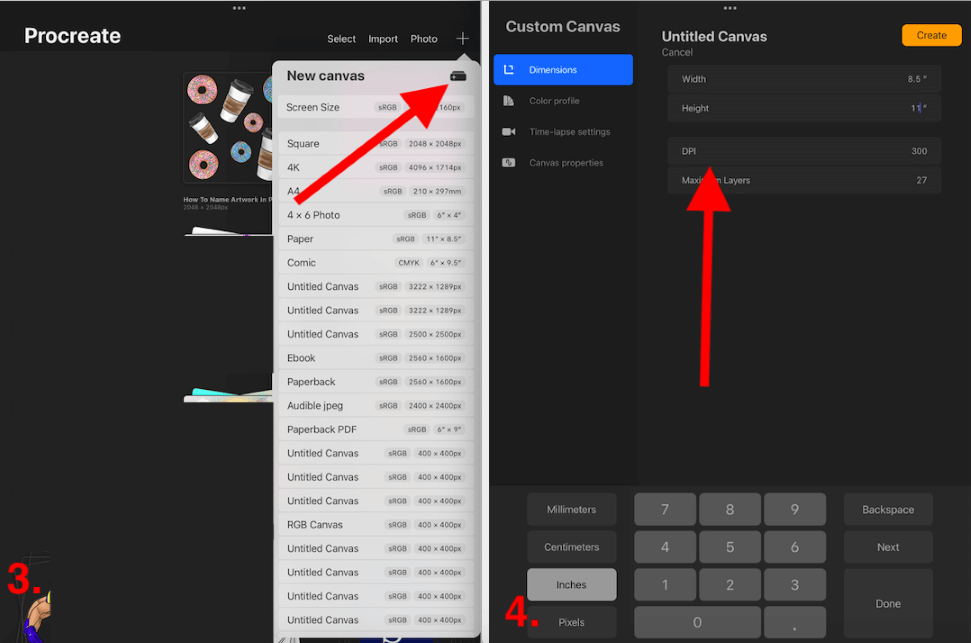
Step 3: Create a New Canvas by tapping the + icon in the top right corner of your Procreate Gallery. The icon you are looking for will be a black rectangle shape with a white + symbol on it.
Step 4: At the bottom of your canvas window, change the settings to Inches. Then adjust your dimensions to 8.5” Width x 11” Height with a DPI of 300. When you have done this, tap on the yellow Create button in the top right-hand corner of the screen.
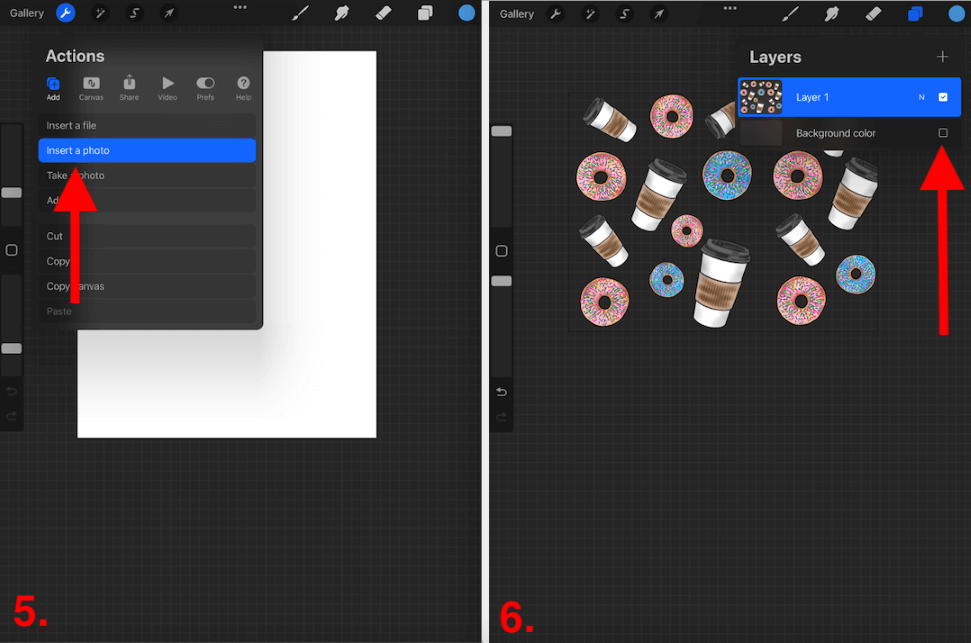
Step 5: Tap on the Actions tool (wrench icon) in the top left corner of your canvas and select Add. Choose Insert a Photo and choose your previously saved PNG file from your device.
Step 6: Arrange the file on your canvas in a way that gives you the best use of space but also has adequate space in between each drawing as you will need to cut out around the shapes when you have printed them. Ensure you untick the Background Color layer.
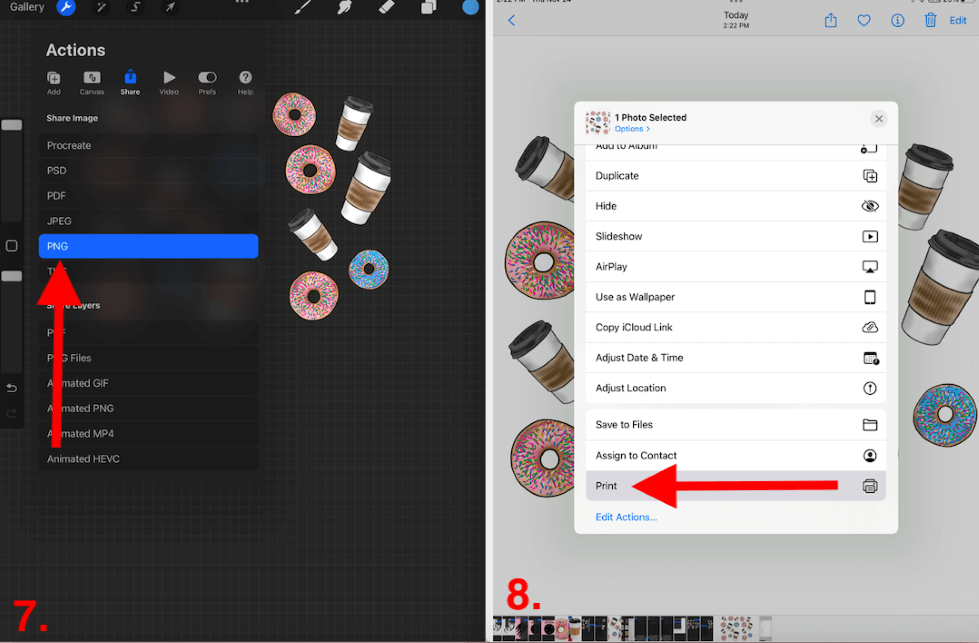
Step 7: Tap on the Actions tool (wrench icon) in the top left corner of your canvas. Select Share and save your new project as a PNG file to your device.
Step 8: Open your files/photo app on your device and select the newly saved sticker project. Tap the Share option, scroll down and tap on Print. Now you can select which printer to save your project and then cut out your stickers once they are ready.
Things To Note:
If you’re new to making stickers on Procreate, I have listed a few things to be aware of that you may not have thought about yet and may save you some time down the road.
- You can create your canvas in any size that corresponds with the size of the sticker paper you have. I used 8.5×11 as this is a popular sticker sheet size however feel free to use whatever size you want and is compatible with your printer.
- Ensure your ink is adequately full. There is nothing worse than dedicating all of this time to print onto your sticker sheet only to realize that you are running low on ink, your colors are destroyed and you’ve wasted a whole sheet of sticker paper.
- The cutting of your stickers is almost as crucial as the printing process. Make sure you have sharp, good-quality scissors so your final stickers will look professional and clean cut.
- Making stickers is time-consuming. I recommend starting with a small project or batch of stickers and seeing how long the full process ends up taking you before committing to large orders or projects.
- Always print a tester sheet on regular paper first. This will give you a chance to amend any errors before wasting a whole sheet of expensive sticker paper.
- If your intention is to create a business out of sticker making, it may be worth your time to invest in a Cricut maker which will reduce time spent hand-cutting stickers.
FAQs
Below I have briefly answered a small selection of some frequently asked questions regarding the sticker creation topic.
How to make stickers on Procreate Pocket?
You can follow the exact same method as shown above. Just ensure your printer is compatible with your iPhone device.
How to make stickers on iPad?
You can use the steps above to create stickers on your iPad. You must however have access to the Procreate app on your device as well as the necessary resources to print and cut your stickers.
How to make transparent stickers on Procreate?
You can follow the same methods above except when you are drawing the image you plan on using, ensure you save it with a transparent background every step of the way. And of course, ensure you are printing onto clear/white sticker paper.
Where to get Procreate sticker ideas?
For me, the simpler the better. Stickers tend to be small so cannot require a lot of detail. It also depends on the purpose of what you’re using it for. I always like to ensure my stickers are bright, colorful, and fun.
Conclusion
Learning how to create stickers on Procreate was probably one of my favorite processes to learn. I found this really fun to explore and experiment with and to have a tangible piece of work at the end of it, makes it even more enjoyable and rewarding.
Whether or not you’re a sticker person, this is an awesome feature to learn about because you really never know when you might use it. Even if it’s not something you may ever use for work purposes, you can create stickers for weddings, promotions, and gifts.
Do you create stickers using Procreate? Share your favorite stickers in the comment section below.