We’ve all been there—you’re using your MacBook with no problems until, one day, you can’t connect to WiFi. This can be incredibly frustrating, especially if you have important work to do. So how can you fix your MacBook not connecting to WiFi?
In today’s article, we’ll explore a few reasons why your MacBook won’t connect to WiFi. You’ll also learn 8 easy fixes so you can get back to what you were doing with functioning WiFi.
Let’s get to it!
Table of Contents
- Key Takeaways
- Fix 1: Try Restarting Your Mac and WiFi Router
- Fix 2: Move Closer to Your WiFi Router
- Fix 3: Forget Your Network and Reconnect
- Fix 4: Disable BlueTooth and Try Again
- Fix 5: Make Sure the Date and Time are Correct
- Fix 6: Run Built-in Apple Wireless Diagnostics
- Fix 7: Run Maintenance Scripts
- Fix 8: Reset Your SMC and NVRAM
- Final Thoughts
Key Takeaways
- The most common fix to WiFi problems is to simply restart your MacBook and your wireless router. Try reconnecting within a few minutes.
- You can also move closer to your router to ensure it is not a range issue. If your router has a weak range, you can get a wireless range extender to increase it.
- Forget your network and reconnect to clear out any corrupt settings your MacBook might have saved for your WiFi.
- BlueTooth can sometimes interfere with your WiFi. Disable your BlueTooth and try again to see if this remedies the issue.
- Make sure the Time and Date are correct, as this can cause issues with internet connectivity.
- Run Apple network diagnostics and take any suggested fixes. This can sometimes remedy minor issues.
- You can also run Maintenance scripts to clear up any software bugs. You can do this via Terminal or with an app like CleanMyMac X.
- If nothing else works, you can reset your SMC and NVRAM. Your MacBook may have a hardware issue if it still refuses to connect to WiFi.
Fix 1: Try Restarting Your Mac and WiFi Router
The first fix is the easiest. Oftentimes your MacBook just needs a quick reboot for everything to work properly. Restarting can clear up any minor software bugs that might have popped up if your Mac has been on for a few days or even weeks.
Turn your MacBook off entirely by selecting Shut Down from the Apple Icon in the upper left. Give it a few seconds to ensure it is completely shut down, then turn it back on. Try connecting to your WiFi network now.
If that doesn’t remedy the issue, try doing the same on your WiFi router. Many routers have an on/off switch that you can hit. Alternatively, you can unplug the power cable from your router to ensure it is shut down. Wait about 30 seconds before plugging it back in, and see if you can make a connection.
Fix 2: Move Closer to Your WiFi Router
The connection might drop if your WiFi router is on the other end of your house or far away. If your wireless signal is weak, your MacBook won’t be able to connect to your WiFi network. To remedy this, you can try moving closer to your router or moving your router to a better location.
If your MacBook connects to WiFi without any issues while standing right next to your WiFi router, then you know that the location is to blame. Try finding an ideal spot for your WiFi router. Generally speaking, higher and more central locations are best for even signal distribution.
If the issue is the location of your router and you can’t bring your router closer to your MacBook, you can look into a wireless range extender. This can broadcast your WiFi signal over a greater distance and fill in weak spots in your network.
Fix 3: Forget Your Network and Reconnect
Sometimes, you can fix network problems with your MacBook by “forgetting” the network and adding it back. By doing this, your MacBook erases all settings and configuration data associated with your network. You’ll need to reenter your WiFi password to gain access.
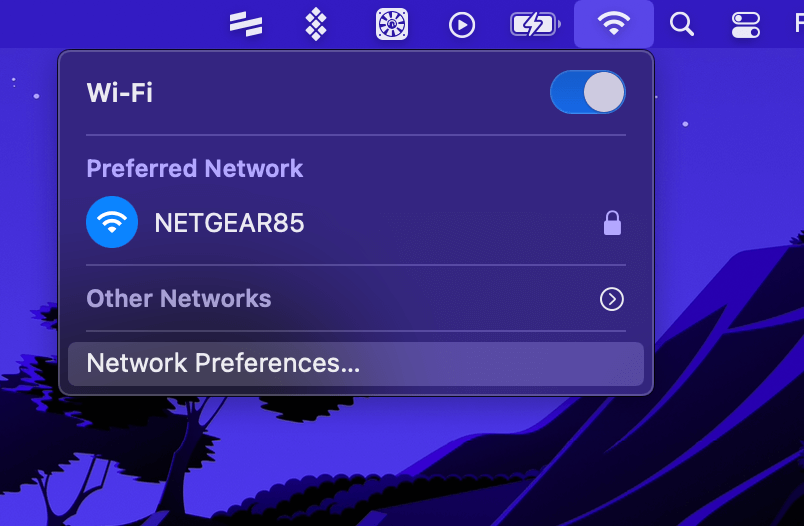
To get started, locate the WiFi icon in the upper right corner and select Network Preferences from the dropdown menu.
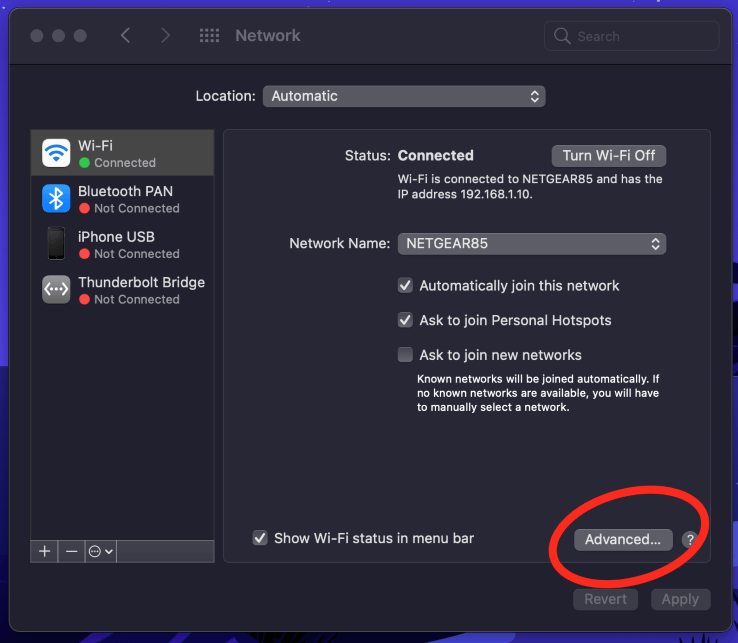
A window will open, displaying all of your network options and settings. Locate the button labeled Advanced in the lower right corner.
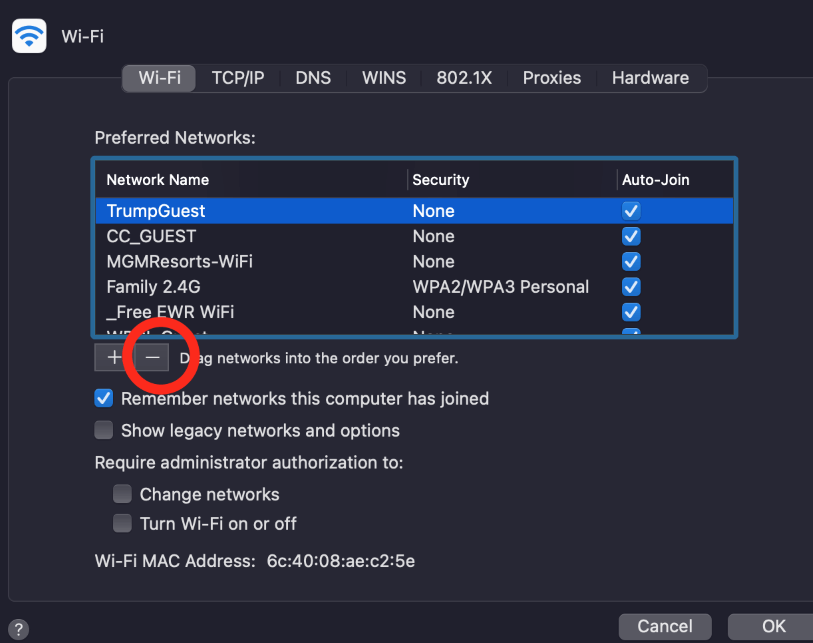
Next, a window showing your network list will appear. To forget a network, just select it from the list and hit the Minus button directly underneath the list. Hit OK when you are done.
Fix 4: Disable BlueTooth and Try Again
BlueTooth can sometimes interfere with WiFi operation. Although this issue is rare, it is a straightforward process to fix. To turn your BlueTooth off, simply locate the Control Center icon from the top of the screen.
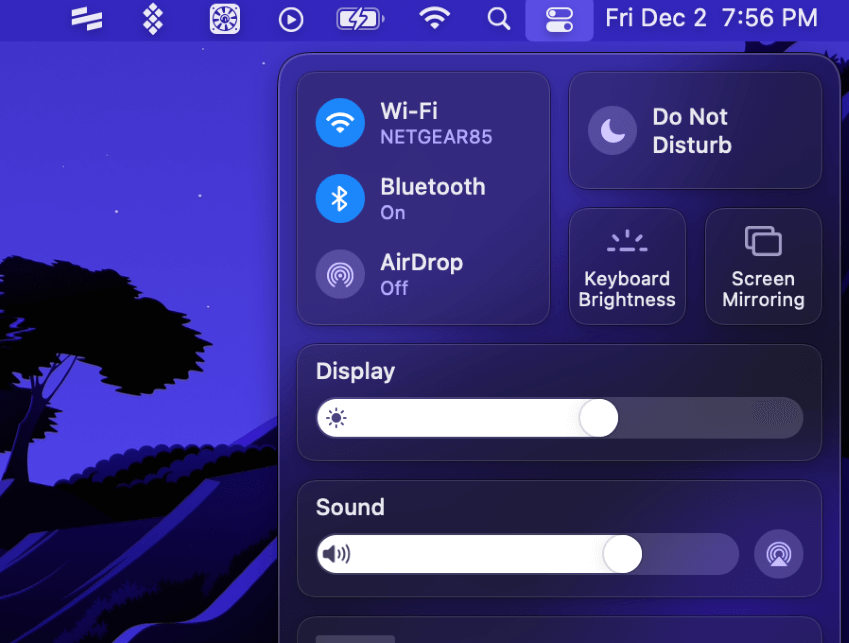
Tap the BlueTooth icon once to turn it off. Give it a few seconds to disable itself, then try your WiFi connection again. You might also have to restart the computer to notice a change.
Fix 5: Make Sure the Date and Time are Correct
Incorrectly set time and date can cause issues with macOS security certificates. While this won’t prevent the WiFi from functioning, it will cause your Mac to display invalid security certificates, blocking it from accessing the web.
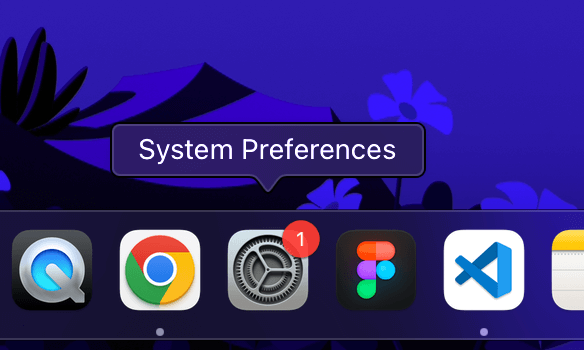
If you notice your time and date are set incorrectly, it is a good idea to set it up properly. Fortunately, this is a very straightforward process. To get started, open the System Preferences from the Dock.
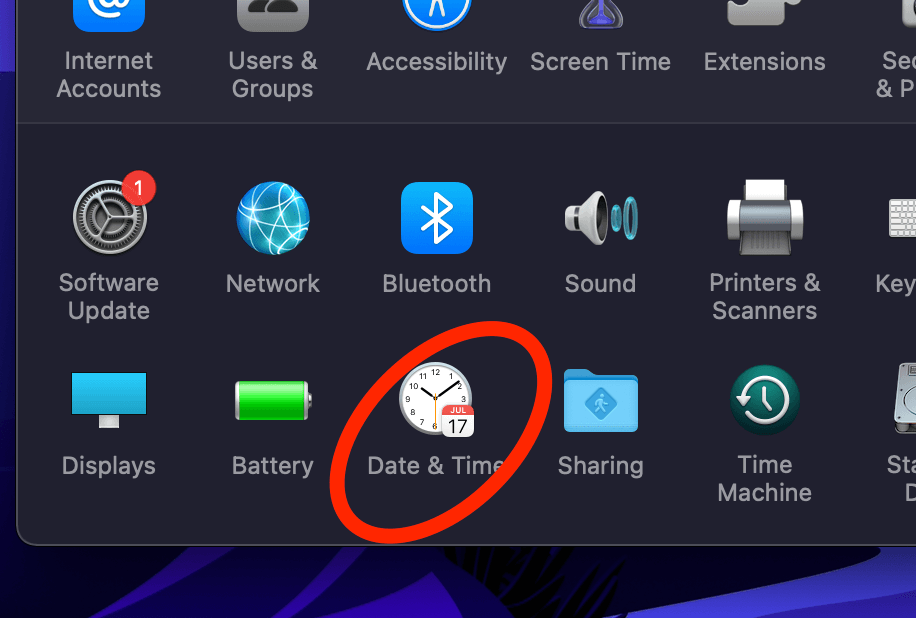
Next, navigate to the Date and Time settings from the options that appear.
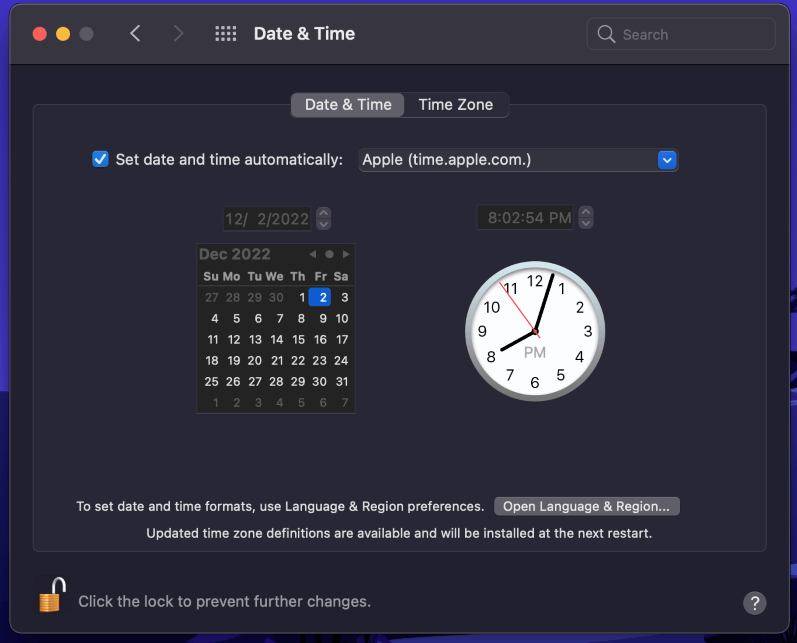
Click the lock to make changes and enter your password. Once you do this, you can select the correct date from the calendar. Additionally, you should ensure that the Set date and time automatically box is checked.
Fix 6: Run Built-in Apple Wireless Diagnostics
You can give the built-in diagnostics a shot if your MacBook still does not connect to WiFi. Hold down the Option key while clicking the WiFi icon near the upper right corner of your screen to find the wireless diagnostics utility.
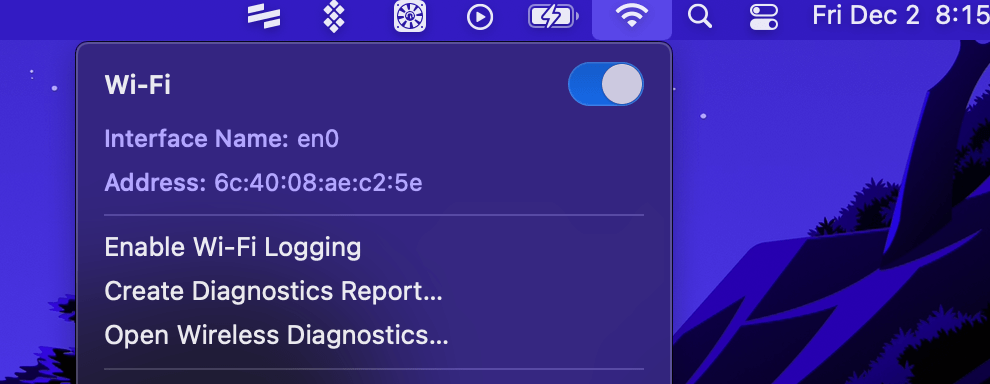
Hit Open Wireless Diagnostics. Once the window opens, click Continue to start the tests.
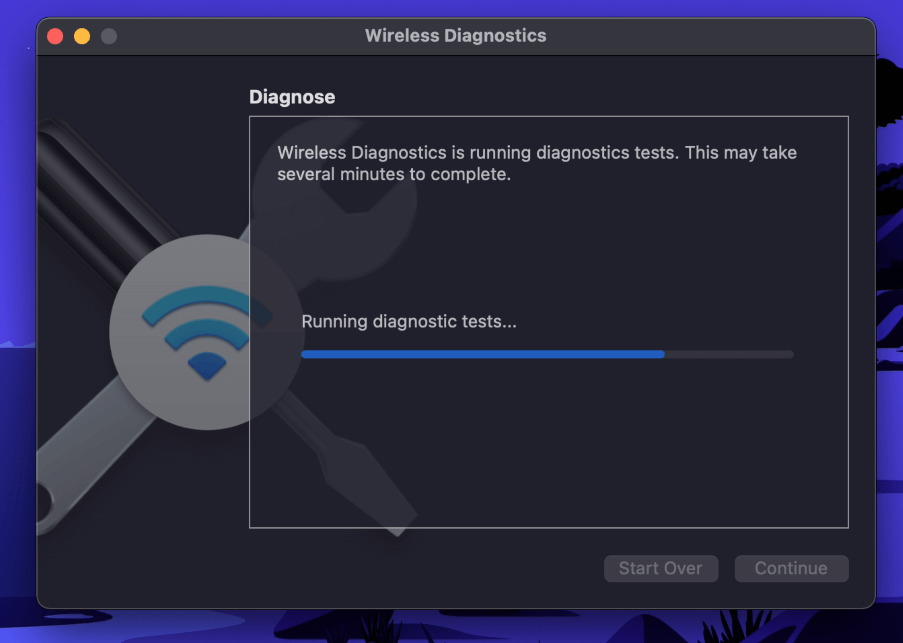
Follow any suggestions that the Wireless Diagnostics utility suggests. If these don’t work, proceed to the next possible fix.
Fix 7: Run Maintenance Scripts
It can be challenging to pinpoint software issues causing your MacBook to not connect to WiFi. Fortunately, macOS allows you to run Maintenance Scripts to sort out any minor software bugs. You can do this in a couple of different ways.
For advanced users, you can enter a few commands in the Terminal to run Maintenance Scripts. Locate your Terminal application from the Dock or Applications folder and enter the following command:
Sudo periodic daily weekly monthly
Next, hit enter, and Maintenance Scripts will run. If you don’t feel comfortable working in the Terminal, you can download a program like CleanMyMac X to handle it for you. This app makes it simple to do a wide range of tasks with just one click.
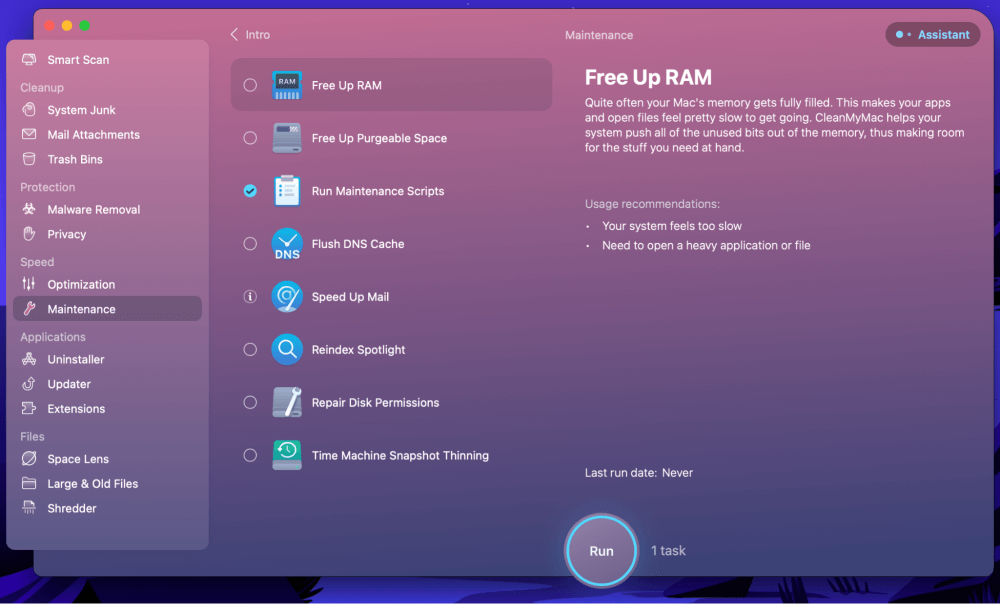
To get started, download and install CleanMyMac X. Next, locate Maintenance from the options in the left sidebar. Make sure Run Maintenance Scripts is checked and hit Run. The app will handle everything from there.
Fix 8: Reset Your SMC and NVRAM
One final solution if your MacBook won’t connect to WiFi is to reset your SMC and NVRAM. These are the various chips located on your MacBook’s logic board responsible for handling low-level hardware functions. Occasionally, they can malfunction, and a quick reset can fix any issues they may have caused.
You can skip this step if your Mac is based on Silicon M1 or M2. When a silicon-based MacBook restarts, the SMC automatically resets. For Intel-based Macs, you must turn your computer on using a keyboard combination to reset the SMC.
Shut down your computer completely. When you press the power button, hold down the Option, Shift, and Control keys when you turn it back on. Once you hear the startup sound, release the keys, and your SMC is automatically reset.
Another solution to fix your MacBook WiFi is to reset the nonvolatile random-access memory (NVRAM). Your Mac stores specific settings and files in this small amount of memory, so resetting it could potentially solve the WiFi issue.
You must shut down your MacBook entirely to reset the NVRAM. You can then turn on your MacBook by pressing Option, Command, P, and R simultaneously. Release these buttons once you hear the startup sound.
A video showing a demonstration:
Final Thoughts
If your MacBook is not connecting to WiFi, it can interrupt your workflow or take time away from your favorite activities. WiFi problems are particularly frustrating if we’re in the middle of an important task when the network goes out. Luckily, there are a few potential solutions available.
You can first try a simple reboot. Restart your MacBook and your WiFi router. If that doesn’t fix the issue, make sure it is not a range issue by moving closer to your router. You can also try forgetting your network and reconnecting, disabling Bluetooth, and ensuring the time is set correctly.
If your WiFi still refuses to connect, you may run diagnostics or maintenance scripts to remedy the issue. The last resort is to reset your SMC and NVRAM. If your MacBook still does not connect to your WiFi, you most likely have a hardware issue that needs professional repair.
