
So, you just bought a new external hard drive or a portable SSD and wanted to use it on your Mac. But somehow, macOS doesn’t allow you to write data to the drive?
That’s all because your drive was initialized with Windows NT File System (NTFS), a file system that is primarily for PCs. Apple Mac machines support a different file system.

In this post, I’m going to show you how to format your external drive for a Mac-compatible file system i.e. Mac OS Extended (Journaled). Just follow this easy step-by-step guide and you’re all set.
Important note: If you have useful files stored on the external drive, be sure to copy or transfer them to another safe place prior to formatting. The operation will erase all data and your files will be gone for good.
Pro tip: If your external drive has a large volume, like mine – a 2TB Seagate Expansion. I highly recommend you also create multiple partitions. I’ll also show you how to do that below.
Table of Contents
Most External Hard Drives Are Initiated with NTFS
During the last several years, I’ve used a few external drives, including a 500GB WD My Passport, 32GB Lexar flash drive, and a few others.
I bought a brand new 2TB Seagate Expansion to backup my MacBook Pro before I updated it to the latest macOS. When I connected the Seagate to my Mac, the drive icon showed up like this.
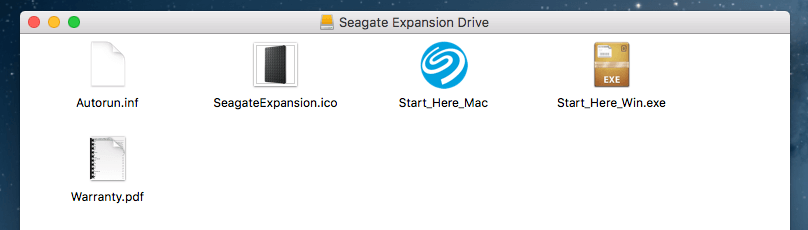
When I opened it, the default content was all there. Since I wanted to use it on Mac, I clicked the blue logo with the text “Start_Here-Mac”.
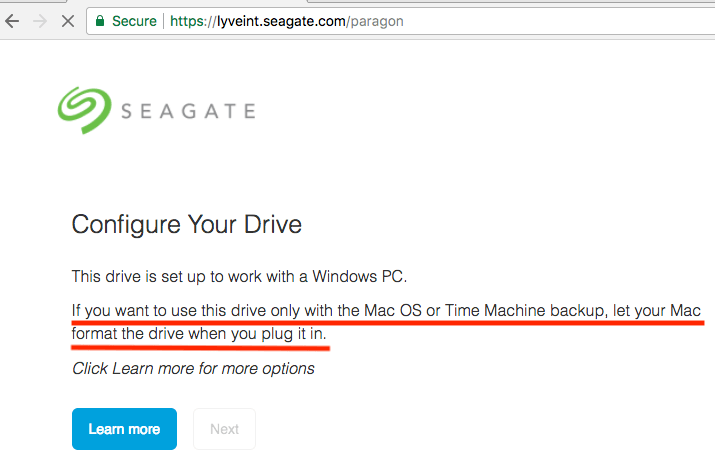
It brought me to a webpage on Seagate’s site, where it clearly indicated the drive was initially set up to work with a Windows PC. If I wanted to use it with Mac OS or Time Machine backup (which is my intent), I’ll need to format the drive for my Mac.
I then right-clicked the external drive icon on Mac desktop > Get Info. It showed this format:
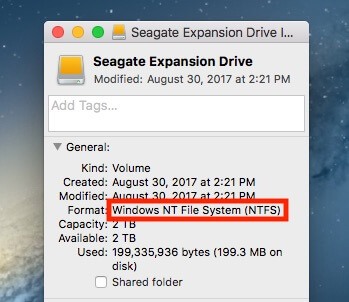
What is NTFS? I’m not going to explain here; you can read more on Wikipedia. The problem is that on macOS, you can’t work with files saved on an NTFS drive unless you use a third-party app which usually costs money.
How to Format an External Drive for Mac
As explained above, you need to format your drive from NTFS to Mac OS Extended.
Note: The tutorial and screenshots below are based on an older version of macOS. They might be different if your Mac is on a relatively new macOS version.
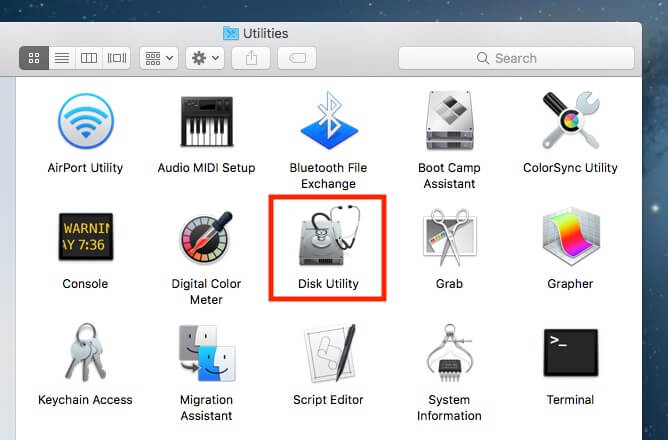
Step 1: Open Disk Utility.
The quickest way to do this is a simple Spotlight search (click the search icon on the upper right corner), or go to Applications > Utilities > Disk Utility.
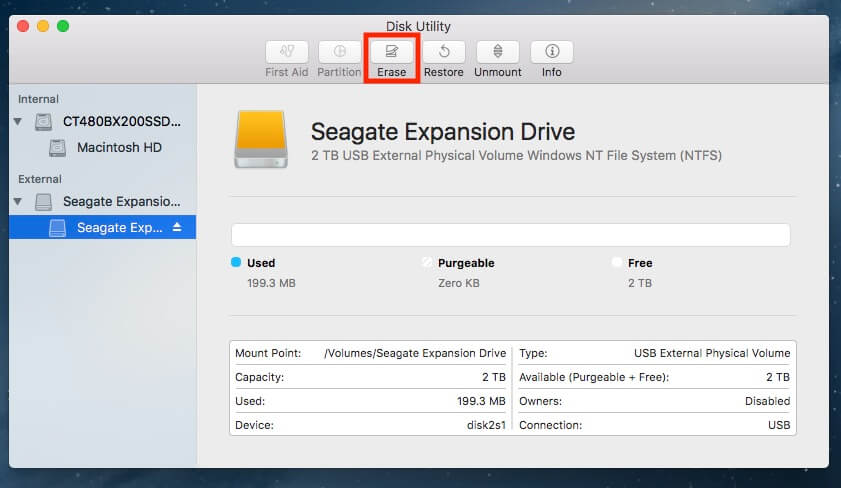
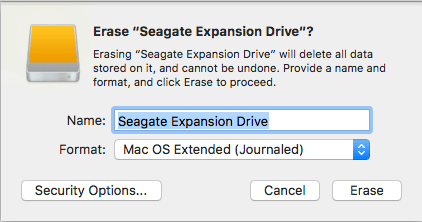
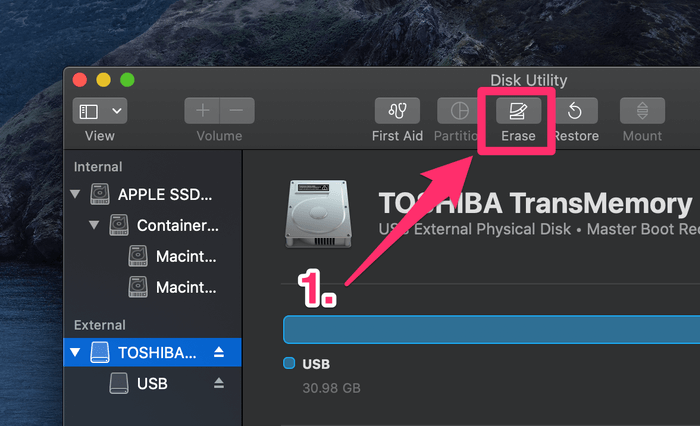
Step 2: Highlight your external drive and click “Erase”.
Make sure your drive is connected. It should show up on the left panel under “External”. Select that disk and click the “Erase” button, the one highlighted in red in the screenshot below.
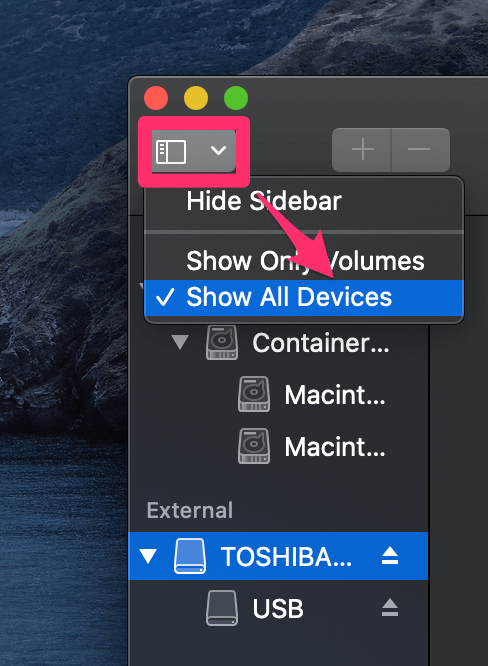
Note: if your hard drive is not showing on the left panel, it must have been hidden. Click on this icon on the top left corner and select “Show All Devices”.
Step 3: Select “Mac OS Extended (Journaled)” in Format.
A new window will pop up asking which file system you’d like to format the external drive to. By default, it’s the Windows NT File System (NTFS). Select the one shown below.
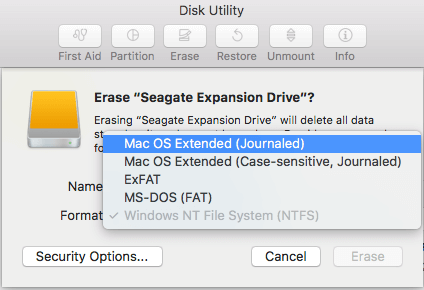
Pro tip: If you want to use the external drive for both Mac and PC, you can also select “ExFAT”. You may also want to rename your external drive here.
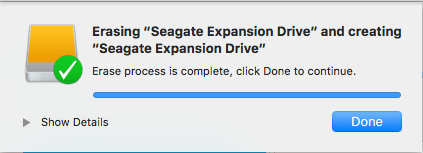
Step 4: Wait until the erasing process is complete.
For me, it took less than a minute to format my 2TB Seagate Expansion.
You can also check to see if the format was successful. Right-click on the icon for your external drive on Mac desktop, then select “Get Info”. Under “Format”, you should see text like this:
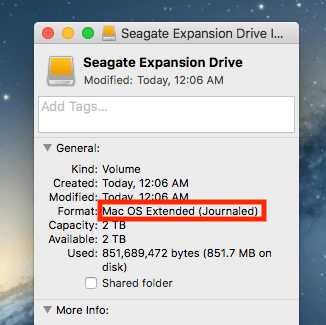
Congratulations! Now your external drive has been formatted to be fully compatible with Apple macOS, and you can edit, read, and write files to it as you want.
How to Partition an External Hard Drive on Mac
If you want to create multiple partitions on your external hard drive (in fact, you should for better file organization), here’s a step-by-step guide:
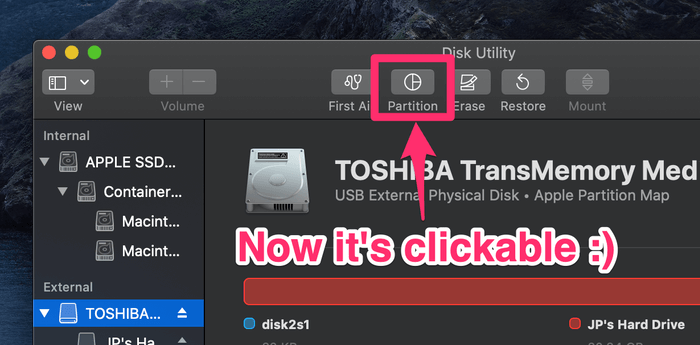
Step 1: Highlight your drive and click “Partition” in Disk Utility.
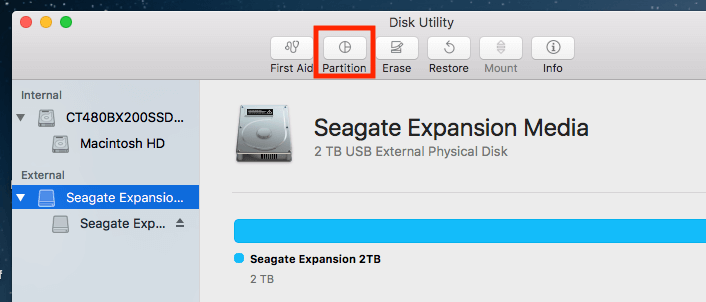
Open the Disk Utility app and highlight your external hard drive. Make sure you select the disk icon right under “External”. If you select the one below it, the Partition option will be greyed out and become unclickable.
Update: many of you reported that the “Partition” button is always greyed out. That’s because your external drive hasn’t been formatted/erased to a Mac-compatible file system yet. Here’s how to make the “Partition” button clickable. I’m using my new flash drive as an example.
Step 1.1: Click on the Erase.
Step 1.2: Under Scheme, select Apple Partition Map. Also, under Format, make sure you have selected Mac OS Extended (Journaled).
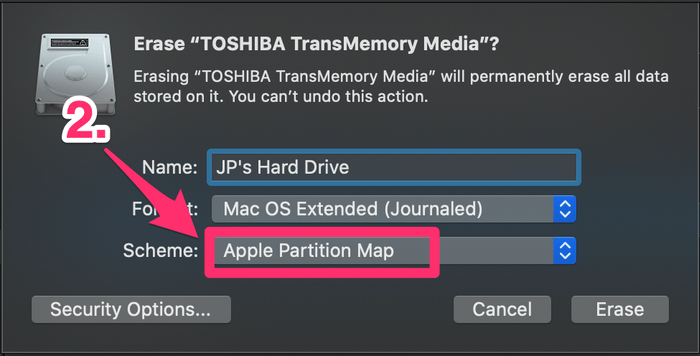
Step 1.3: Hit Erase, wait until the process is complete.

Now you should be able to click the “Partition” button. Follow the steps below to continue.
Step 2: Add partitions and allocate volume for each one.
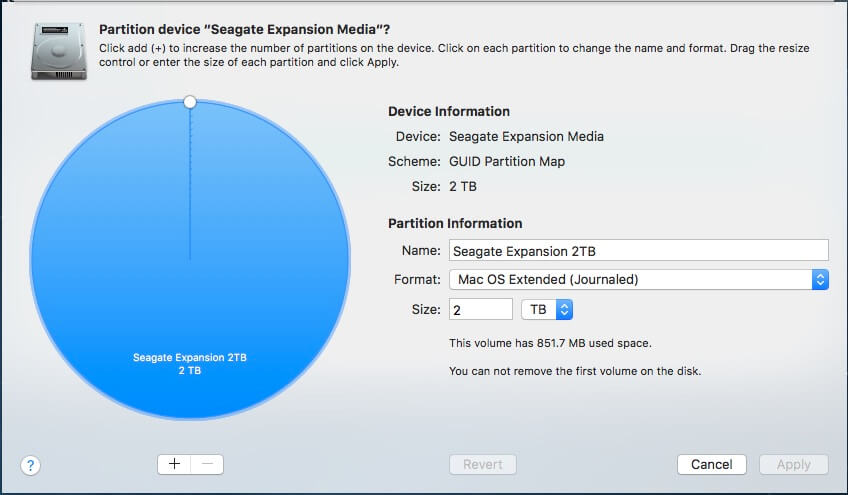
After clicking “Partition”, you’ll see this window. Located on the left is a big blue circle with the name of your external drive together with its volume size. What you need to do next is click the add “+” button to increase the number of partitions on your external disk.
Then allocate the desired volume to each partition. You can do that by clicking the small white circle and dragging it around. After that, you can rename each partition and define a file system for it.
Step 3: Confirm your operation.
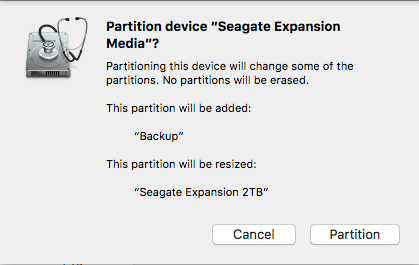
Once you hit “Apply”, a new window pops up asking for your confirmation. Take a few seconds to read the text description to make sure it reflects what you intend to do, then click the “Partition” button to continue.
Step 4: Wait until it says “Operation successful.”
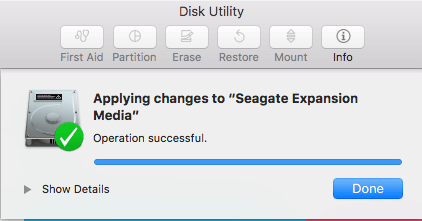
To check whether the operation is really successful, go to your Mac desktop. You should see multiple disk icons show up. I chose to create two partitions on my Seagate Expansion — one for backup, and the other for personal use. You can find more info in this post: How to Backup Mac to an External Hard Drive.
That wraps up this tutorial article. I hope you find it helpful. As always, let me know if you have any issues during the formatting or partitioning process.
Thank you very much for the clear instructions. Worked perfectly and quickly for me to reformat and partition a new external HD (LaCie 5TB).
Your post here was the most helpful I was able to find. Thanks! But I am stuck. I am trying to partition a new Seagate 2TB exterrnal drive so that one partition is Mac OS Extended so I can use it with Time Machine, and another partition with exFAT so I can use that partition with both Windows and Mac. I go through the steps, create a partition map, but when I “Apply” the partition setup I defined, it fails, with message that “MediaKit reports partition (map) too small.” I’ve tried a few times with different partition sizes; always the same failure. Any idea what is happening and how to fix it? (I am running Catalina 10.15.7.)
Hey JP, I have a quick question so if we are partitioning the 5 TB hard disk in to 3 sizes and one with NTFS format and one with MAC format. Can we use this hard disk for both windows and MAC back ups. Appreciate your Respone.
I purchased a 8TB external SSD drive, but when I got it the drive was partissioned into 4 2TB drives. How do I make it an 8TB drive? – I use Mac OS 12.0.1
Thanks a lot for this tip. Helped me
I have the same problem. Partition greyed out. The external drives have been reformatted to Mac OS Extended (Journaled). however with Catalina OS 10.15.7 you no longer get SCHEME as a drop down option. Can anyone advise how to deal with this issue.
Click View > Show All Devices. That should show a name that ends in ‘Media’ at the top of the hierarchy. That’s the HDD/SSD device ( = ‘media’).
The indented name is the storage space ON the hard drive, not the external drive itself. The storage space is what you want to divide up by creating a partition.
What is the purpose of partitioning to back up & personal? Does it give you an option of which to back up if you partition the drive?
The Scheme set isn’t appearing on my Macbook Pro and I just updated it?
Any suggestions?
Thank you so much
I have an iMac (mid 2010) and has a Mac OS Sierra. It’s not giving me SCHEME option. I am only getting NAME and Format when erasing the girl. I need to partition the disk so I can use as a bootable installer. any help would be appreciated. Thank you.
hi. so I followed the steps it all worked out fine except there is no “SCHEME” option on my Mac. It only shows NAME and FORMAT when I go to erase. the scheme is non existent. please help. I want to partition my drive.
My disk utility does not have the option to select “scheme” when I erase the disk.
I am using Mac Catalina 10.15.3
Hi, that worked great for me thanks!
Do I need to, or should I, change back to Master Boot Record in order to best utilise my externalHD for both Windows and Mac?
Thanks in advance!
I am about to get a new hard drive and appreciate all this information. If I partition the HD, how will Time Machine know which side to back up on? My old HD was not partitioned, so I just plugged it in and started Time Machine. Thanks for any advice!
The word scheme does not appear in the drop down menu and therefore partition is permanently greyed out. This is a Samsung SSD T5
Thanks for all the advice above. Setting the desk to GUID on erase/reinstalling worked for me. Note, however, that you cannot* used Time Machine on an APFS disc. I was caught out and had to start all over again.
https://support.apple.com/en-gb/guide/mac-help/mh15139/mac
* as of Oct 2019
Hi JP, thank you for writing this article. It saves me lot of time.
I followed the first one and now I can’t use it anymore. $87 for it to not work anymore, thanks.
Great – worked spot on. Thanks!
Has anyone had any luck when the partition icon stays greyed out?
Your step 1 is fake, that option doesn’t exist
HI JP
Same as all above. I have formated to exfat and the partition button remains grey
I know what the reason why I can’t click the partition icon because I didn’t show the device, I have to select Show All Devices from View menu.
I have an external SSD drive 500GB, it was partitioned into two already, I don’t need them any more, I can’t only find both individual volume under the external but not a drive and then expanded into two volume. I can only select either one but partition icon is grey.
Same problem. Seagate 1TB External. Partition (all) always grayed out.
Thank you for your explanation it is really helpful, thank you so much.
Cmd+2 or tab click view and show all devices.
The left display HDD. And you show you the partitions under the external HDD. Then click the HDD and erase. Done.
Greetings to everyone with the partition button greyed out. Here’s something to try. 1. In Disk Utility, go to the View menu, and make sure that Show All Devices is selected. 2. Under External (in the left pane of Disk Utility) make sure you select the drive (it should have the name of the drive, including the brand). 3. Hopefully, you’ll now see a partition icon that’s not greyed out.
FANTASTIC! New hard drive formatted and partitioned. Back up now in progress
Why do you use gray text? It’s hard for read and decreases accessibility.
I found that u can’t partitiate until u formate it Mac journaled. I wanted to use FAT. But that was the reason why it stayed grey. otherwise ur step by step advise is good.
Hey JP, how do I format the external harddrive back to NTFS?
Hello,
I have erased an USB drive as you have recommended, it was successful however after the action I cannot mount the drive ( I can see ii in disk utility). Can you advise me where is the pb?
thank you
Every time I try to erase to reformat, it says the process has failed. Under details, it says the operation failed because it couldn’t unmount the disk. What should I do?
If you want to partition, please check:
1- Do you have View All Devices selected under the View icon (top left side of the Disk Utility window);
2- Is the device itself selected (i.e. Seagate…) instead of the partition on the device.
Hope thus helps.
😉
Try issuing the following Terminal command;
diskutil erasedisk hfs+ External GPT /dev/disk2
In Step 2 to erase the external hard drive, the screen shot has the second “Seagate” highlighted…does it matter which “Seagate” is selected before you hit Erase? (the “Seagate” under External vs the “Seagate” under the Seagate)
Hi JP,
Your advice on formatting the external hard drive is rather insightful. I hope you can help me here: I would like to format my external hard drive so that I can edit in on my macbook pro. I was hoping to copy & save the files currently in the hard disk onto my Mac but can’t do so – it can’t read the files; I don’t have another PC computer to back it up on.
What is your advice to this? I am really hoping to reformat it to exFAT format.
let me know. Thanks!
V.
How do I unpartition my external HD using my Mac?
There’s no reverse option unfortunately.
You can change the volume of each of the partitions such that one volume is reduced to almost nothing. Its a workaround…..
Well, that’s not true. You will need to back up your data though as you can only do it through erasing and reformatting.
To remove partitions:
-back up your data
-erase and reformat the drive as a single partition in the format you want
-restore your backed up data to the drive
You can copy the files on your external HD elsewhere, then format it or delete the partition(s). That should “unpartition” your hard drive. After which you can transfer your files back on it.
Just erase that specific Partition.
Click on the View Icon at the top left and select the volume then you use “Erase” to reformat the device.
I have a MacBook Air: macOS Sierra 10.12.6., a Toshiba 1Tb external drive, & a Toshiba Microsoft 10. I hadn’t partitioned my drive but I’d like to use the added partition for some files that I have on my MS 10. The external drive is in the “exFat” format. I was wondering, if I’m able to partition my external drive, will I be able to access the new partition when I hook it up to the the MS 10 & what would it look like?
Hi JP, thanks for this – really great. Quick question. Is there any difference in formatting the external drive to ‘MacOS extended (case sensitive, journaled) as against ‘MacOS extended (journaled)’ ? I did mine the first way. After working well for a year its now failing to back up and trying to figure out why.
case sensitive = folders named “Homework” and “HOMEWORK” are two different folders.
Same problem with partition greyed out on 10.13.3 High Sierra – I’ve erased/reformatted, just to be safe… nothing.
have you selected “View > Show all devices” from top left menu.
I encountered the same problem, no matter which drive option I selected I was unable to partition. Then I noticed in the tutorial above that the scheme being used was GUID partition map ( the scheme I was using was Master Boot Record). With my external HD still empty, I went to utility disk, selected erase, changed the format to MAC OS ext Journaled AND selected GUID partition map under the scheme option then I erased. After that I was able to select partition.
Try issuing the following terminal command;
diskutil erasedisk hfs+ External GPT /dev/disk2
Same problem. I cannot get the drive to mount no matter how many times I following this process. I am using Mac OS Mojave 10.14.5.
If I have files on my hard drive – how do I format it without losing all the files, pls?
A way to do is by copying your backup image to another shared drive and format the external drive followed by partitioning it. You can copy the backup image back to the preferred partition.
Hope this helps.
I too have the same problem under Mac OS 10.13.3 High Sierra
Once I have backed up my Mac, is it possible to partition the external hard drive?
I have a Seagate 1 TB external hard drive, but have already backed up my Mac once, so the Partition button is always grayed out. I have selected the drive icon right under “External” as you pointed out.
Thanks!
I can follow this to the letter until the partition section. my partition button is ALWAYS greyed out regardless of what is seated or how many times I erase the drive.
help.
Make sure you select the drive icon right under “External” (in Disk Utility).
Same problem, I choose the drive icon right under “External” but it’s still greyed out. Both of them the one right under “External” and the one below it.
I have the same problem. The partition button is unavailable.
Hi Mona.
I also had this error and I solved it. When erasing the drive there are optins to select some properties for the new drive:
NAME
FORMAT
SCHEME
Name you can use anything you like.
Format NEEDS to be Mac OS Extended (Journaled)
Scheme NEEDS to be GUID Partition Map
If the format or more importantly the scheme are wrong the partition button stays greyed out.
Hi Mona, make sure to select the GUID Partition Map schema. That should let you create a partition 🙂
Ran into the same problem and somehow managed to find the solution: You need to change View settings (on the upper left corner) and change it to “Show all devices”. Then it will likely show your disk’s name (probably the disk’s brand) and whatever name you chose for the volume below.
I’ve read everything and Rachel’s comment is the one that did it for me. Change on View to SHOW ALL DEVICES. Then you can click on the root of your eternal drive and erase it to factory settings and erase the partition. Before I was only able to see the drives.
Bless you, Rachel!
I wasn’t being given the scheme option because I couldn’t see the disk! This solved it!
This is pretty easy to fix. When formatting your external hard drive, simply set the scheme to “GUID partition”. After formatting the disc, your partition should no longer be greyed. Cheers!
No
Did u find a solution? I’m facing the same issue as well!
couldnt solve it after multiple tries
In the up left corner, View>show all device
Then the external devices ( not the SSD itself ) >erase> format > scheme make it Apple partition map .
Found the solution.
Erase the main External drive at the top and change format to GUID Partition Map. Worked for me n hope it works for u!
Same issue here! Anyone have a fix for this? Using a Samsung Portable SSD T5 2TB and trying to partition so I can use 1.5TB for my music production software and 500GB for xbox one. Any assistance would be greatly appreciated!!
I have the same problem!
I am doing this and it still grey out. What is the solve?
Same problem, have formatted the new ext. hard drive, configured for mac OS extended Journal, selected the ext. drive, in Disc Utility & it’s greyed out.
This is pretty easy to fix. When formatting your external hard drive, simply set the scheme to “GUID partition”. After formatting the disc, your partition should no longer be greyed. Cheers!
Hey, try erasing the HD and reformatting to Mac OS extended journaled and the partition scheme be GUID. THEN select it and go to the partition tab again. Now you have the +. Crete the partition. THEN go back and reformatted portions to whatever file format you want.
I had the same problem, this helped:
https://discussions.apple.com/thread/8220695
When you are in disk utility, click on view then show all devices. Erase the drive NOT the partition and as GUID Partition Map. Then after it is successful you should be able to partition!