
There are a few ways to address the issue of your Logitech mouse double-clicking. Unfortunately, many of them fail to address the underlying cause of your mouse woes and just mask the problem.
Hi, I’m Aaron. I love working with and around technology and have parlayed my passion into a decades-long career. I also lost a wireless G403–my favorite mouse–to the dreaded Logitech double-click issue.
In this article, I’ll address why the double-clicking issue happens, what you can do to mitigate the impacts, and how to fix it once and for all.
Table of Contents
Key Takeaways
- The Logitech double-clicking issue is a hardware defect related to the type of Omron switches it uses for the left and right-click buttons.
- You can implement workarounds in Windows to try and make the mouse workable, but eventually, the mouse will cease to work properly.
- The only permanent solution to this problem is to replace the switches.
- If you don’t want to replace the switches, the hardware will continue to degrade, so you’ll eventually need to replace your mouse.
Why the Logitech Mouse Issue Exists
Logitech makes, in my opinion, excellent consumer-grade gaming and productivity mice. For the past 10 years, I’ve primarily used Logitech mice for my main rig. That doesn’t mean I wouldn’t also highly recommend other mice–I 100% would and Logitech is in no way sponsoring that statement. I just personally haven’t used other mice.
Many others seem to agree with that sentiment, with the G502 Hero (the one you’ll see featured in this article) being one of the most popular gaming mice.
One of the main drawbacks of the G502 Hero–and other Logitech gaming mice as this is an almost universal problem across Logitech (and some non-Logitech) gaming mice–is their use of Omron switches for the left and right click buttons.
You’ll notice that all of the other switches are Kalih-made. In fact, there are other more suitable switches for the left and right mouse buttons. Logitech likely used these switches because they were in high supply or as a cost-saving measure.
You can see more about the switch issue in this YouTube video.
For a graphical representation of this issue, here’s a cutaway diagram of the inside of the switch.
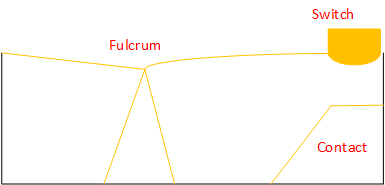
A curved piece of brass metal sits on the top. Pressing the switch makes it pivot on the fulcrum and touch the switch contact, completing the circuit and registering the click.
Over time, repeated clicking flattens the curve of the brass metal. As a result, the switch sits much closer to the contact.
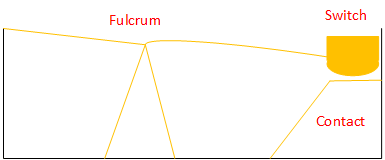
When you click, the mouse buttons provide the same amount of travel–meaning that you’re still pressing the full movement of the switch. The switch, however, only needs to move part of that distance.
Where the brass metal should pop fully back into place it instead bounces when it hits its new lower position and may touch the contact again. The mouse registers two clicks, ergo the double click problem.
How You Can Fix It
You ultimately fix the problem by opening the mouse and swapping out the switches. That requires some soldering, so isn’t for the faint of heart. If you’re unwilling to do that, eventually you’ll need to replace the mouse. This is a hardware defect that only worsens over time.
That being said, most people can stave off the ultimate replacement of their mouse. There’s a tradeoff: you sacrifice performance. Where the mice primarily impacted are focused on performance, that might not be a satisfactory compromise.
You’re going to speed up the double-click speed. This effectively creates a debounce circuit in software. Windows will be told to effectively ignore double-clicks that happen randomly.
Click Start or Search.

Type Mouse settings and click that option when it appears.

Click Additional mouse settings.

Set your speed as fast as you reasonably can handle.

By increasing the sensitivity of your mouse double click, the hope is that a random switch bounce might not happen quickly enough to register.
I have a bone to pick with other guides on this matter, which is that they recommend the opposite: make the double click speed as slow as possible. I guess the idea is that slow = not fast, which isn’t true with the Windows mouse settings.
Slow provides a floor: any speed above it will work. So you’re likely increasing your chances of a double-click by moving the slider to Slow.
Remember that this isn’t a fix. It’s just postponing the inevitable. This is a well-documented issue and there’s only one way to actually fix this double-clicking problem.
How You’ll Actually Fix It
You’ll need some tools to fix your Logitech mouse:
- Number 0 Phillips head screwdriver
- Rubbing alcohol
- Lint-free cloth
- Replacement switches
- Replacement mouse speed pads
- Tweezers
- Soldering iron
- Solder
- Flux (optional)
- Solder sucker (optional)
Wow, that’s a lot, right? Maybe. But if you’re going to do any degree of electronics troubleshooting and repair, this is the most basic toolkit you can make and it will take you far. The great part: you can likely put the entire kit together for around $100 with reasonably good beginner’s equipment.
I’d also recommend just replacing the switches instead of repairing them. You can technically repair them, but it requires a great degree of manual dexterity and good eyesight. Also, because you’re bending the metal back and forth, it’s already more pliable and the problem will reoccur quicker than before.
The more sturdy Japanese Omron replacement switches, at the time of writing, cost $3 each at the high end and more typically half that. They’re rated for tens of millions of lifetime clicks, so will likely last the rest of your life.
Now that you’re ready, let’s jump in.
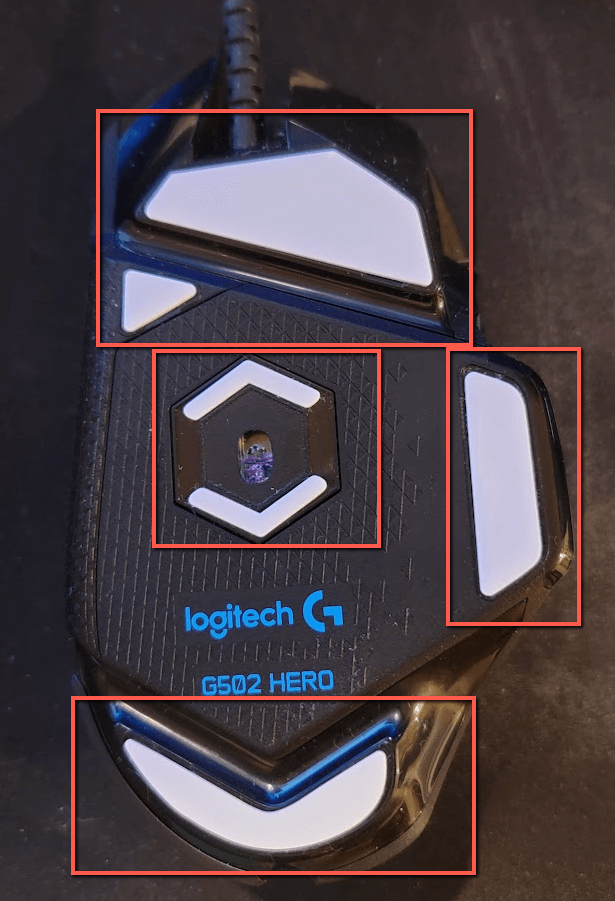
As I mentioned in the introduction, I have a G502 Hero, so this guide specifically uses a G502 Hero as a reference model. You may have a different Logitech mouse. Fortunately, they generally use the same rough construction, so this should help you. Definitely look up a guide for how to disassemble your specific mouse if you have concerns.
I’ll start with my concluding reassembly picture because my new mouse speed pads are white and easier to see than the original black pads.
Unplug the mouse from your computer.
Remove all the speed pads.
Scrub the plastic underneath with rubbing alcohol and the lint-free cloth. Make sure to remove all sticker residue, dust, or other detritus. If you don’t, your replacement pads will not stick as nicely.
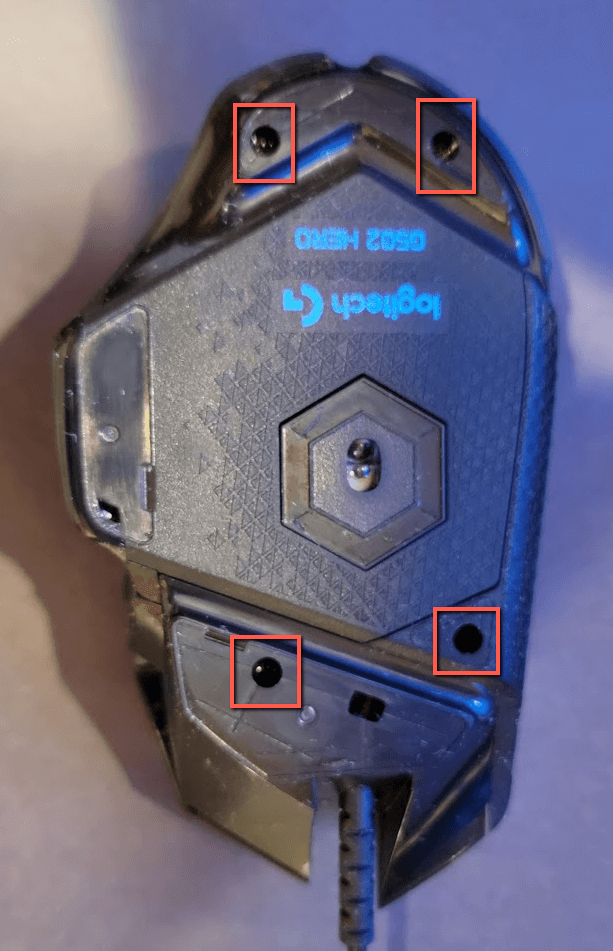
Unscrew the four bottom screws. Those hold the bottom of the shell to the top of the shell.
Carefully separate the top and bottom of the case. There is a vertical daughterboard for the three side buttons.
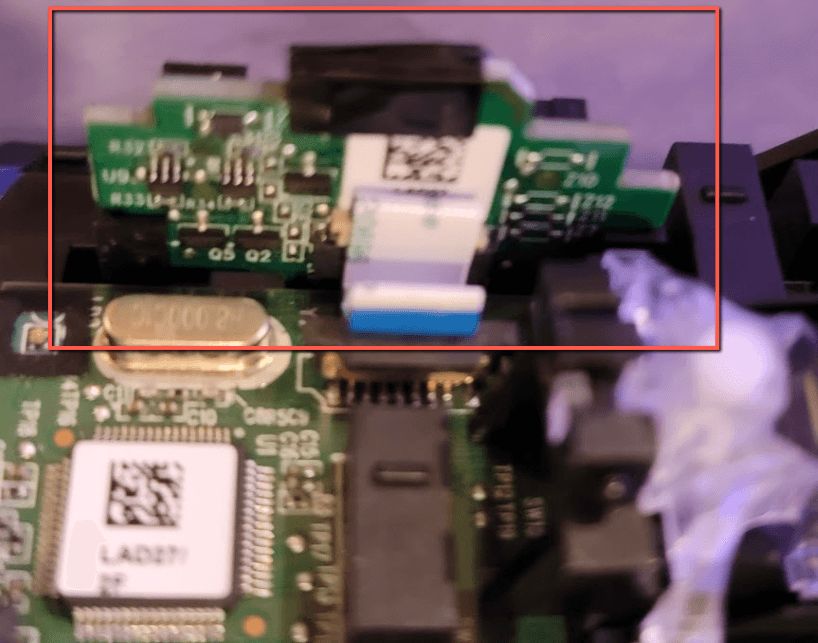
While that has a plastic insert it sits in, when I removed this, it came out of its case and the ribbon cable was ripped from the daughterboard. Luckily, I didn’t damage mine, but yours could be damaged from doing that.
Remove the mouse wheel linchpin.
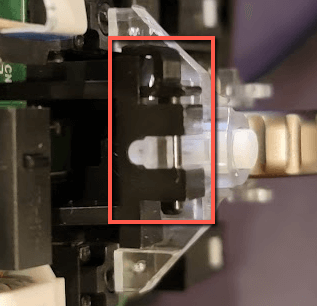
I used tweezers and a dowel to push it out.
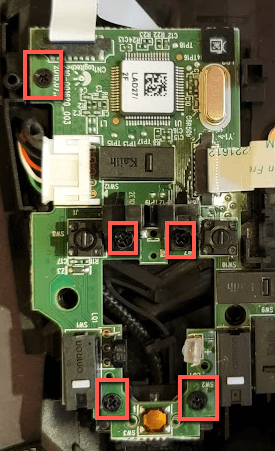
Remove the five screws holding the mouse circuit board to the bottom of the mouse.
Pull out the middle click springs. They should come out with no force. Remove the ribbon cable for the Hero sensor.
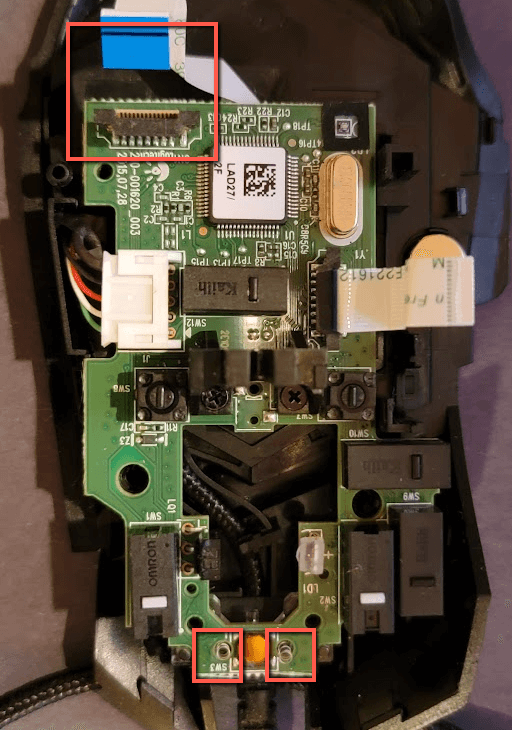
You can also detach the red, white, green, and black USB cable from the side. It’s not necessary.
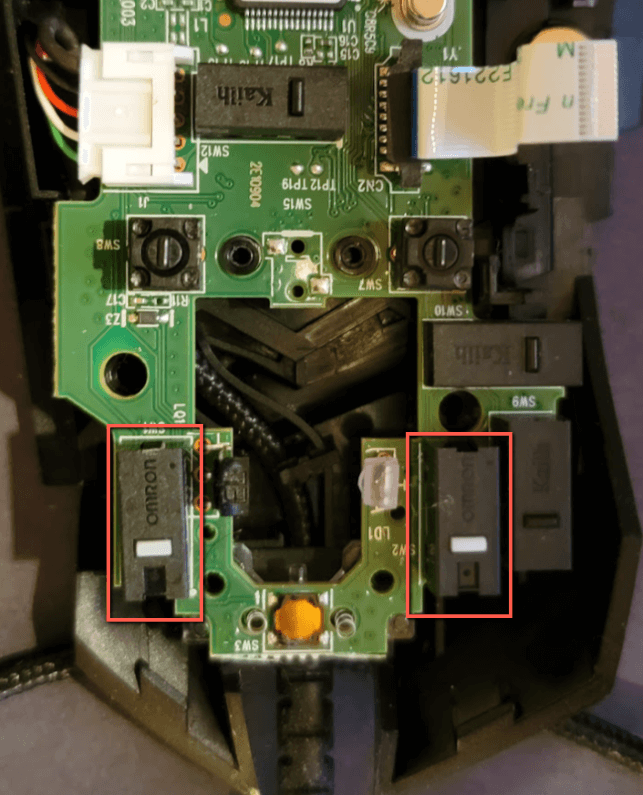
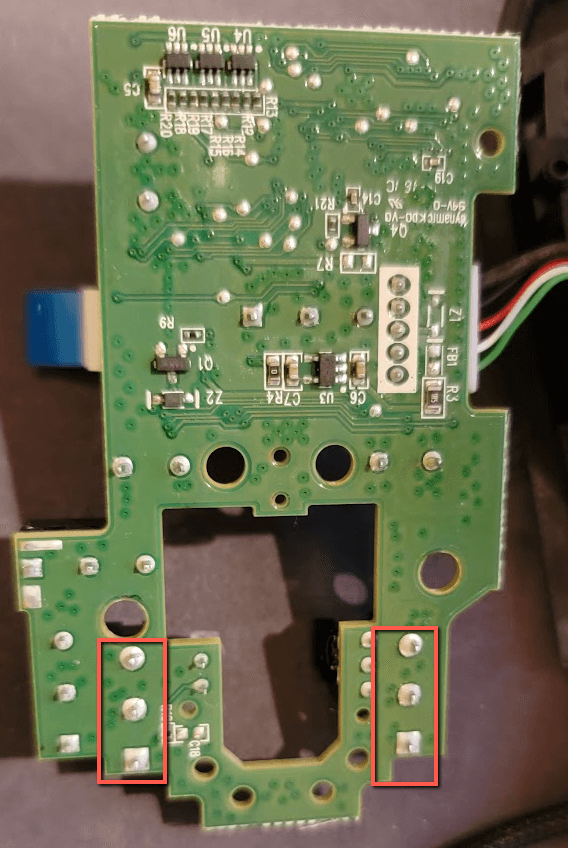
Remove the mouse circuit board and flip it over. Now you’ll be looking at the bottom. The switches you need to desolder are circled in red.
You have two options for how to do this:
- Use your soldering iron to heat the three pads of each switch at the same time and use tweezers to pull out the switch. Flux will help with this–use a generous amount across the pads and clean with rubbing alcohol after.
- Use a solder sucker to pull the solder away from each pad as you heat it.
The solder sucker takes some time to get used to, but it’s far and away the better method, in my opinion. It’ll be easier to remove the switches and you’ll leave clean holes to reinsert the switches.
Solder in the new switches. This isn’t a soldering tutorial, so you’ll need to search for that. My tips:
- Heat the pad – don’t blob solder on your iron and try to solder with that
- Be careful with the heat – the switches have a plastic housing that can melt if the metal inside is heated too much.
Follow this guide in reverse to put the mouse back together. When you get to the end and screw everything back together, remember to install your replacement speed pads.
Do You Need to Fix It?
There’s no shame in not fixing your mouse and just buying a new one. As I mentioned in the introduction, I had a wireless G403 that I really liked. I used the double-click defect as an excuse to upgrade to the G502. I wanted a mouse with the high-resolution Hero sensor and my 403 didn’t have it.
That being said, if you are planning on replacing it and you also want to practice electronics repair, this is an excellent project to do so. It has a relatively low difficulty and there’s no downside to trying to repair it. If you fail, you’re replacing it anyway. You may even learn something from the experience! I’d highly recommend it.
Conclusion
There’s really only one reason your Logitech mouse will begin randomly double-clicking. Fortunately, it’s well-documented and straightforward to repair. Due to the popularity of Logitech mice, replacement parts are also plentiful (and relatively inexpensive). Consequently, this is a great electronics project for someone who wants to practice their repair skills.
Have you swapped out the switches on your Logitech mouse? How did it go? Let me know in the comments!