
When we fade an audio or music track, we are slowly changing its volume so the sound “fades” in or out.
Over the decade that I have been making home movies and professional films I’ve learned how fading audio or music can help your movie have a more professional feel, fit just the right sound effect into a clip, or end a song on just the right note.
Fading audio is quite easy in Final Cut Pro. We will show how to do it quickly and how to fine tune your fades so you get exactly the sound you want.
Table of Contents
Key Takeaways
- You can apply default fades to your audio through the Modify menu.
- You can manually adjust how slow or fast audio will fade by moving a clip’s Fade Handles.
- You can change how the audio fades by holding CTRL, clicking on a Fade Handle, and choosing a different fade curve.
How Audio is Displayed in the Final Cut Pro Timeline
The screenshot below gives a quick overview of the different kinds of audio that can be used in Final Cut Pro.
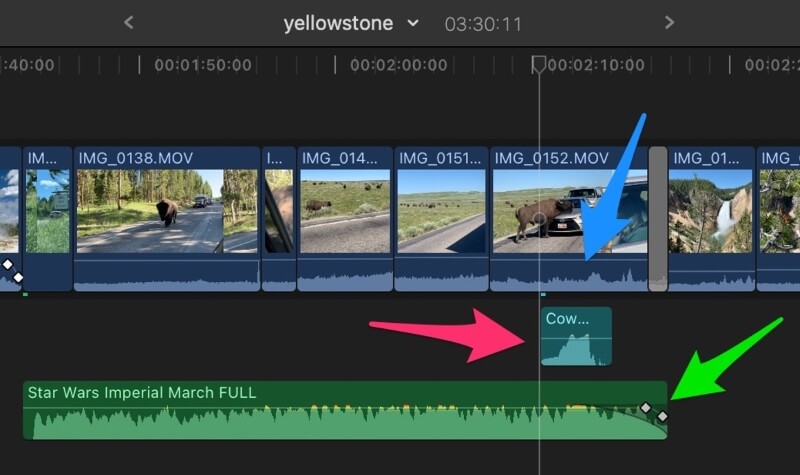
The Blue arrow points to the audio that came with the video clip – the audio that the camera recorded. This audio is attached to the video clip it was recorded with by default.
The Red arrow is pointing to a sound effect (in this case the “Mooooo” of a cow) I added just to show you what it looks like.
Finally, the Green arrow points to my music track. You may notice its title: “The Star Wars Imperial March”, which may seem an odd choice, but it was the first thing I thought of when I saw buffalo walking down the road and thought I would see how it played. (It was pretty funny, I’m told).
If you look closely at each clip of audio in the screenshot, you may see that the volume of each video clip is a little different and, more problematically, each clip might have sound that starts or ends rather abruptly.
By fading the audio at the start or end (or both) of each clip, we can minimize any abrupt changes in the sound from one clip to another. And as great a song as the Star Wars Imperial March may be, there is no way we want to hear it all.
Rather than abruptly stopping it when our scene changes to something else, it will probably sound better if we fade it out.
How to Add Automatic Fades in Final Cut Pro
Fading audio in Final Cut Pro is easy. Just select the clip you want to change and then go to the Modify menu, select Adjust Audio Fade, and select Apply Fades, as shown in the screenshot below.
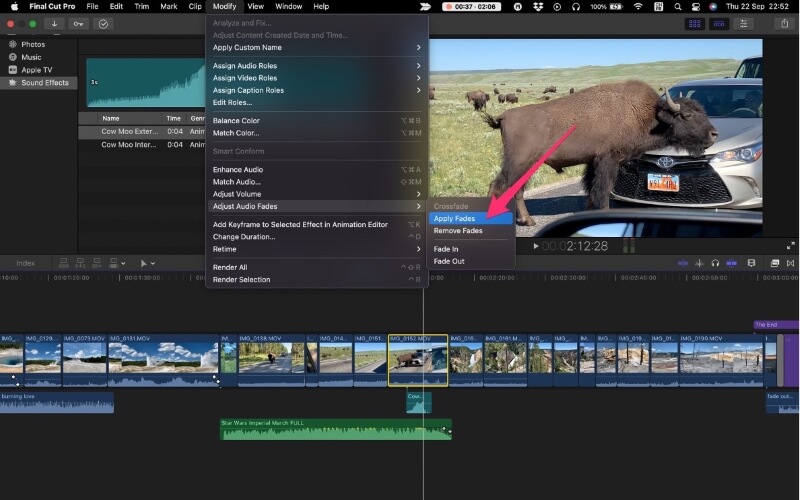
Once you have selected Apply Fades, the clip you choose will now have two white Fade Handles, highlighted by red arrows in the screenshot below.
Notice also the thin black curved line which extends from the edge of the clip to the Fade Handle. This curve shows how the sound will rise in volume (fade in) as the clip starts and fall in volume (fade out) as the clip ends.
Note that Final Cut Pro defaults to fading audio in or out for 0.5 seconds when you Apply Fades. But you can change this in Final Cut Pro’s Preferences, accessed from the Final Cut Pro menu.
In my screenshot, I’ve shown how Apply Fades affects the audio in a video clip, but you can apply fades to any type of audio clip, including music tracks, sound effects, background noise, or separate narration tracks that say exciting things like “the buffalo are now walking down the road.”
And you can Apply Fades to as many clips as you want. If you want to fade in and out the audio in all your clips, just select them all, select Apply Fades from the Modify menu, and all of your clips’ audio will automatically fade in and out.
How to Adjust the Fade Handles to Get the Fade You Want
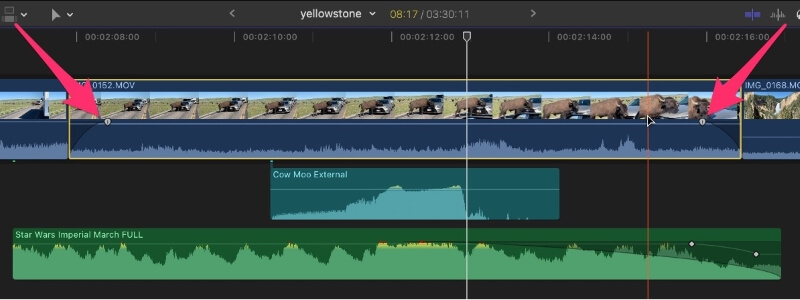
Final Cut Pro adds Fade Handles to every clip in your movie automatically – you don’t have to select Apply Fades to get them to appear. Just hover your mouse over a clip and you will see the Fade Handles nestled right up against the start and end of each clip.
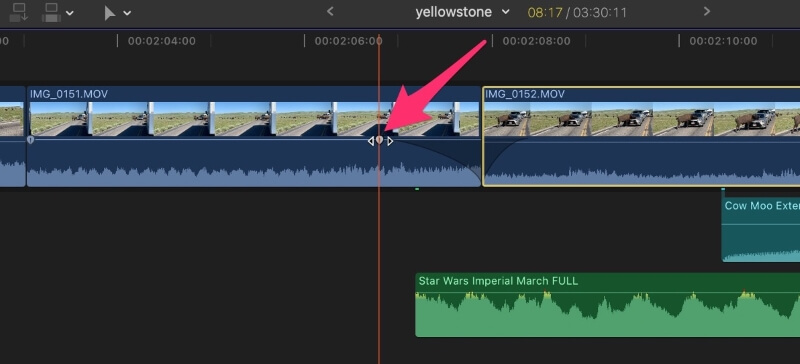
In the screenshot below you can see the fade handle on the left is at the very start of the clip. And, on the right, I have already selected the fade-out handle (the red arrow is pointing at it) and dragged it to the left.
Because the fade handles are right up against the edges of the clips It can be a bit tricky grabbing the fade handle and not the edge of the clip. But once your pointer switches from the standard arrow to the two white triangles pointing away from the handle you will know you’ve got it. And, when you drag the handle, a thin black line will appear, showing you how the volume will fade in or out.
The advantage of fading audio through the Modify menu is that it is quick. You can fade in and fade out the audio of clip just by selecting it and choosing Apply Fades from the Modify menu.
But the devil is always in the details. Maybe you want the audio to fade in a little quicker or fade out a little slower. Speaking from experience, the default 0.5 seconds that Apply Fades uses is pretty good most of the time.
But when it isn’t, it just doesn’t sound right, and you’ll want to manually drag the fade handle left or right a bit more or less to get just the fade you want.
How to Change the Shape of a Fade in Final Cut Pro
Dragging a fade handle left or right shortens or extends the time it takes for the audio to fade, but the shape of the curve is always the same.
In a fade-out, the sound will fade slowly at first and then pick up speed as it nears the end of the clip. And a fade-in will be the opposite: the sound quickly rises, then slows as time goes by.
This can be very annoying. Particularly when you are trying to fade in or out a music track and it just doesn’t sound right.
Time after time I have tried to fade out a song only to find – however quiet the volume may have faded to – that the start of the next verse of the song or just the beat of the song ends up propelling the music forward just when you want it to fade into the past.
Final Cut Pro has a handy solution to this problem, and it is remarkably easy to use.
If you want to change the shape of a fade curve, simply hold CTRL and click on a fade handle. You will see a menu that looks like the screenshot below.
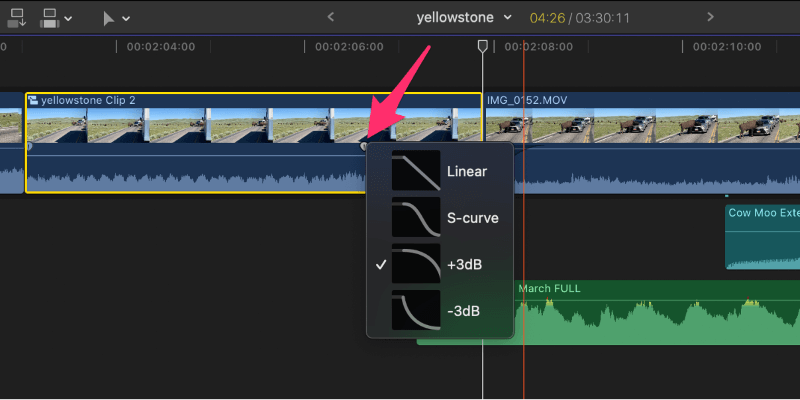
Notice the checkmark next to the third curve in the menu. This is the default shape that is applied whether you drag a fade handle manually or Apply Fades through the Modify menu.
But all you have to do is click on another shape in the menu and voila – your sound will rise or fall in line with that shape.
In case you are wondering, the S-curve often works best for music fades because most of the volume drop is in the middle of the curve: The fade eases in, accelerates rapidly, then eases out again at a very low volume. Or if you are fading dialogue in and out as two people are talking, try the Linear curve.
Final (Fading) Thoughts
The more video editing I do the more I learn how important sound is to the experience of watching a movie. Just like abrupt video transitions can be jarring and take the viewer out of the story, being thoughtful about the way sounds come and go in your movie can really help the experience of watching it.
I encourage you to play around with applying audio fades automatically through the Modify menu and manually dragging around the Fade Handles and trying different fade curves.
Everything you need to have good sound is available in Final Cut Pro and I hope this tutorial helps you make your movies sound better.