
I’ve been using Google Drive to create and manage almost all of my projects, including my writings at SoftwareHow.
One problem (more like a hassle) I’ve faced with Google Slides, a sub-product of Google Drive, is how to save an image or several images inside the presentation slides — especially when those images look really good or contain valuable information.
Unfortunately, Google Slides does NOT allow you to directly download images or extract them to a local folder on your desktop. It just reminds me of the old days back when I used Microsoft Office PowerPoint, which also makes it hard to export pictures.
However, there’s a quick way to get around that and save the images to your desktop. You do NOT have to download or install any third-party extensions or plugins.
Table of Contents
Saving Images from Google Slides: Step by Step
Here’s how to do it:
Please note that the screenshots below are taken from my MacBook Pro. If you’re on a Windows PC, they will look slightly different. But the steps should be quite similar. Also, I created this simple presentation in Google Slides to make the tutorial easier to follow. My goal is to save this awesome photo to my computer desktop.
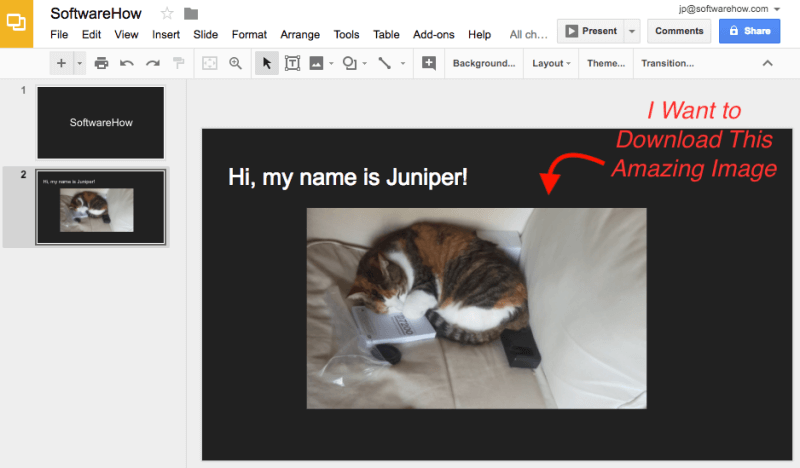
P.S. I hope Thomas (my teammate here at SoftwareHow) won’t mind me using this photo. He recently bought a new camera, and it seems his cat Juniper is also excited…seriously, she is reading the user manual! :=)
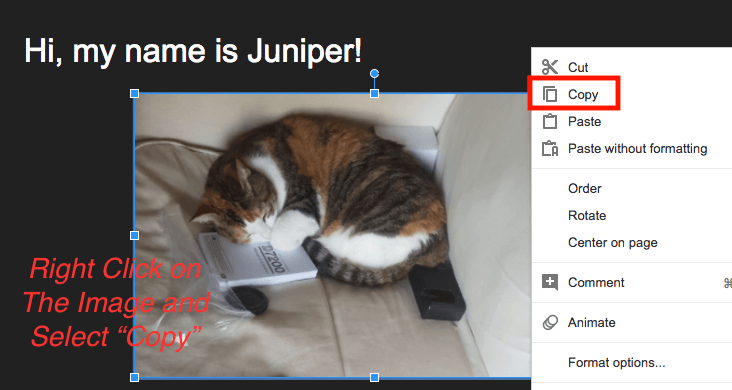
Step 1: Move your cursor and select the image, then right-click and select “Copy”.
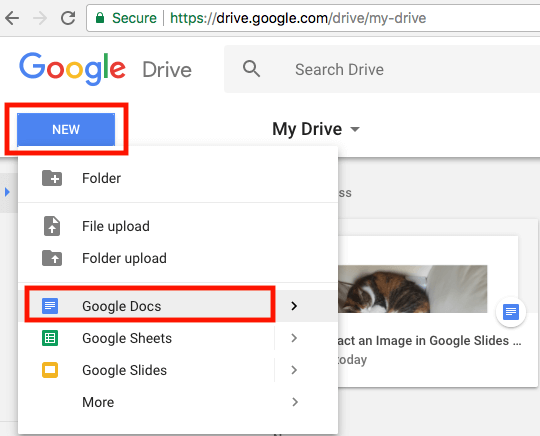
Step 2: Open the main Google Drive page, hit the blue “NEW” button on the top-left, then select “Google Docs”. It’ll create a new Google doc.
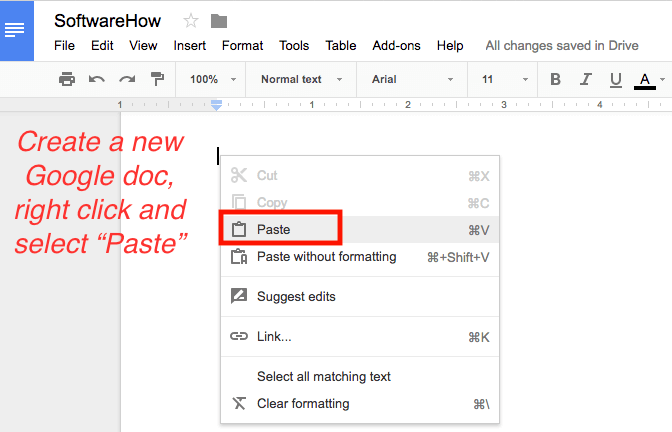
Step 3: In the newly created doc, right-click and select “Paste” in order to save the image you just copied from the Google presentation.
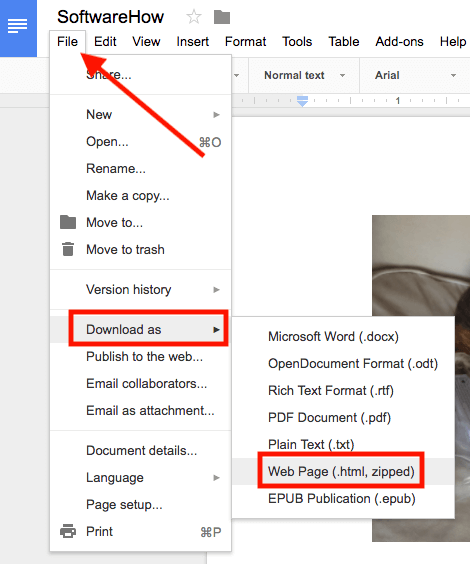
Step 4: In the Google doc, click the menu and select File > Download as > Web Page (.html, zipped).
Step 5: Wait until the zipped file completes downloading, then click to open the file.
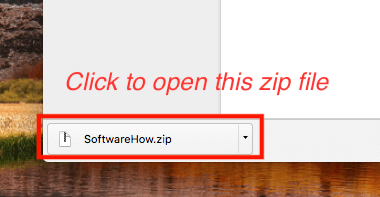
Note: On macOS, the .zip file can be opened automatically. I’m not sure if it’s the case on Windows 10.
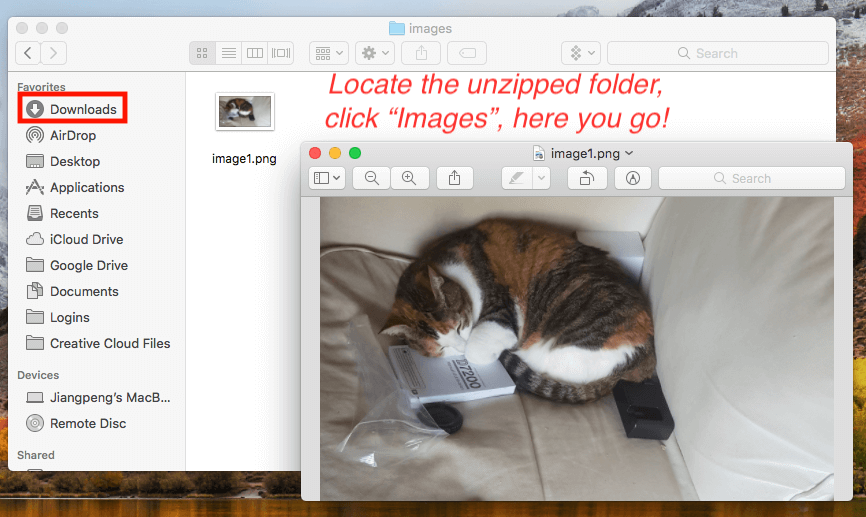
Step 6: Go to Downloads, unzip the archive, locate the folder called “images”, open it and you’ll see all your images. Now I can add this photo of Juniper to my Photos app.
This is by far the quickest and most effective way I’ve discovered to save an image from Google Slides. Plus, you can extract multiple images and download them in one zip file, which saves time. Another reason I like this method is that the image quality is exactly the same as the original file — same size, same dimension. I use the same technique to extract images from Google Docs as well.
Any Other Methods?
Yes — but personally I feel they are less efficient than the one shared above. In case you’re interested, you may also choose one of the techniques below.
Update: Don’t forget to check out the Comments area, several readers also shared some techniques that work.
Option 1: Take a screenshot of the image
This method may look like a no-brainer, but sometimes we geeks tend to think too deeply and ignore the easiest solution.
If you’re like me and use a Mac, first click the “Present” button to enlarge the slide, then press Shift + Command + 4 to screenshot the part that your desired image takes. It’ll then be automatically saved to the Mac desktop.
If you are on a Windows PC, you can use the print screen option (Ctrl + PrtScr), or use an open-source screenshot program called Greenshot. I won’t provide too many details here as the process is quite easy.
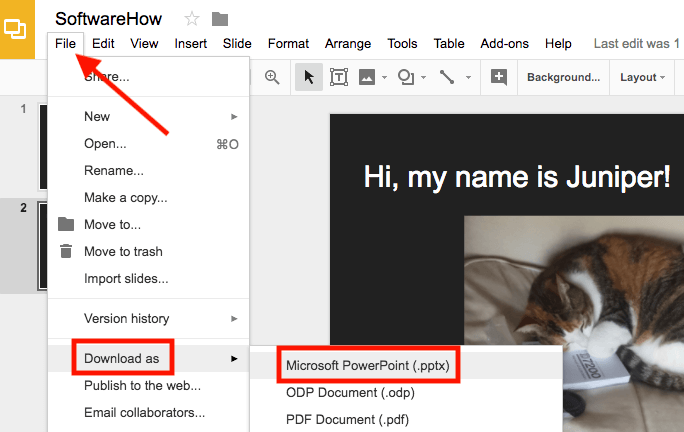
Option 2: Convert the Google presentation into Microsoft PowerPoint
Then extract the media files. This is also pretty straightforward. On the Google Slides menu, click on File > Download as > Microsoft PowerPoint (.pptx).
Once your file is downloaded, you can then refer to this Microsoft guide to get the pictures you want from the PowerPoint.
Final Words
Although our site, SoftwareHow, is supposed to introduce good software to help our readers solve computer-related problems, it’s not necessary when it comes to addressing a small issue like extracting images from Google Slides.
So, what do you think about the preferred method I just showed to you? Are you able to get your images out of a Google Slides presentation? Or did you happen to find out a better trick to get the job done? Let me know.
Thank you, saved my day.
Saving as an ODP would be another way to get the zip file with images, but there is a bug with Google Slides that doesn’t let you download a large file in this format.. Too bad since this would be really helpful as I don’t have powerpoint.
I always right click and “Save to Keep” this opens up a side bar with the image. From there you can save the image. Much faster than the solutions mentioned here.
when you use save to keep, it seems to save a lower resolution image for me
This is a really efficient solution. No involvement of third party softwares or extensions is a bonus point. Thanks for sharing this.
I found a much simpler and faster way
1. Right click on the image in Google Slides, and click ‘Save to Keep’
2. Open the note in Google Keep.
3. Right click on the image in Google Keep and click ‘Save Image As…’. Done!
Digging an image out of Google Slides in dev tools is too much for me — a gajillion divs and iframes and js gunk… “Publish to the web” gives you a slim HTML page that is easy to pull images out of with dev tools.
Wonderful idea. Thank you so much!
Now you can right click -> Add to Keep -> Click on it in Keep to open the image -> Drag to Desktop
Extremely helpful. Thank you!
Thank you man. This was super helpful and probably saved me about 1 hour.
A great help, thank you!
Thank you, JP Zhang!!! It worked like a charm!
Its a very good workaround!
Thank you thank you thank you! Annoying workaround, but at least i don’t have to dig through 20 folders of photos to get these again. Really appreciate it!
If you are a bit tech savvy you can use the developer tools from your browser to get to the url of the image.
Cheers
You are a life saver! Thank you so much for sharing this!
Another quick way is to download as *.pptx, rename as *.zip, and then look in the media folder. 🙂
Great, thanks for sharing!
Inspired by your suggestions, I found another way that first download the google slides as a pptx file, open it with MS office and there will be an option “save as Picture” for each image.
Nice!
Thanks! You made my day.
Worked a treat. Thank you!!!
Many thanks!
that works great thank you!
only when I put the picture into a shape and copy/paste to goolge docs it just copy the picture without taking over the shape. I know I can crop into shape in google docs but it loses on quality and the picture is blurry.
Thanks for your help on this. What a hassle hey! Managed to follow your process. All the best
it works only simple images not in the case of flowchart image. it only copied line not all content and background-color
Awesome! Saved me so much time at the office today in trying to figure this out on my own. Super grateful!
works like magic! TYSM
The MOST EASIEST solution to download google slide images in 2019 is by right click on the image, and select “Save to Keep”. It will open Google Keep sidebar. You can then right-click on that image in Google Keep, and download the image normally, like the way you want it to be. You can then delete the image from Keep if you don’t want it.
Thanks man, really saved me a lot of my time ! 😀
It’s really helpful
saved me on a work night, thanks!
Such a neat trick thank you! I accidentally didn’t save my animated gifs once they were in a slideshow. This is heaps quicker than making them again!
This is awesome, you saved my bacon! Thank you!
This was super helpful and easy. Thanks so much!
Thank you so much! This was such a quick solution and I wouldn’t have figured it out on my own.
This is extremely complicated. Try using dev tools to inspect the element. Find the url, something like https://lh4.googleusercontent.com/ with a long set of characters after.
open the url in a new tab. Right click and save as.
Still hope there must be some simpler solution..:) but here’s similar option:
1) copy the image
2) paste to new email (gmail), than send it to yourself
3) open the “incoming” email and click on download arrow in the corner of the image
(benefit: a bit faster & you don’t need to delete redundant Google Doc file after the process…)
Thank you so much!!! That is priceless advice!
You’re welcome! Glad you found this little guide helpful.
Copy it, go to New, make a Google Drawing, paste the image, and then Download As a .jpeg or a .png
Hi! I have an easier way…..or at least I think it’s easier. 🙂
Copy the image and paste into Google Draw. Make sure the image is the same size as the canvas, then download as an image file. I use PNG format. I find this gives better quality images than screen shots.
Thank you so so so much!
What about if you need to group 2 images in the slide, and save the grouping as one image?
Worked great on a Chromebook. Thanks!!!
So hard. Use Inspector mode in Chrome )))
Wow this worked so easily! Thanks a ton for solving a long-lived problem!
There’s a much quicker way. Just insect the element…
In Chrome press Shift Ctrl I, then go to the Application tab, scroll down to frames then images. All the images on the page are there waiting to be downloaded.
Thanks, incredibly helpful!
Alternative 1 (taking a screenshot of your picture) won’t give you the original quality of the image, so I like the primary option better.
Hey bud theres a way way easier way to do this. Right click the image you want to save on google sides, select, Save to Keep at the bottom, this opens the “Keep” on the right side. You will see your image, right click on image and save image as..
THANK YOU!!
Hi JP, I found an easier way to do this: Ctrl right click on the image in Slides, “Save to Keep”, ctrl right click on the image in Keep, “Save image as”
Or more-quickly, in Chrome, you can right click somewhere in the white space above the presentation and click “inspect”.
Developer Tools should open up, click on “Elements” (heading at the top of the panel)
Now click on the left-most icon that looks like a rectangle with a cursor pointing to it.
Now point to your image and click on it.
In the “Elements” sidebar you’ll see an element highlighted with “href=” something.
That something is the URL directly to your image. Copy and paste it into a new tab.
Now right-click and save.
Btw. if you have Microsoft Word on your machine, there is an easier way. Copy the image to your clipboard (Step 1) and paste it onto a Microsoft Word document. Right click on the image and select “Save as Picture” option and viola.
You don’t need to copy the image and switch to Google Docs. Just download Slides as ODP Document (File – Download As – ODP Document) and open the downloaded file with 7zip. You can see Images folder in the zip editor and all the images in the Slides will be there.
Thank you—this is exactly what I needed. You just saved me a ton of time!
Is there a solution that works for saving embedded videos, or only images?
very helpful information. thanks for sharing.
Hey JP, I think we can use google developer tool for inspecting and download any image on google slides.
I actually had to download as a PDF instead of a webpage and since I have Acrobat Pro I was able to grab the image that way. For some reason when I download as a webpage I still got a blank page and no images folder. I don’t know why? Thank you for the help though! Great to have people out there that help out with stuff like this!
This was very helpful, thank you.
You can also copy the image and paste it into a gmail message. Might work with other mail services, but I’ve only used it with gmail. Then send the email to yourself and download from your inbox.
Um… yes, thats great, but i don’t want to download a picture from google slides, i want to turn a slide into a picture
Such a good hack thank you so much extremely helpful will always refer to this
This worked! Thanks so much
You’re welcome Gaby.