
If you are a frequent email user, you have probably seen mail from co-workers, colleagues, friends, or family that has a signature at the end. It might give their name, phone number, job title, and other pertinent information. A signature can make an email look extremely professional.
While most electronic communications are now in the form of instant messaging, text messaging, video chat, or social media, email is still widely used in the business world. Because of this, it’s critical to have a professional-looking mark that stands out and lets others know who they are communicating with.

Are you an Outlook user? Creating an email signature in Microsoft Outlook is rather simple; it can be done in just a few minutes.
If you already have one, and you’ve forgotten how to change it, we’ll show you how. Let’s look at how to add or modify your email signature. After that, we’ve included some notes on how to make it look professional.
Table of Contents
Add a Signature in Microsoft Outlook
Adding a signature in Outlook is a fairly straightforward process. We’ll be doing this in the web version of Outlook, but it can also be done using nearly identical steps within the Outlook app. The screenshots in this article are from the web version of Outlook.
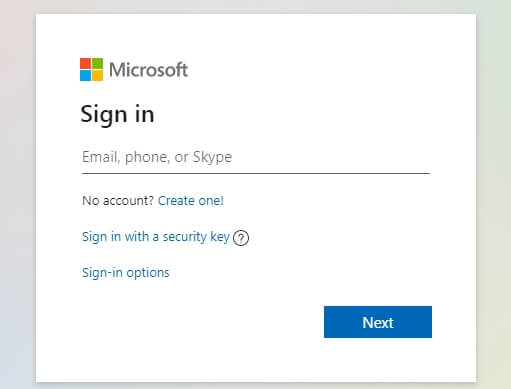
Step 1: Log in to Microsoft Outlook
Sign in to Microsoft Outlook.
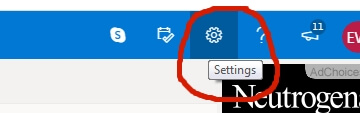
Step 2: Open the Outlook Settings
Open your account settings. Do this by clicking on the settings icon in the upper-right corner of your browser.
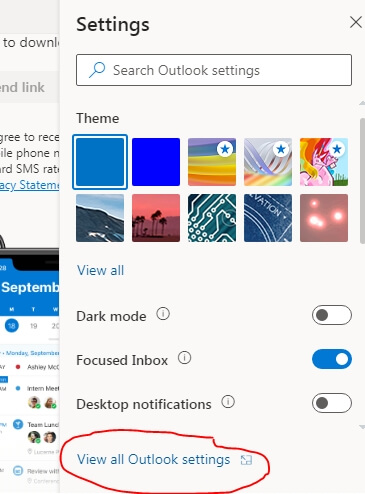
Step 3: Click on “View all Outlook Settings”
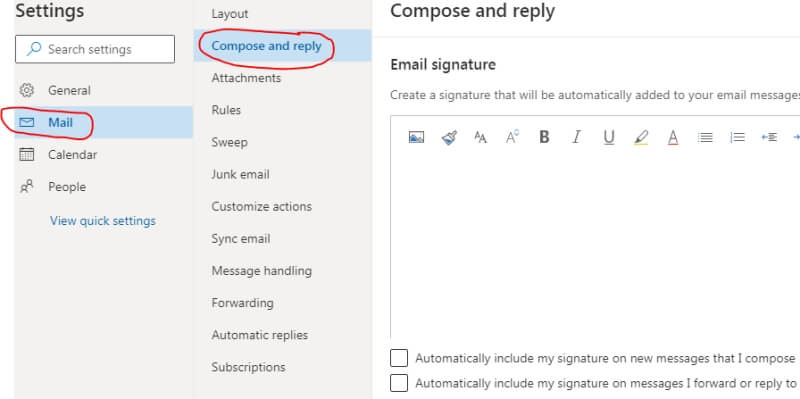
Step 4: Click on Mail – Compose and Reply
On the settings menu, click on “Mail” and then “Compose and reply.” At the top of the window on the right side of the screen, you should immediately see the “Email signature” section.
Step 5: Add Your Signature Information
Add all of the things that you want to show up in your signature. See the section below on how to make sure that yours looks professional.
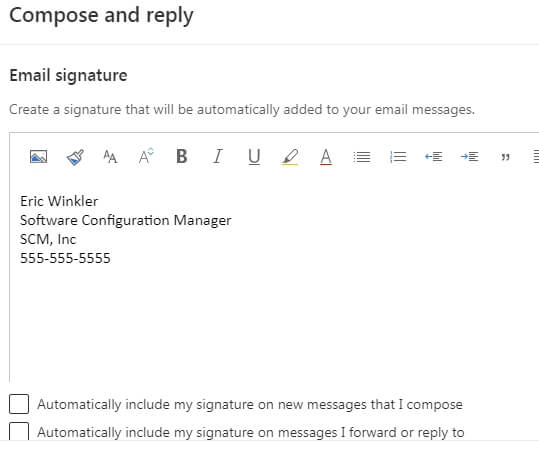
You can change fonts and use other standard text formatting options. It’s also possible to add images if you would like.
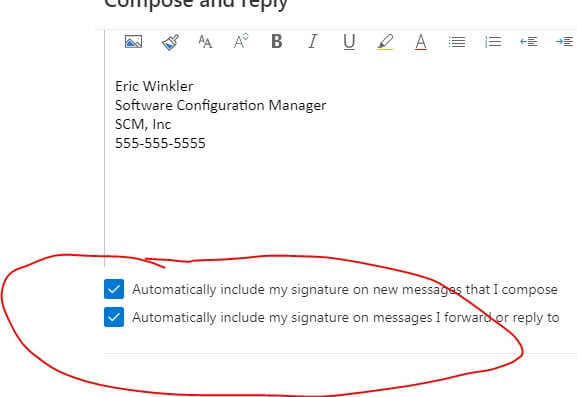
Step 6: Select Options
Select options to determine when the signature should be used. It can be included in new messages and messages that you reply to or forward.
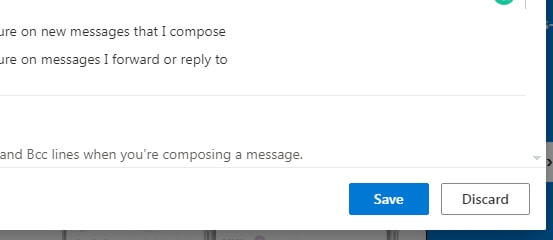
Step 7: Save Your Changes
Don’t forget to click the “Save” button in the lower right corner. Once you save, you’re done; you should have a nice professional-looking signature on your emails.
Update Your Microsoft Outlook Signature
If you’re not happy with the way your new signature looks, no worries. It’s easy to edit it. It’s also common to need to make changes when contact information changes, you receive a new job title, or you just want to brush it up a little.
To update it, just follow the same steps that were used to create the new one. When you get to the signature section of the settings (step 4), click on the text window on the right side, then edit the text box to look the way you would like. It’s that simple. Don’t forget to save your settings.
How to Make Your Outlook Signature Look Professional
There are numerous ways to ensure your email signature looks professional. Your top priorities: include your full name followed by your job or position, then contact information. The following are items that will add the most value.
1. Name
You may want to use your formal name. Leave out any nicknames or shortened names unless you have a more casual work environment or clients.
2. Title
This can be critical, especially for those who may not know you well or have not worked with you in the past.
3. Company Name
If you work for a company, recipients need to know its name. If you don’t work for a company, you might put something like “Independent Contractor” or “Freelance Developer.” You may also leave this part out if you are not representing a company.
When adding company information, you may consider adding your company logo. Check with your company first to see if they have specific things that they would like you to include.
4. Certifications
You might also list any certifications that you or your company have. Certifications may come with a logo or symbol that can be added as well.
5. Contact Information
This may be the most important part. Provide alternative ways for someone to get in contact with you. Add your phone number, your business website, or any other methods you may have. You may also include your email address even though it will already be in the message on the “From” section. It doesn’t hurt to have it there where someone can easily see it and access it.
Consider linking to any professional social media accounts such as LinkedIn or others that represent your business.
7. Photo
A photo of yourself is optional, but it is nice for people to see who they are communicating with. If your company culture is formal, make sure to use a professional-looking photo.
What You Shouldn’t Include in Your Outlook Signature
As you can see, the signature section will allow you to add an abundance of text or pictures, but there’s nothing wrong with keeping it simple. The goal is to provide data that adds the most value to your messages.
Don’t overdo it. If you add too much, it may look cluttered. Information overload may cause the recipient to just ignore it, especially if they are in a rush.
You will often see people include some type of quote or saying in their email signature. I recommend against this unless it’s a motto or slogan of your company. Quotes can often be opinionated, political, or controversial; you may risk offending someone. If your desire is to be professional, quotes are something that you should avoid.
One last thing to think about: avoid making your signature too distracting. You want it to be noticed, but you also don’t want it to be so eye-catching that it takes away from your message.
The signature should tell people who you are, what you do, who you work for, how to contact you, and possibly why they can trust you.
Why You Need an Email Signature for Outlook
There are some other good reasons to have a preformatted moniker. While they may seem simple, don’t underestimate their importance.
As we’ve already seen, an email signature makes your messages look more professional. A signature can save valuable time.
While it may not seem like much, sending out multiple emails and constantly adding your name and other details can take away from other tasks. With a pre-created default, there’s one less thing you have to do for each message.
A signature also ensures that your name and other details are always included in each email. You won’t forget to add your all-important contact information. A standard signature keeps your contact info constant so that you know you are sending the exact same thing to each recipient.
There’s one last reason: the recipient will know who they are receiving the message from. Email addresses are often jumbled parts of our names combined with numbers or other letters.
As a result, the person receiving the message may not know your full name. A formal signature ensures that the recipient knows who you are.
Final Words
Your Outlook email signature is a vital part of your communications. It provides information about you and gives your readers alternate ways to contact you. It saves time when typing and sending emails since you will not have to continually fill in repetitive text.
Once you’ve set up your Outlook signature, be sure to review it frequently and make sure that you keep it up to date if anything changes.
Hopefully, this article has helped you set up your professional email signature in Outlook. Please feel free to reach out to us with any questions or comments.