
Every photographer has their own style. For some, it is honed and consistent whereas others, particularly newer photographers, jump around a little. If you’ve ever wondered how to get your style to be a little more consistent, I’m about to let you in on a secret – presets!
Hello, I’m Cara! It took me a few years to develop my style as a photographer. After a bit of trial and error, as well as playing with (and learning from) other people’s presets, I figured out my own photography style.
Now, I maintain that style by using presets that I’ve created. These settings give my images that crisp, boldly colorful look that I love so much. How can you create your own Lightroom presets? Come along and I’ll show you. It’s super easy!
Note: the screenshots below are taken from the Windows version of Lightroom Classic. If you are using the Mac version, they will look slightly different.
Table of Contents
Lightroom Preset Settings
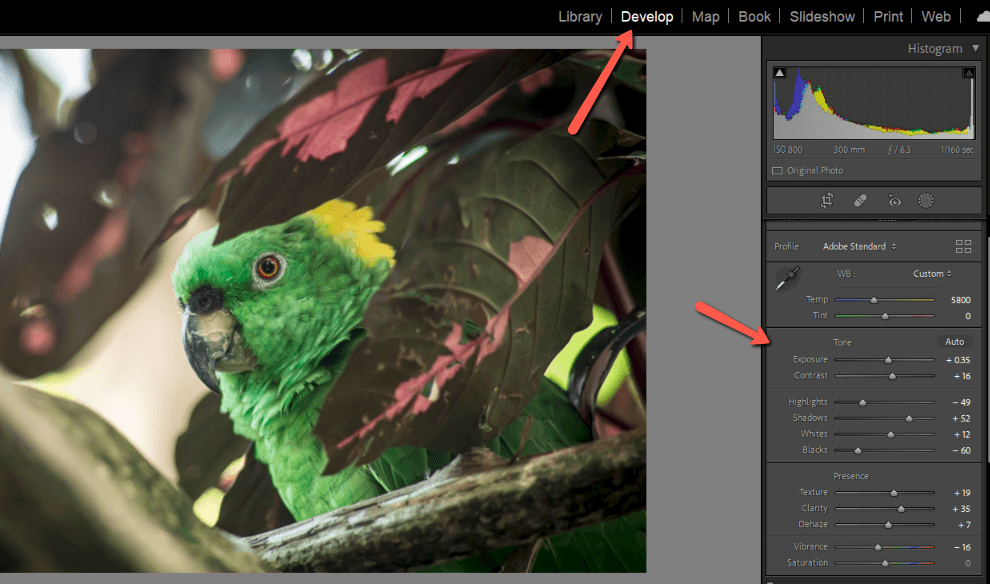
Go to the Develop module in Lightroom and make the desired edits to your image.
You can start from scratch with your own edit from the ground up. Or you can start with a preset you bought or downloaded for free. That’s how I got many of my presets, by adjusting other people’s presets until they gave me the look I wanted.
Pro Tip: studying other people’s presets is also a great way to understand how the different editing elements work together.
Creating & Saving Your Preset
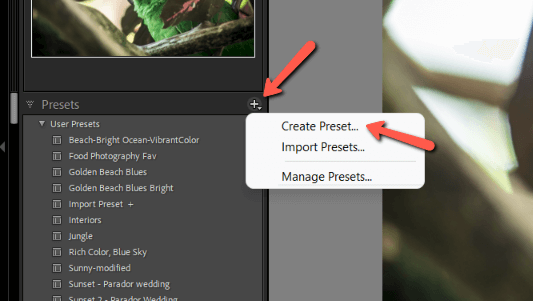
Once you’ve got your settings selected, go to the left side of the screen where you’ll see the Presets panel.
Step 1: Click the Plus sign on the top right side of the panel. Choose Create Preset.
A big panel will open.
Step 2: Name your preset something that makes sense to you in the box at the top. In the dropdown menu underneath this box, choose the preset group where you would like your preset to go.
Choose which settings you want the preset to apply. For example, I don’t want the same Masks or Transformation settings to be applied to every image on which I use this preset. So I’ll leave those boxes unchecked. The checked settings will be applied to each image when you apply the preset.
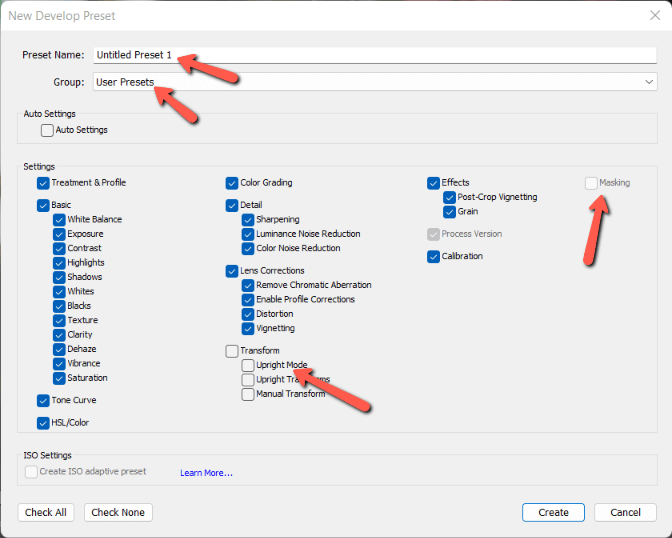
Step 3: Click Create when finished.
That’s it! Your preset will now appear in the Presets panel in the preset group that you chose. With one click you can apply all your favorite settings to one or multiple images!
FAQs
Here are some questions related to Lightroom presets that you might want to know.
Are Lightroom Presets free?
Yes and no. Adobe offers a collection of free presets and an internet search for free presets will return plenty of results. There is definitely a plethora of new photographers to play with.
However, free collections of Lightroom presets are often offered as an incentive to sign up for a program or to test out a few presets from a seller’s collection. Access to the full collection (or more sets of presets) requires payment.
How to make a good preset?
An excellent way to understand how Lightroom’s features interact with one another is to study other people’s presets. Download free presets or purchase your favorites. In Lightroom, you can examine the settings and play with changing them to see how they impact the image.
Over time, you will develop tweaks that suit your style of photography. Save those as your own presets and soon you will have a collection of custom presets that will bring consistency to your work.
Do professional photographers use presets?
Yes! Presets are an excellent tool to have in your photography arsenal. Most professional photographers make use of them to speed up their workflow and keep a consistent look to their images.
Though some people might assume that using presets is “cheating” or “copying” someone else’s work, this isn’t the case. Presets will not look exactly the same on every image, it depends on the lighting situation and other factors.
Furthermore, presets will almost always need slight tweaks to work for an individual image. It’s better to think of presets as a starting point that applies all the basic edits in one click that you would otherwise have to apply manually to all your images.