
Whether you’re a photographer or take beautiful pictures in your spare time, there’s a good chance you’ll need to convert RAW images to JPEG images from time to time.
To convert RAW images to JPEG on your Mac, you can use “Covert Image,” Preview, the Sips commands in Terminal, Lightroom, Photoshop, or another file convertor.
I’m Jon, a Mac expert, and amateur photographer. I often convert RAW images to JPEG images on my MacBook Pro, and I put together this guide to show you how.
Luckily, converting RAW images to JPEG is a quick and easy process, so continue reading to learn how to use each option!
Table of Contents
Option #1: Use Convert Image
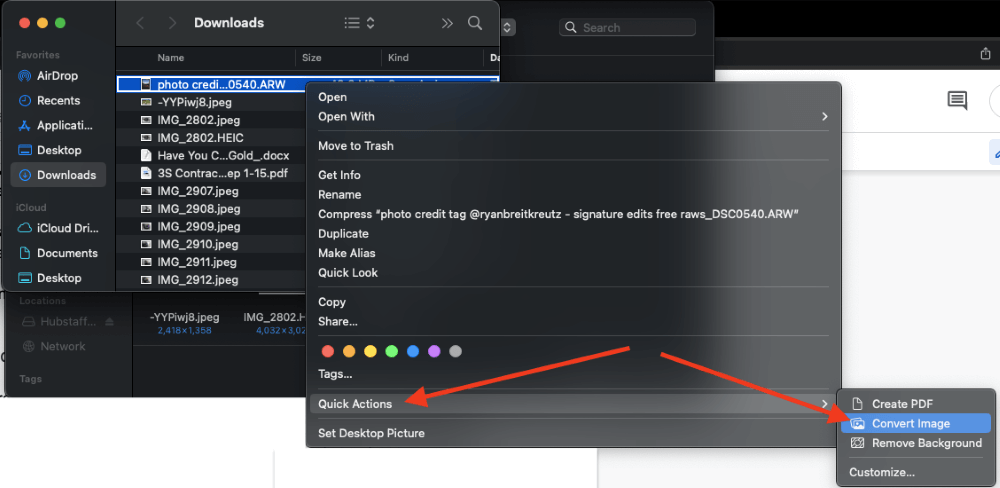
The quickest way to convert a RAW image is to locate it in Finder, right-click it, select Quick Actions, and click on Convert Image.
Then, simply select JPEG from the Format field, choose the image size you want, and click on Convert to JPEG.
You can select multiple images at once by holding the Command key and clicking once on each image. Then, right-click once on the selected items and follow the same steps above.
Option #2: Use Preview
Preview, Apple’s official tool for viewing photos and pdf files, is another way you can easily convert RAW images to JPEG on Mac.
To use Preview, follow these steps:
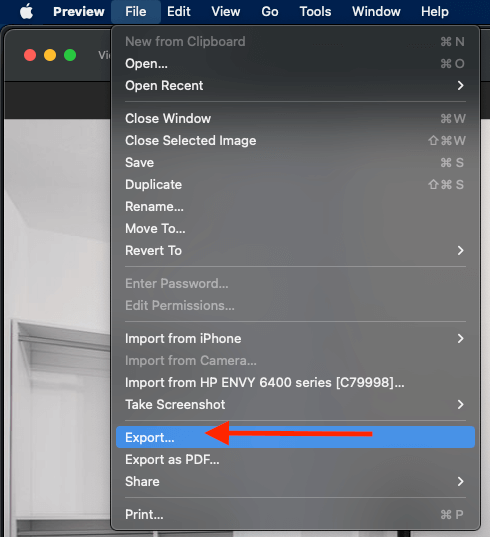
Step 1: Open the photo in Preview. Click on the File button in the top left corner to open the file menu, then select Export. If you’re working with multiple images, click Export Selected Images.
Step 2: In the menu that appears, select the JPEG from the Format options.
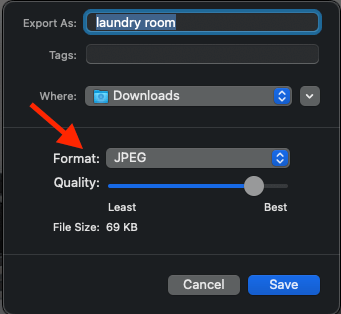
Step 3: Create a name for the image and assign which folder you want to save the photo in. Once you’re done, click Save.
Option #3: Use Sips in macOS Terminal
Terminal is a handy and versatile app available to Mac users, as it provides various purposes, including photo format conversion. You can use Terminal to convert one or more photos easily using “sips” in macOS Terminal. Follow these steps:
Step 1: Start by copying the photos you’re converting and paste them into a folder.
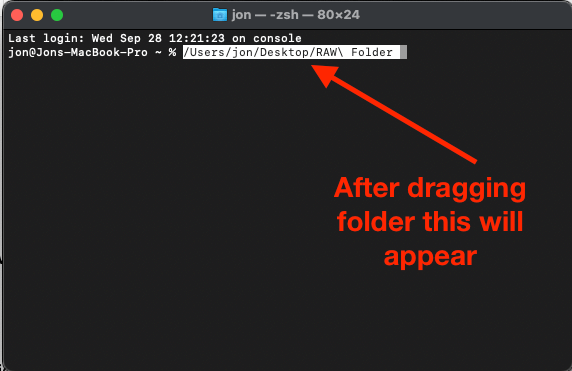
Step 2: Open Terminal, then drag that folder into the Terminal app.
Step 3: Then copy and paste this code in the Terminal app and hit Return on your keyboard:
for i in *.RAW; do sips -s format jpeg $i –out “${i%.*}.jpg”; done
You can easily convert photos to any format within Terminal by trading the “jpeg” part of the code for another image format.
Option #4: Use Lightroom
If you have Lightroom on your Mac, use it to convert your photos to the correct format. The process is simple:
- Open the photo in Lightroom by selecting File > Import Photos and Video. The import window will appear, allowing you to choose the image you want to import.
- Check the box in the top left of each photo to select it for import. To select multiple images, use Command + click or Shift + click to select the first and last in a sequence to select numerous consecutive photos.
- Click “Import” once you select your photos.
- If you want to complete editing, now is the time to do it. If not, continue to the next step.
- Select the photos in Lightroom you want to export and convert in the Filmstrip or Library.
- After selecting the files, click “File” in the top left corner and “Export” at the bottom of the drop-down menu.
- In the pop-up window, adjust the export settings for your photo as necessary (export location, name, quality settings).
- In the “File Settings” tab, select JPEG (next to “Image Format”).
- Click “Export,” and your photos will export to the destination of your choosing as JPEG files.
Option #5: Use Photoshop
If you don’t have Lightroom or prefer to use Photoshop, you can always convert your photos in Photoshop. The process is similar to Lightroom photo format conversions but gives users in-depth capabilities beyond basic photo editing.
Follow these steps:
- In Photoshop, you need to import the photo. In the top left corner of the screen, click “File,” then “Open” to select the file you want to import.
- The Camera RAW window will automatically pop up, allowing you to edit photos as necessary. If you’re not editing, click “Open” to open the photo in Photoshop.
- Once your image opens in Photoshop, click “File” in the top left corner of the screen.
- In the drop-down menu, select “Export,” then “Export As.”
- In the window that pops up, switch to the “File Settings” section, then click on the drop-down menu next to “Format” and select JPG.
- Adjust the file location, image quality, and other settings as necessary, then click “Export.” This will send your photo to its destination as a JPEG file.
Option #6: Use a File Converter
If you don’t have Lightroom or Photoshop downloaded on your Mac. These sites are helpful when you simply want to convert the photo and bypass editing altogether.
You can use Cloud Convert, I Love IMG, or other similar options.
FAQs
Here are the most common questions about converting RAW image files to JPEG on Mac.
Can I Speed up The Conversion Process from RAW to JPEG?
If you’re a photographer, you’ll probably regularly convert hundreds of photos from RAW to JPEG format. So, you might want to speed up the process. If you use Lightroom, you can use an export preset to simplify the process.
Simply set the file format to JPEG, the quality slider to 100, and a designated location for future exports. Click “Add” in the Preset panel to create an export preset. In the future, click on the preset to easily convert RAW to JPEG in the future.
Does Converting RAW to JPEG Lose Quality?
Yes, converting your photos from RAW files to JPEG files will affect the quality. RAW files are larger as they contain intricate detail, and when you compress the file to JPEG, you lose some of these details in the much smaller file size.
Is It Better to Edit RAW or JPEG?
Generally, editing your photos in RAW format will give you more options to correct exposure issues. Once you move to JPEG format, there’s a white balance applied and fewer options for modification.
Conclusion
Editing RAW images can be time-consuming for photographers, but converting the file to JPEG format doesn’t have to be. Whether you use Mac’s quick “Convert Image” feature, Preview, Terminal, Lightroom, Photoshop, or other convertor programs, the process is quick and easy.
What’s your go-to method for converting RAW images to JPEG on your Mac?