
Lookup Tables (LUTs) are a lot like the filters you may have applied to a photo on your phone, LUTs can change the mood of a clip of video, or a whole film, just by slanting the color, contrast, or brightness of your final look.
Unsurprisingly, color “correction” and color “grading” is the full-time occupation of an increasing number of specialist film editors. And while a LUT will never replace the expertise of these folks, they are an incredibly quick way to flip the look of a scene, and can often be – without any tweaking – just what you hoped for.
Over the decade I’ve been making movies, I’ve come to rely on LUTs to help (quickly) create a visual cohesion in what always seems to be a pile of shots taken with different cameras, different filters, or just over different days (when the light will be subtly different).
But ultimately, a LUT can change the overall look of your film so much that it is worth taking a few minutes to get comfortable trying them.
Key Takeaways
- You can add a LUT by applying the Custom LUT Effect to a clip.
- Then, in the Inspector, select which LUT you want to apply.
- You can adjust the Mix between the original clip and the LUT in the Inspector.
How to Install (and Use) a LUT in Final Cut Pro
First, on the assumption you – dear reader – do not have any LUTs installed on your computer, you will need to download some. There are hundreds of LUTs available across the internet, some free and many quite expensive.
If you want some free ones just to get yourself started, try here, where you will find the LUTs I have used in the examples below.
But, when you download the files, remember where you put them! We will need to access them in the final steps of installation.
That done, the steps to install your new LUTs are quite simple:
Step 1: Select the clip or clips in your Timeline that you want the LUT to affect.
Step 2: Reveal Final Cut Pro’s Effects Browser, by clicking the icon at the top right of your Timeline (shown by the red arrow in the screenshot below).
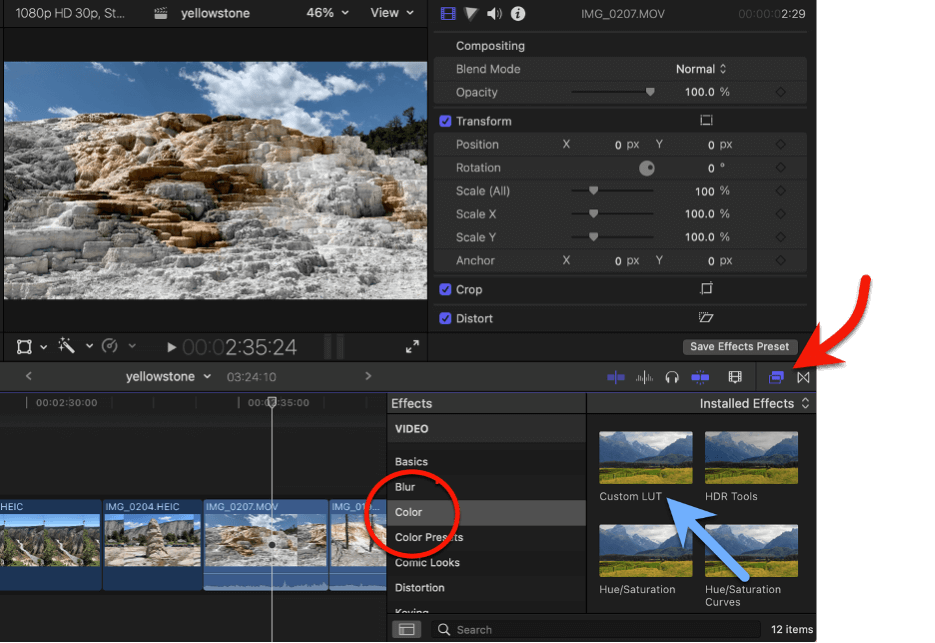
Step 3: Select Color in the Effects category (in the red circle in the screenshot above)
Step 4: Click on the “Custom LUT” Effect (blue arrow in the screenshot above) and drag it onto the clip you want your LUT to apply to.
The preceding steps let Final Cut Pro know that you wanted to apply a LUT to the selected clips. Now, we will choose which LUT and, finally, make any tweaks to how the LUT looks.
Step 5: Make sure the clip(s) that you want to apply the LUT to is still selected in your timeline, and turn your attention up to the Inspector. (If it is not open, press the Inspector toggle button shown by the red arrow in the screenshot below)
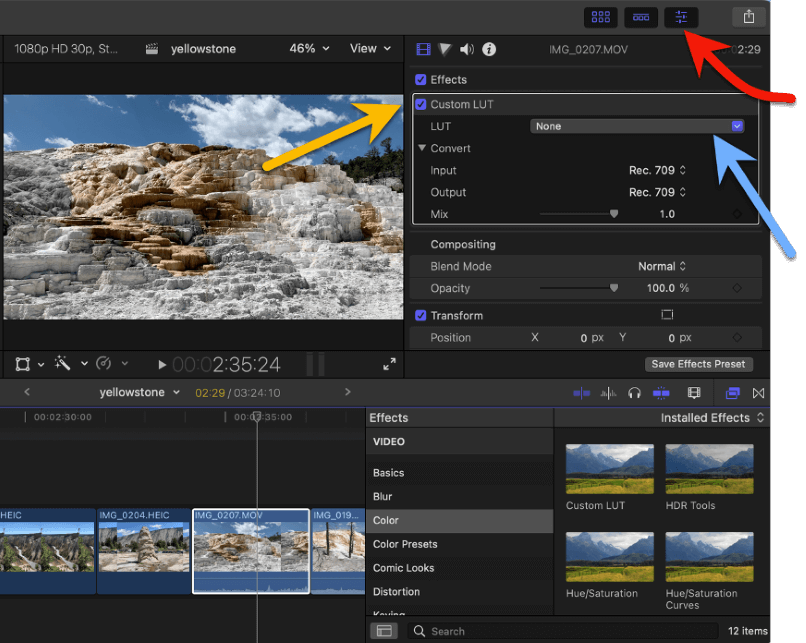
Step 6: You should see the “Custom LUT” Effect you selected earlier (shown by the yellow arrow in the screenshot above). The next line allows you to choose your LUT by clicking on the dropdown menu (shown by the blue arrow in the screenshot above).
Step 7: Your list of available LUTs will not look like the screenshot below because we will have different LUTs installed, but in my example, I have selected a folder of LUTs called “35 Free LUTs” (which was downloaded from the link at the start of this section).
However, you should have the option to choose a recently used LUT or import one (shown by the green arrow in the screenshot).
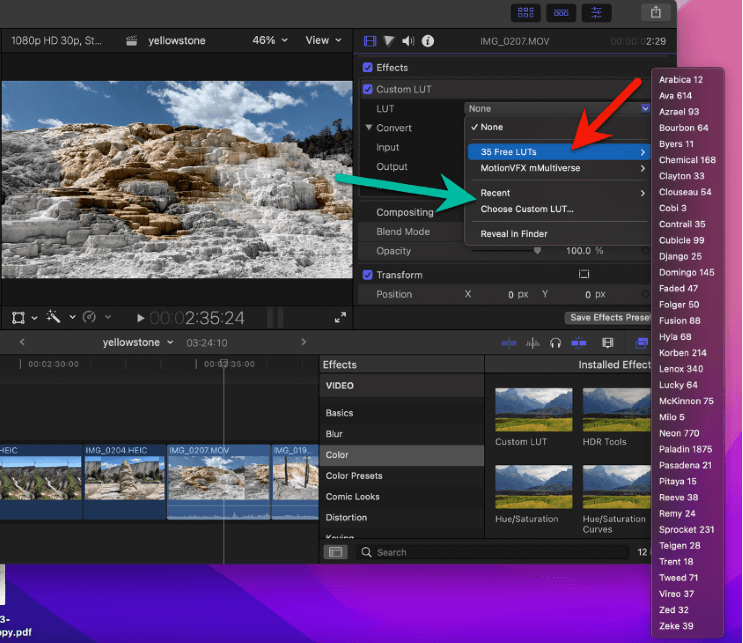
Step 8: Click “Choose Custom LUT” (near the green arrow in the screenshot above). A Finder window will open, allowing you to open the LUT file wherever you have stored it.
Step 9: Click on the file(s) you want to import and click “open”.
Note that you can import LUT files that have a .cube or a .mga extension, and can select multiple files. And, you can just select a folder of LUT files and Final Cut Pro will import them all as a folder much like my “35 Free LUTs” example above.
And.. you did it!
If you selected just one LUT, it will be applied to your clip automatically. If you selected multiple files or a folder of LUTs, you will need to choose which LUT you want to apply by clicking on the LUT dropdown menu again (Step 6).
But the LUTs you’ve added through the above steps are now installed. You can apply them to any future clips or projects just by following steps 1-7 above, and instead of clicking on “Choose Custom LUT” (Step 8), you can just click on the LUT, or the folder of LUTs you want.
One last thing: There is only one setting for LUTs, and that is their Mix. The setting can be found in the Inspector.
When you click on a clip that has a LUT, opening the contents of the Inspector should look similar to the screenshot below (obviously, the LUT chosen will be different than mine)
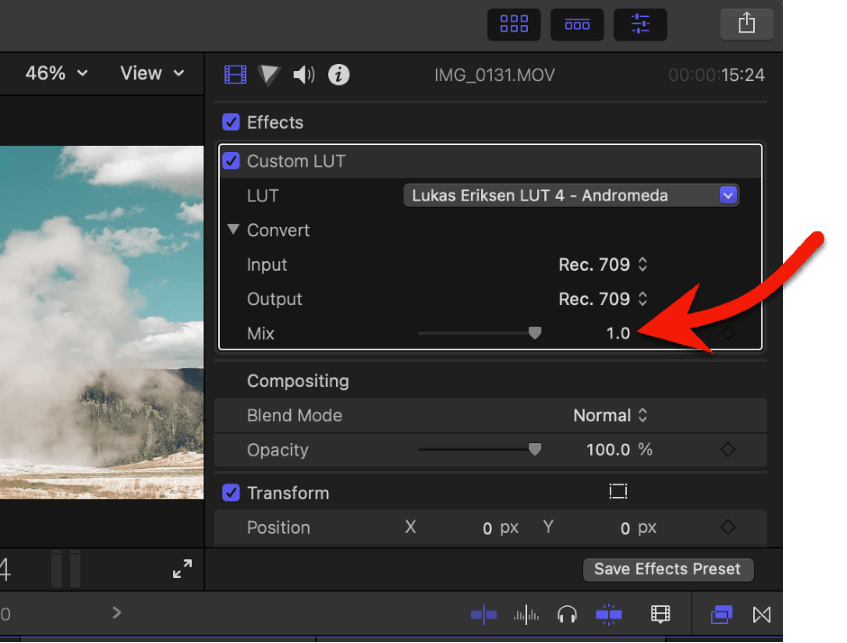
The two options under “Convert” – the Input and Output settings – are best left unchanged. While changing them will change the look of your image, it will seem a bit random and probably won’t be very helpful. They have a (highly technical) purpose, but for most of the LUTs that you will download and import, these settings will be irrelevant.
However, the Mix setting (shown by the red arrow in the screenshot above) can be very helpful. It is a simple slider setting that will apply your LUT on a scale from 0 to 1. So, if you like the look of the LUT but wish it was just a little less intense, slide that Mix down a bit.
Note: Some third-party LUTs may offer additional settings that can be tweaked in the Inspector. They will probably make this clear and tell you what the settings do.
A Final Look
LUTs, like iPhone filters, can open whole new worlds for stylizing your movie.
Now that you know how to import them, the science of using them ends. From here, it’s up to you to play around with different LUTs, find what you love, and see what excites you.
In the meantime, please let us know if you found this article helpful or think it could have been more stylish… And if you do have some favorite free LUTs, please share the link! Thank you.