
Powerpoint-type decks are among the most popular and effective ways to present information to a group of people. Google Slides is a premier tool for such presentations: it’s free and readily available to almost anyone.
As more of us telecommute, slide decks have become more important for business, software development, sales, teaching, and more. Displaying a well-organized grouping of information is invaluable in almost all industries and learning environments.
Slide show tools such as Google Slides should be more than just bland pages of typed information. You can add color and stylist fonts for interest and clarity. You can add graphics, pictures, audio, video, and even animation. Adding animation can provide fabulous effects for Google Slides presentations.
Table of Contents
How to Create Animations in Google Slides
Now, let’s add some simple animations in Google Slides.
Adding Transition Effects
Transition effects can be added individually to each slide, or you can add the same to each one in the deck.
Here is how to add them:
Step 1: Start Google Slides and open your presentation.
Step 2: If you want to add transitions to specific slides, click the one that will have the transition. The effect will happen as you move from the previous slide into the slide you have selected.
If you wish to transition into your first slide, create a blank slide as your first one. You can then add the effect after it. To add the same transition effect to every slide, select all of them.
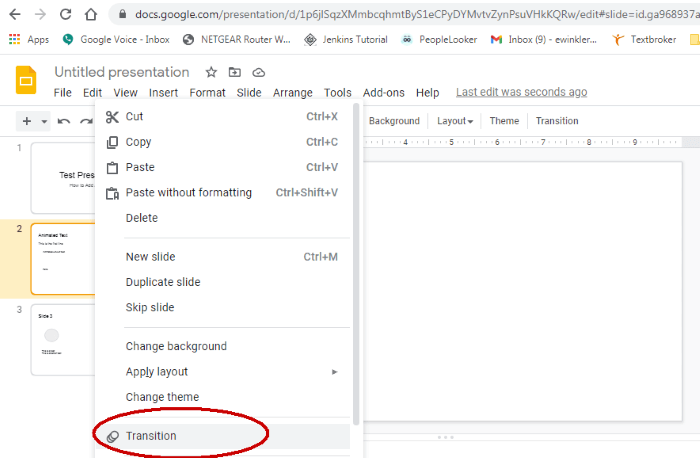
Step 3: Right-click on the slide on the left side of the screen and select “Transition.” You can also use the menu at the top of the screen by selecting “Slide” and then “Transition.”
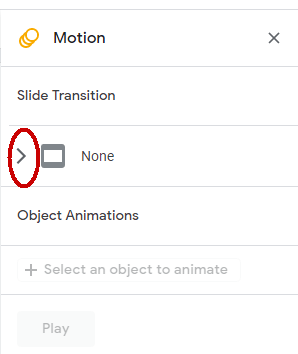
Step 4: The “Motion” menu will pop up on the right side of the screen. At the top, you’ll see “Slide Transition.” Below that will be a drop-down menu. It should currently say “none” unless you have already added a transition. Click on the down arrow next to “None” to bring up the drop-down menu.
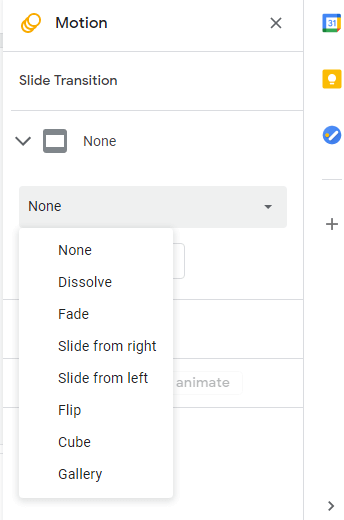
Step 5: Click the drop-down menu and select from the different types of transitions.
Step 6: You can then adjust the transition’s speed by using the slider below the drop-down menu.
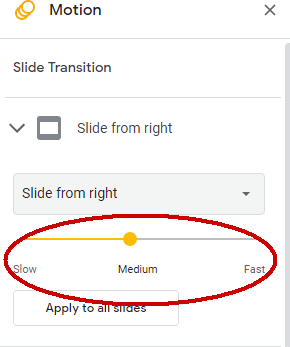
Step 7: If you want the transition to apply to all of your slides, click the “Apply to all slides” button.
Step 8: You may want to test out some of the effects to see how they look. If so, you can click on the “Play” button to see how they look. It will give you a demonstration of how your slide works with a particular transition and settings. Just hit the “Stop” button when you’re done.
Animating an Object
In Google Slides, objects are anything on your slide layout that you can select, such as a text box, shape, picture, etc. After selecting the object, you can add animation effects to it. Just follow these simple steps:
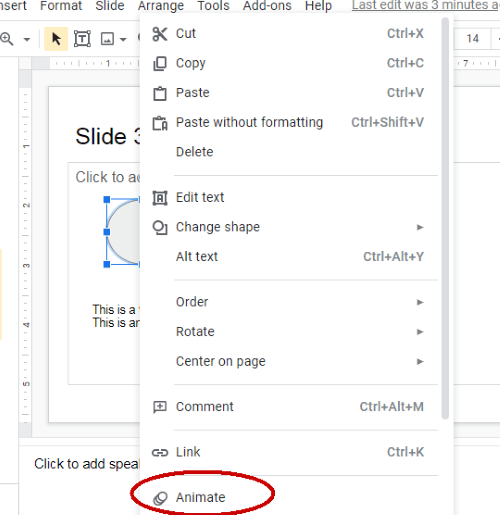
Step 1: In Google Slides, click on the object you wish to animate to select it.
Step 2: Right-click to show the context menu, then select “Animate,” or click on the “Insert” menu at the top of the screen and select “Animation.”
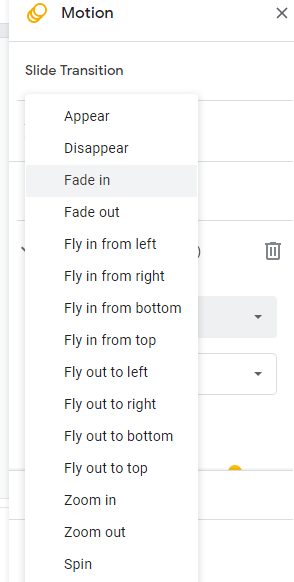
Step 3: The motion panel will appear on the right side of the screen. This is the same panel you saw when creating transitions, but it will be scrolled down to the animation section.

Step 4: Click on the first drop-down menu to select the type of animation you want. It may be defaulted to “ Fade In,” but you can choose from other options like “Fly-In,” “Appear,” and many others.
Step 5: In the next drop-down, select whether you want it to start when you click on the screen, after or with a previous animation.
Step 6: If you are animating a text box and want the animations to occur to each paragraph in the text, you can check the “By Paragraph” check box.
Step 7: Adjust the slider at the bottom to set the animation’s speed to slow, medium, or fast.
Step 8: You can test and make adjustments using the “Play” button at the bottom of the screen. You may need to try different settings. You can see how they affect the object by using the “Play” feature. Click on the “Stop” button when you are done.
Step 9: Once you’re done, you can move on to the next task. All the animations you create will be saved and listed on the same motion panel whenever you bring them up.
Additional Tips
As you can see, adding animation to your presentation is actually quite simple. Use the above techniques to make transitions more unique and eye-catching to your audience.
You can also animate just about any object placed on the slides, from text to shapes and even backgrounds. Below are a few tips to help as you create spectacular, eye-catching presentations.
- As you create animations, you will notice that on the slide menu at the left-hand side of the screen, slides containing animations will have a three-circle symbol by them. This can help you to keep track of where your effects occur within your presentation.
- Animations are great, but don’t overuse them. Too many will cause them to lose their effectiveness.
- Use animation in strategic places where you want people to focus or to signal that your topic is heading in a different direction.
- Don’t rely on just animation for a good presentation. You still need quality content that the audience can follow and learn from.
- Ensure the pacing of your animations fits your presentation. If it’s too fast, your audience may not even see it. If it’s too slow, they’ll wander away from your topic before you get a chance to begin.
- Always test your slideshow thoroughly before you present it. There’s nothing worse than having something not work when you go live.
Why Use Animation in Your Slide?
While slideshows can provide a world of information, there are times when they can become plain and even boring. Nobody wants to watch slide after slide of bullet points and text against a blank background.
There will be certain parts that you want to emphasize. You need to maintain interest—you probably don’t want your audience to fall asleep on you.
This is where animation can provide that extra punch to keep your audience focused and alert. By “animation,” we are not talking about dropping in a Pixar short film. We mean simple graphical motion that draws and holds the attention of your viewers.
Some examples include having individual bullet points slide onto the screen as you click, allowing you to reveal each portion of the text one by one. This controls the flow of information, preventing your audience from reading ahead of you.
You can also add a fade-in effect to text or pictures. This will allow a chart or diagram to come onto the screen at a specific time or when you click on the slide.
These animations not only keep people focused on your presentation, but they also allow you to let information slowly trickle onto the screen instead of all at once. This prevents overload, helps you maintain simplicity, and keep your audience from nodding off.
Animation Types
There are two basic types of animations that can be used in Google Slides. The first is transitions. These take place when you “transition” or move from one slide to another.
The other type is object (or text) animation, in which you make specific objects or text move across the screen. You might also make them fade them in or out.
Both transition and object animations are effective tools for making interesting presentations. Transitions grab your audience’s attention as you move to the next slide. Object animations can serve a number of purposes, whether you want to control the flow of information or just catch your audience’s eye.
Final Words
Animations can make your presentations more interesting and exciting. Use them wisely and take advantage of them whenever possible.
We hope this article helps you create a magnificent display for your co-workers, students, readers, or friends. As usual, please let us know if you have any questions or comments.