
I’ve been using Google Docs for quite a few years now. And I’m a big fan of its collaboration feature. Google Docs is super convenient for teamwork.
However, one of the challenges I’ve faced with Google Docs in the past is this: Unlike other document software, Google Docs doesn’t allow you to directly copy images from a file and use them in your computer’s clipboard. It allows you only to crop, adjust or replace the images by right-clicking on an image.
Today, I’ll show you a few quick ways to extract and save images from Google Docs. What’s the best way? Well, it depends. #3 is my favorite, and I still use the image extractor add-on today.
Table of Contents
1. Publish to the Web, then Save Images One-by-One
Use This Method When: You only want to extract a few images.
Step 1: Open your document in Google Docs. On the top left corner, click File > Publish to the web.
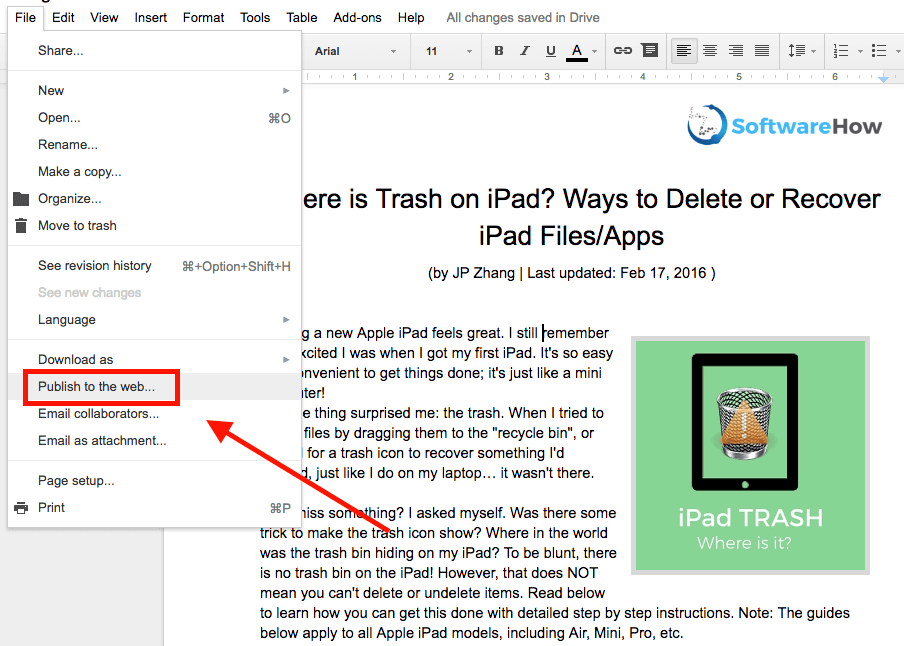
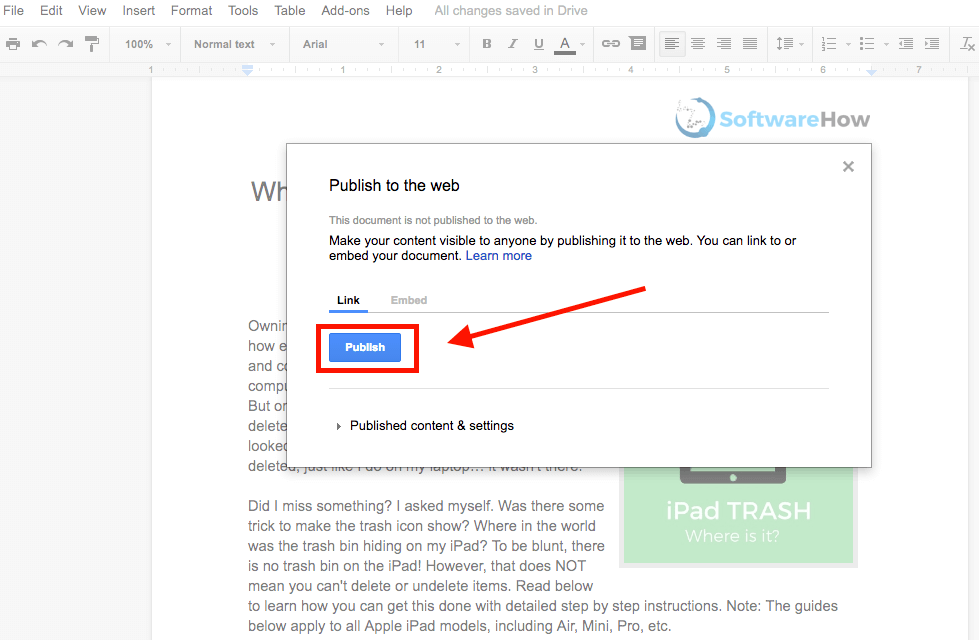
Step 2: Hit the blue Publish button. If your document contains private or confidential data, remember to stop publishing it after you save your desired images. See step 6.
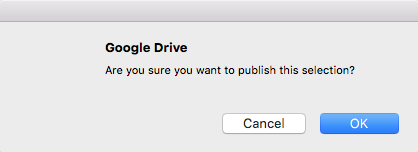
Step 3: In the pop-up window, click OK to continue.
Step 4: You’ll get a link. Copy the link, then paste it into a new tab on your web browser. Press the Enter or Return key to load the web page.
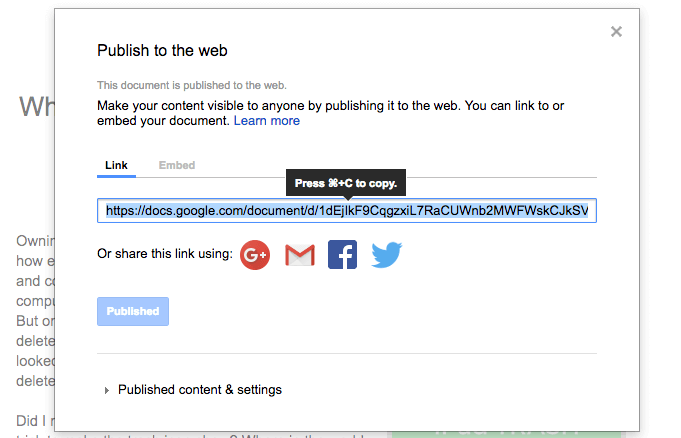
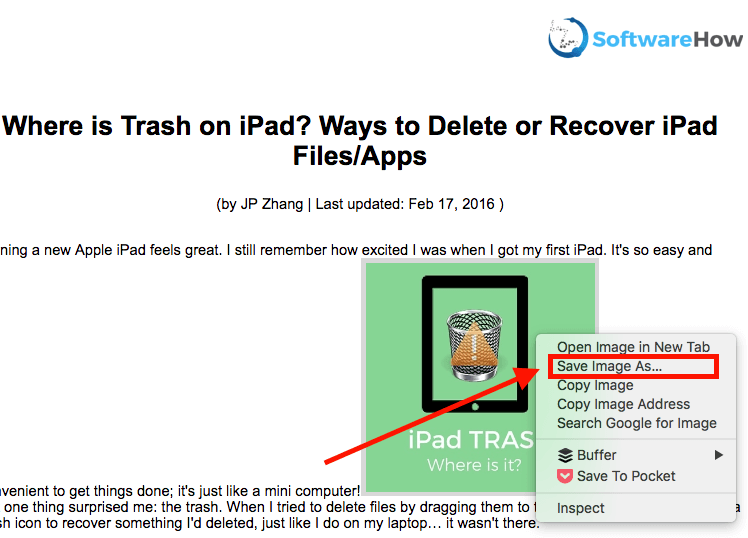
Step 5: Locate your images on the web page that just appeared, right-click, then select “Save Image As…” Specify the destination to save those images.
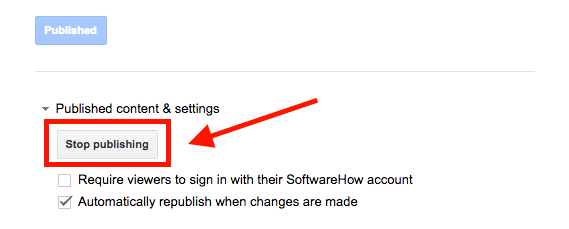
Step 6: Almost there. Go back to your Google Docs document, then go to the publish window (File > Publish to the web). Under the blue Publish button, click “Published content & settings” to expand it, then hit “Stop publishing”. That’s it!
2. Download as a Web Page, then Extract Images in Batch
Use This Method When: You have lots of images to save in a document.
Step 1: In your document, click File > Download as > Web Page (.html, zipped). Your Google doc will be downloaded to a .zip file.

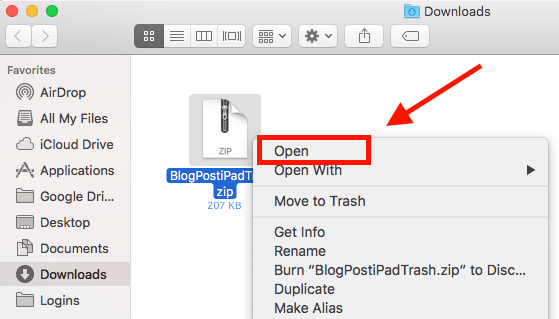
Step 2: Locate the zip file (usually it’s in your “Download” folder), right-click it, and open. Note: I’m on a Mac, which allows me to unzip a file directly. If you are on a Windows PC, make sure you have the right software to open the archive.
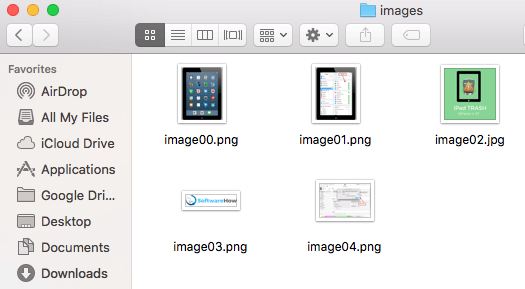
Step 3: Open the newly unzipped folder. Find the sub-folder called “images.” Double-click to open it.
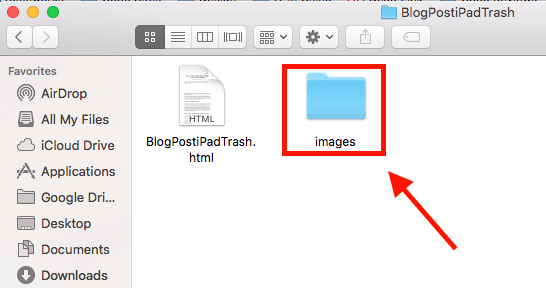
Step 4: Now you’ll see all the images that your Google Docs document has.
3. Use Image Extractor Add-on
Use This Method When: You need to download several images, but not all of them.
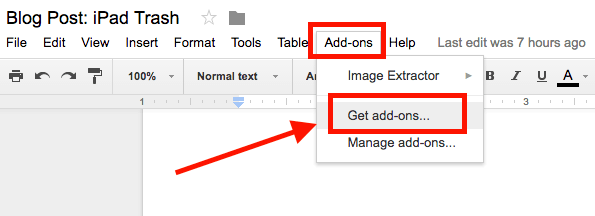
Step 1: Open your Google Docs document. In the menu, go to Add-ons > Get add-ons.
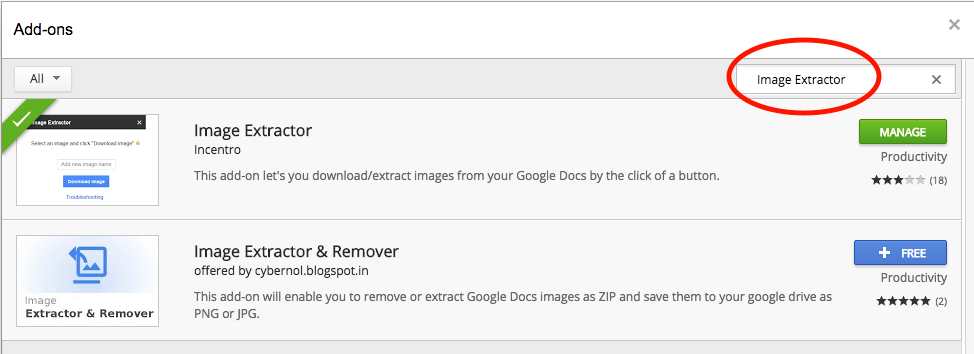
Step 2: In the new window that just opened, type “Image Extractor” into the search bar and click Enter. It should show up as the first result — Image Extractor by Incentro. Install it. Note: Since I’ve installed the add-on, the button in the screenshot below shows “Manage” instead of “+ FREE”.
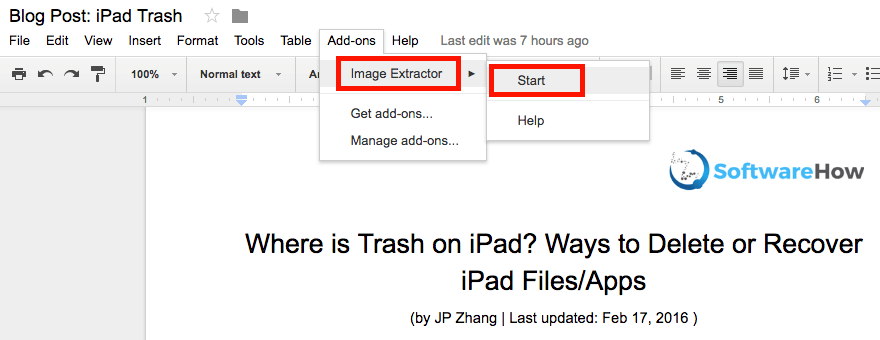
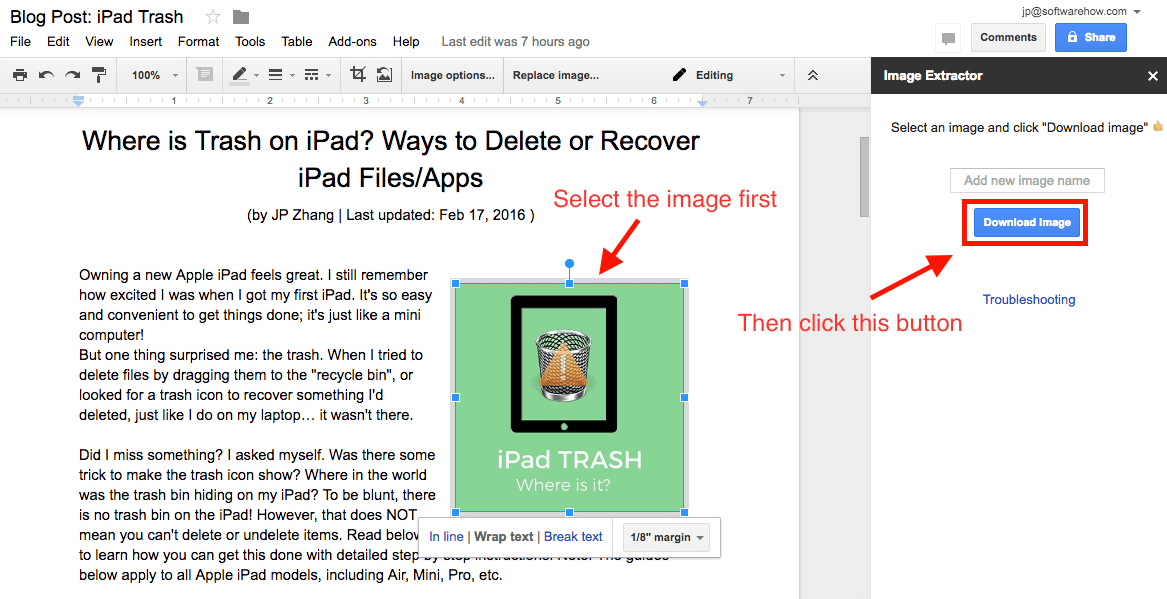
Step 3: Once you’ve installed the plugin, go back to the document, select Add-ons > Image Extractor, and click Start.
Step 4: The Image Extractor add-on shows up in your browser’s right sidebar. Select the image you want to save, then click the blue “Download Image” button. The image will be downloaded. Done!
4. Take Screenshots Directly
Use This Method When: You have a few images to extract and they are high-resolution.
It seems like a no-brainer, but it works amazingly well and it’s efficient. Just enlarge your web browser to full screen, select the image, zoom in to the desired size, and take a screenshot.
How do you do that? If you are on a Mac, press Shift + Command + 4. For PC, use Ctrl + PrtScr, or you might need to install a third-party screenshot tool like Snagit.
5. Download as Office Word, then Reuse the Images as You Want
Use This Method When: You want to reuse the images and content of a Google Doc in Microsoft Office Word.
Step 1: Click File > Download as > Microsoft Word (.docx). Your Google Doc will be converted to Word format. Of course, all the formatting and content will remain — including the images.
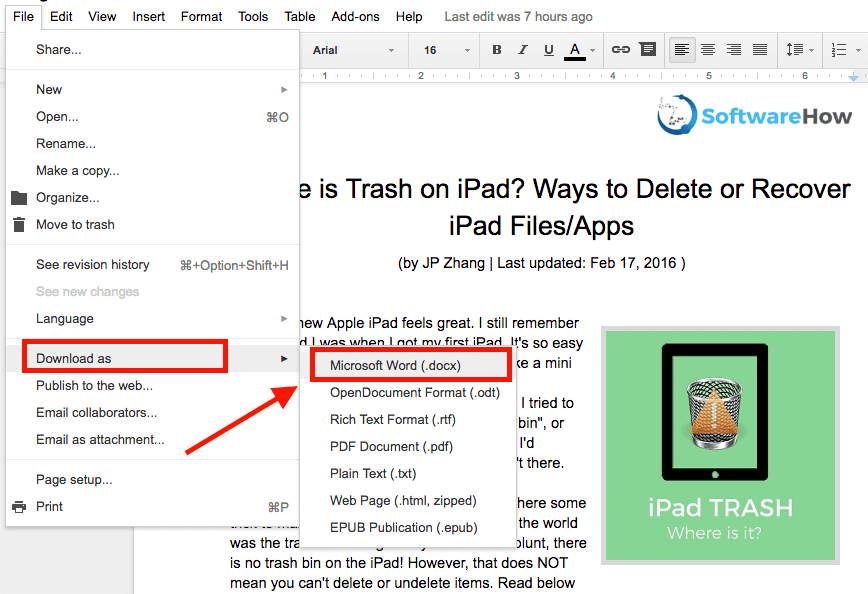
Step 2: Once you open that exported Word document, you can copy, cut, or paste the images as you want.
That’s it. I hope you find these methods useful. If you happen to find another quick method, please leave a comment below and let me know.
downloading as a webpage was perfect!! so easy for a doc with a lot of images to access. Thank you!
Hi JP,
Thanks for the instructions. However, I’m still having issues. We’ve created an inventory sheet that includes images inserted into cells directly from an iPhone camera.
The images were initially inserted as original size. Although the thumbnails fit into the cells, the resulting sheet size is shown as 500 MB! I’ve tried locating the where the actual image files are stored on Google Drive, but cannot. I’ve tried downloading the sheet as an XLS, but, the images downloaded are only the thumbnails. I’ve tried downloading the sheet as an HTML, but, there is no Images folder in the Zip file.
HELP! What am I doing wrong? I didn’t originally insert the images. If the images were resized to thumbnail size, then, why is the sheets file so large?
Any help or direction you can provide would be truly appreciated! It would really help if you could email me directly at the email address provided.
Thanks!
Clem
This was a super useful guide, thank you! Downloading the whole thing as html made it easy to extract the images.
I found the easiest way! Shift+right click on the image, and then “Save image as”.
Hi JP,
Great Post! Thank you so much for sharing this impressive post on Extracting google docs image & save. I was already using the 2nd method by downloading as an HTML zip file & it really works and gives you high quality pictures. And again thank you for sharing other methods also.
Definitely gonna use them. Keep up the good work…
Cheers,
Abhay
This article saved my life. Thank you so much. Downloading as a web page and then having a file of all the Images is too easy!! Thanks again
this did not help me. i am dissapointed ! ! do better nex ttime ! ! ::(((
When exporting to Word .docx format, my images created in Google Docs became blank rectangles. A simple workaround I found was to export as RTF and then open in Word and save as .docx. Hope this helps others having the same problem.
The other thing to flag with the Save as Microsoft Word / Microsoft Excel pathway – you can rename the exported .docx / .xlsx file to .zip and then unzip it; within the folder structure will be a Media folder with all embedded images at full res.
Thank you so much. You have saved me hours in image extraction. I am a publisher and this was the most BORING part of my work! Thanks again!
Thanks. “1. Publish to the Web, then Save Images One-by-One” helped me to solve my problem
Great tip thanks! Method #1 worked for me (Chrome OS).
I can’t find the image extractor add-on, and method #2 didn’t create an images folder.
The download as web page is truly helpful! Thanks so much!
Image Extractor seems to be gone now. It sounds like a great too.
How do you get rid of an image?
Thanks for the post. It helped just for what I needed in a clear and simple way.
Taking to your dictum to publish it the web, I saved to Google Drive. Then exited the document. Used “copy link” in the three vertical dots menu. Put the link in the Chrome browser and displayed the document. Selected the image and downloaded it.
Of course the document remains in my private Google Drive. For privacy, I put it in my USB, detach that from my computer and physically secure it.
Thank you very much for this information. you saved me too much work really… 🙂
Found a way easier way! Right click image, select ‘Save to Google Keep’. Google Keep sidebar auto opens, right click image there, ‘Save Image As’. Literally takes like 5 seconds!
https://medium.com/@joshdance/how-to-download-images-from-google-docs-the-easy-way-7dda0d7bbe64
Thank you
Thank You Very Much!!!! I am doing a project and this just saved my butt.
Thank you! You just saved me SO much time with the tip on downloading a Google Doc with photos as a web file.
Hey, Thanks for the tip I was banging my head trying to figure this out. The only thing I have an issue with is that I can only seem to do one photo at a time unlike what you said about several photos. I option 2 but when I right click , it just saves save as and not save image as. but still worked. How do you do it for several photos as you can pnly open one at a time to get the save as web html etc.
Thanks
Hi Tony, thanks for your feedback. It seems you were using method #1, unfortunately you can’t do that for several photos at a time. But I’d recommend you try out method #2 for efficiency.
Thanks very much. I changed to google docs for the same reasons… just got stuck with the above. Thanks for your post. I used method 2 and it was very straightforward and easy.
Hi Mehedi, thanks for your feedback. It seems many readers like you found method 2 useful in particular, maybe I should move it up. Anyway, thanks again.
Method 2 helped me out! Thank you very much for listing various methods!
You’re welcome! Glad you found it helpful. In fact, Method #2 is also my favorite these days, when I need to publish posts with lots of images (stored in Google docs) 🙂
Thanks, this helped me! I appreciate it.
Thanks so much for the help!!!
Adithya
JP – Thanks so much for putting this together. You’ve just saved me time, a gift we can’t get more of. Tip #2 worked awesome for and my MAC!
Hi there,
Firstly, thanks for the effort in providing us with some solutions regarding this issue.
Somehow struggling to utilise two of the options, downloading it as a webpage and I can’t seem to find Image extractors on the add-ons.
Any alternative suggestions.
Cheers
Hey man thanks so much for the guide. It helped me download my custom drawings as images.
Hi Ajay, you’re welcome. Glad that it worked for you!