If you are getting a new phone soon or you have multiple phones, then you probably want to keep all your contacts on both phones. Contacts are an essential piece of personal data—the age of the Rolodex has passed; our ‘Little Black Books’ are digital now.
Manually re-entering lost phone numbers can be difficult and very time-consuming. Thankfully, Gmail and Google provide an easy way to transfer them.
Table of Contents
Don’t Rely On The Phone Sales Person
When you get a new phone at a cell phone store, the salesperson often says that they can transfer your contacts. When you actually get the phone, often they say they’re unable to do it for some reason. It happens to me almost every time I get a new phone.
At this point, I just transfer everything myself. Sheesh!
Anyone Can Do It
Transferring contacts is pretty simple to do using Google. It’s probably quicker and safer than having that phone salesperson do it as well. If you have Gmail—and you probably do if you have an Android phone—you also have a Google account.
The process will first involve uploading all your contacts to Google. Then, you sync your new or second phone with Google. After that, you’re done: your contacts are available on the other device.
Sounds simple, right? It really is, so let’s go through how to get it done.
Google Account
Before you start, you’ll need to have your email address (Google user name) and the account password. That account should also be connected to each phone. I’ll briefly go over connecting your Google account to your phone below.
But first, what if you don’t have a Google account?No worries! You can easily create one right on your Android phone and get connected as you do. Creating an account has loads of benefits, such as syncing your contacts and lots of handy apps that you can use.
If you already have Google set up on your phone and know that the sync feature is turned on, you can skip down to the section called “Upload Local Contacts To Google.” This will get your contacts uploaded quickly.
Create a Google Account
Note that many phones are different. They may have a slightly different setup, so the procedures may vary from phone to phone. Below are general steps of how to do this.
1. Find the “Settings” app on your phone. Tap it to open the settings.
2. Select “Accounts and backup.”
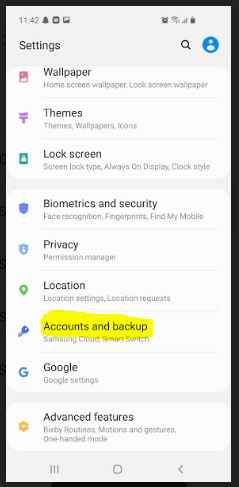
3. Look for the “Accounts” section and tap on that.
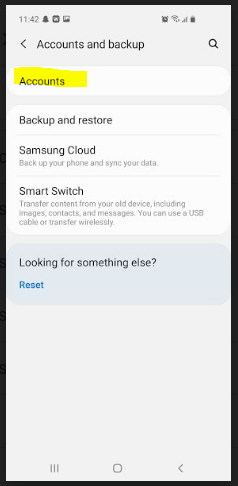
4. Tap “Add Account.”
5. If it asks what type of account you want to create, select “Google.”
6. Now tap ”Create Account.”
7. Follow the instructions and add the required information. It will ask for some personal info, then let you choose a username and password.
8. Agree to the terms and then create the account.
9. You should now have a new Google account connected to your phone.
Add a Google Account to Your Phone
If you have a Google account and it’s not connected to your phone, the instructions below will get you set up. Again, the exact steps may vary slightly depending on your model of Android phone and operating system.
- Find your phone’s “Settings” app and open it.
- Tap “Accounts and Backup.”
- Look for the “Accounts” section, then tap on it.
- Find the section that says “Add Account” and tap it.
- Select “Google” as the type of account.
- It should ask for your email address (account name) and the password. Enter them, then follow the instructions.
Once you’re done, you should now have your Google account tied to your phone. If needed, you can do this on the phone that you wish to transfer the contacts from and the phone you want to send them to. You’ll only need one account. Use the same one on both devices.
Sync Contacts With Your Google Account
Now that you have a Gmail and Google account associated with your phone, you need to make sure you can sync the contacts from your old phone to Google.
It may have asked you to sync when you created or configured the account on your phone. If so, that is fine. You can always check by using the steps below to see if it is already turned on. It will only sync if there is anything new that hasn’t already been updated.
Here’s what to do:
1. On the phone that you wish to transfer contacts from, open your settings app again by tapping on it.
2. Select “Accounts and Backup.”
3. Tap “Accounts.”
4. Select “Google” to select your Google account.
5. Look for “Account Sync” and tap it.
6. You will see a list of items to sync with toggle switches beside them. Ensure that the “Contacts” one is turned on.
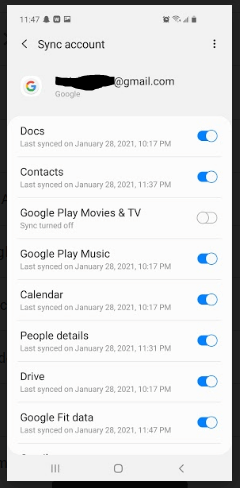
7. Check the other items and their toggle switches and ensure they’re set the way you want. If there are other things you want to sync, make sure they are on. If there are things you don’t want to sync, ensure that those are turned off.
8. Open the menu (3 dots) in the upper right corner, then tap “Sync Now.”
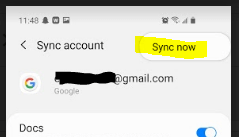
9. You can exit the app by using the back arrows.
Now that your contacts are synced to Google, they’re accessible anywhere you can log in to your Google account. However, you’ll still need to transfer any other contacts that are saved locally on your phone.
Upload Local Contacts to Google
These steps will ensure the contacts saved on your device in your contacts app will also get saved to your Google account.
1. Open your phone’s contact app.
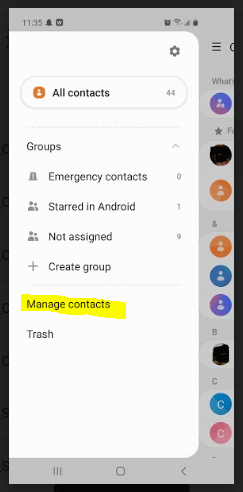
2. Open the menu (it’s in the upper left corner) and then select “Manage contacts.”
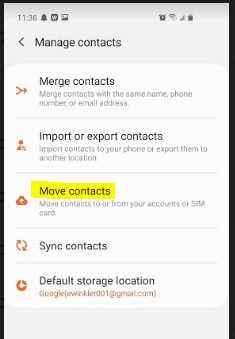
3. Select “Move contacts.”
4. The next screen will ask where you want to move your contacts from. Select “Phone.”
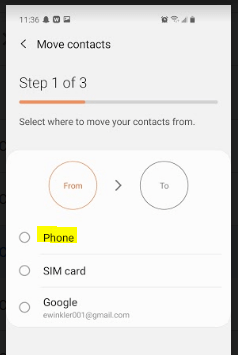
5. You will then be asked where to move them to. Select “Google.”
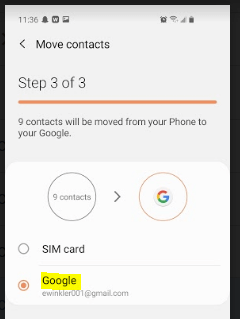
6. Tap “Move.”
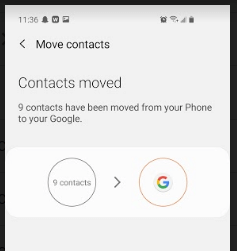
7. Your local contacts will be copied to your Google account.
Sync Contacts to The Other Phone
Now for the easy part. Getting the contacts onto the other phone is a snap, especially if you have already set up your Google account and have it connected to the phone.
Once you have the account connected, if “Sync” is already turned on, your new device will automatically update with the new contacts. If “Sync” is not turned on, use the steps below to turn it on.
- On the phone that you wish to transfer contacts to, open your settings app by tapping on it.
- Select “Accounts and Backup.”
- Tap “Accounts.”
- Select “Google” to select your Google account.
- Look for “Account Sync” and tap it.
- You will see a list of items to sync with toggle switches beside them. Ensure that the “Contacts” one is turned on.
- Look at all the other items and their toggle switches. Ensure that they are set the way you want. If there are other things you want to sync, make sure they are on. If there are things you don’t want to sync, ensure that those are turned off.
- Tap the menu (3 dots) in the upper right corner, then tap “Sync Now.”
Your new phone should now be updated with all of your contacts.
We hope these instructions have helped you to transfer your contacts and other information to another Android phone. As always, please let us know if you have any questions.
