
Windows provides a straightforward way to password-protect drives that is both secure and easy to use. Other operating systems like Linux and macOS do too!
Hi, I’m Aaron. I not only work in technology, I focus on information security and keeping people’s data safe. I’ve worked on projects ranging in size from password protecting individual files and external drives up to creating and managing large-scale secure hosting environments.
In this article, I’ll share why it’s so important for you to encrypt your data and tell you how to do that.
Table of Contents
Key Takeaways
- There are many very good reasons to encrypt sensitive data, especially if you put it on an encrypted drive.
- If you use Windows, then I’d recommend its built-in BitLocker solution to encrypt your data.
- macOS also provides built-in encryption functionality.
- You can always get a drive with proprietary software or which is cryptographically certified.
Why You Should Encrypt Your Data
Everyone should encrypt their data. In an increasingly digital world, it’s highly unlikely that you don’t have some kind of sensitive data on your computer. That data could be tax information, financial information, health records, or other information they don’t want disclosed to the world.
If you have that data on your computer, not encrypting that data means that if whatever storage media upon which that data resides is lost or stolen, then your information is viewable by anyone.
Chances are that you already have encrypted data and don’t know it. If you use OneDrive, Sharepoint, Amazon storage, or Google Drive, all the information on those platforms is encrypted.
Your information may not be encrypted on your own computer or external storage. To keep that information safe, you need to encrypt it and password-protect it.
Depending on what computer and operating system you use, you’ll have different options. Starting with…
How to Password Protect an External Drive on Windows
You’re going to use a program named Bitlocker, included with both Windows 10 and 11.
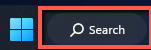
Step 1: Use the Search Bar to search for Bitlocker.
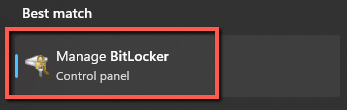
Step 2: Click Manage Bitlocker.
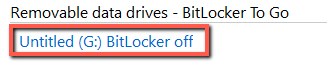
Step 3: Scroll to Removable data drives – Bitlocker To Go and click the drive you want to encrypt. For me it’s my G: drive so I clicked the link Untitled (G:) BitLocker off.
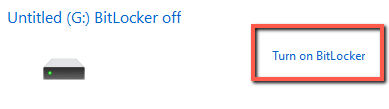
Step 4: Click Turn on BitLocker.
I don’t have a smart card reader, so I’m going to use a password.
Step 5: Click Use a password to unlock this drive. Type the password into the field Enter your password and type it again into Reenter your password. Click Next.

Step 6: You’ll then be prompted to back up your recovery key. This saves the recovery key to a file on your computer or allows you to print it out. I’d recommend keeping this somewhere independent of your drive.
Never store your only copy of the recovery key on the encrypted drive. If you forget your password, you’ll lose access to the drive without that recovery key.

Step 7: Click Next.

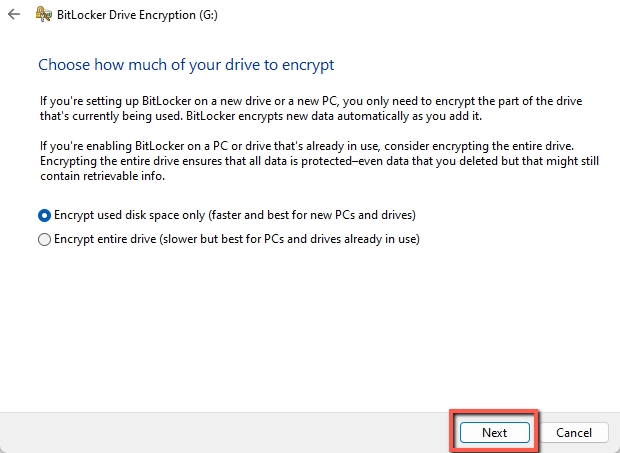
You’ll be asked whether you want to Encrypt used disk space only or Encrypt entire drive.
Step 8: Independent of the advice BitLocker provides, I always recommend encrypting the entire drive. Up to you what you do, though, and when you make a selection click Next.
If you’re running Windows 10 Version 1511 or later, you’ll then be asked if you want to use a new encryption mode introduced in that version of Windows or one that’s backward compatible. If you’re not sure, select Compatible mode; Windows pre-selects that for you. Click Next.

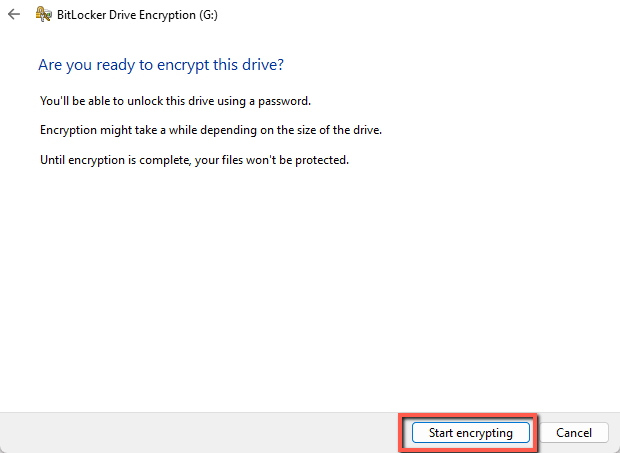
Step 9: Click Start encrypting to encrypt your drive.
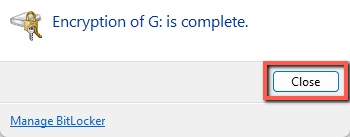
Step 10: BitLocker will notify you when it’s finished. Click Close.
The next time you attach the drive, it will have a yellow lock icon.

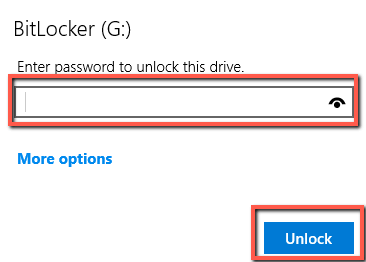
Enter your password in the password field. If you’d like to see the lettering, click the eye in that field. Click Unlock once you’ve entered your password.
Your drive will unlock, represented by a blue unlocked lock icon.

Where Windows lets you encrypt an in-use drive, macOS requires that you format the drive. To do so…
How to Password Protect an External Drive on Mac
I’m using macOS Catalina, but the process should be the same for earlier and later versions of macOS.
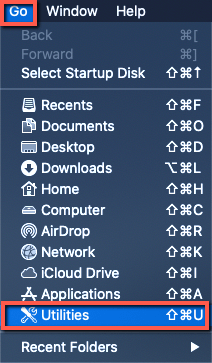
Step 1: Click Go and then click Utilities.
Step 2: Click Disk Utility.

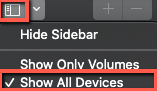
Step 3: Click View and then select Show All Devices.
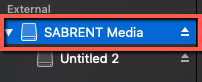
Step 4: Find the list of your external drives and click the drive you want to encrypt. My external disk controller is a SABRENT.
Step 5: Click Erase.

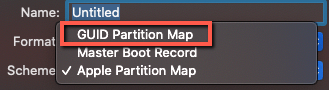
Step 6: Click the menu next to Scheme. This will let you specify the type of system partition map you want to use. In macOS, only GUID partition maps can be encrypted.
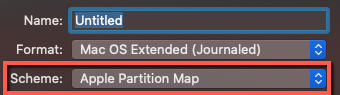
Step 7: Click GUID Partition Map.
Step 8: Clicking the menu next to Format reveals four options for drive encryption.
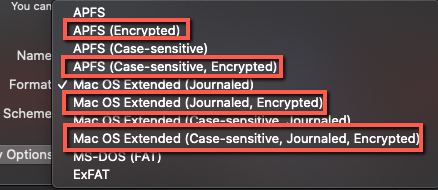
Here’s what the four options mean:
- Case-sensitive vs. non-Case-sensitive: Case-sensitive means that folders on the drive are case-sensitive. So FOLDER is different than folder, which is different than Folder. On a non-Case-sensitive drive, FOLDER is equivalent to folder or Folder.
- Mac OS Extended: this is a legacy partition format used for older mechanical hard disk drives.
- APFS: this is a more modern partition used with flash drives and solid-state drives.
In my case, I had a solid-state drive and wanted case sensitivity, so I picked APFS (Case-sensitive, Encrypted). When you select the kind of encrypted partition you want, the following screen will pop up.
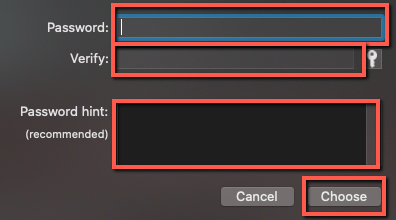
Step 9: Enter your password in the Password field, re-enter it in the Verify field, and then put a hint if you want in the Password hint field. Click Choose to encrypt.
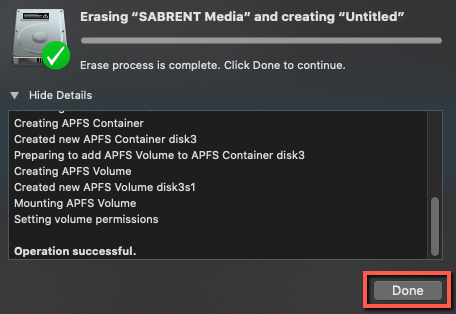
Step 10: Click Erase.

Your drive will format. When completed, click Done.
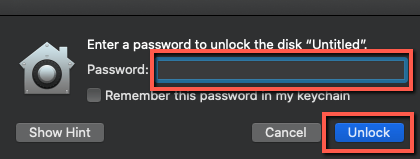
The next time you attach the drive, you’ll be prompted for a password. Enter the password in the Password field and click Unlock. The drive will appear on your desktop.
You may also have a case where your flash drive or external drive comes with…
Password Protect an External Drive with Proprietary Encryption
Some external drives come with their own encryption software. Some even have hardware encryption in the form of buttons on the device! If you need an extra layer of security, you can find drives to meet your needs.
You can search for drives based on their FIPS 140-3 certification level. Briefly, (for your non-commercial needs) those levels are:
- Level 1 – password protected
- Level 2 – password protected + physical tamper-evidence + role-based authentication
- Level 3 – password protected + physical tamper-evidence + role-based authentication + physical tamper-resistence + identity-based identification
- Level 4 – password protected + physical tamper-evidence + role-based authentication + physical tamper-resistence + identity-based identification + other physical security requirements
For your personal use, it’s unlikely you’ll need to pay for something more extensive than Level 1. This is a deeply personal decision, though, and you should get whatever drive makes you the most comfortable with your data safety!
FAQs
Here are some commonly asked questions related to password-protecting an external drive.
Can I Password Protect an External Hard Drive Without Bitlocker?
Yes! But then you’re using proprietary software to do so. Some of that software is free, while other kinds of software cost money. For personal use, I really don’t believe you need more than the built-in encryption functionality in Windows or macOS. Again, it’s whatever makes you feel safest, so only you can really decide.
How do I set a Password for an External Hard Disk without Any Software?
You need to buy a FIPS 140-3 certified drive. That will come with its own built-in cryptography module.
How do I Password Protect an External Hard Drive on Windows 7?
You use BitLocker. That being said, Windows 7 went end-of-life on January 14, 2020. Meaning it’s an incredibly insecure operating system at this point and you shouldn’t be using it for sensitive information–certainly not if you care enough to encrypt the drive.
Conclusion
You have a few options when it comes to securing and password-protecting an external drive. Whether you decide to do so on Windows, macOS, or buy a cryptographically managed external drive you’ll know your data’s secure.
What else do you do to safeguard your most sensitive data? Let me know in the comments!