
The three best ways to get better at Procreate are to ensure your drawing environment is comfortable, practice every single day, and familiarize yourself with the most crucial tools that the app has to offer. All the resources to improve are available to you online.
I’m Carolyn and I’ve been running my digital illustration business for over three years. However, I started using Procreate long before that, and I taught myself how to use it by researching and watching tutorials online. Before I knew it, my skills were improving quickly.
On one hand, we can learn almost anything by doing research online which makes it easier to learn how to navigate your way around the app. On the other hand, you do need a certain level of skill when it comes to drawing and this can be a challenging thing to enhance.
In this article, I’m going to share with you three effective ways to learn and get better at Procreate.
Table of Contents
Key Takeaways
- Create a comfortable and supportive drawing environment for yourself.
- Practice your drawing skills every day or as often as possible.
- Learn how to use all of the features and functions of the app. The more you know, the better artwork you can produce.
3 Learning Tips for Getting Better at Procreate
It wasn’t long after getting Procreate that I felt confident enough in my work to start posting it online in an attempt to generate revenue. Once you have made the commitment to yourself by investing in an iPad, the Procreate app, and a stylus, you’re halfway there.
Now all you need to dedicate to learning is your time. Whether an experienced artist or a beginner, there are many ways in which you can improve your Procreate skills. At the start of your Procreate journey, I recommend spending at least an hour a day on the app.
If you’re an experienced Procreate artist and looking to improve, I recommend spending some of your free time creating artwork that might be out of your comfort zone. Today I’m going to talk you through some tips that have made the biggest impact on my artistic development.
Tip #1: Create a Comfortable Workspace
As I’m always on the go, I have perfected the art of working from anywhere. But that doesn’t necessarily mean that on the go is my optimum state for learning or creating masterpieces. If you’re looking to improve your skills, you will need an area in which to focus and be creative.
If I’m learning something new and looking to expand one of my skills, I ensure to create a relaxed and comfortable environment that allows me enough quiet to focus, enough noise to not be distracted by the quiet and I always want to be physically comfortable and ready to go.
Below are some aspects of my environment that I’ll adjust depending on what it is I need to get done on that day. If it’s a learning and improvement day, these things are particularly important to get right for me.
Apple Pencil or Stylus Cover
If you’re spending a lot of time using a stylus to draw on an iPad, I recommend making it as comfortable as possible. The sleek and smooth design of the Apple Pencil is visually appealing, but for me, I like a thicker circumference for my drawing utensils.
I like to use either a cozy grip or a silicone sleeve on my stylus. This makes it feel heavier in my hand and creates less friction on my skin when I’m drawing for hours on end. You can even find certain stylus holders that will give the effect of drawing with a pencil.
Ergonomic Seating
This is not just for comfort and for the well-being of your back. Yes, being hunched over and curled up on a couch while drawing for hours will cause you serious discomfort and back issues down the line but more importantly, it actually can make drawing more difficult.
Ensure that whatever position you are drawing in, your dominant arm and shoulder have enough space to move freely. By allowing a full range of motion, you’re giving yourself the best chance at creating smoother lines and fluidity in your artwork without even realizing it.
Personalize User Interface
This topic is especially important for left-handed artists as not many people realize that you can actually adjust and move certain aspects of your canvas on the Procreate app to make it easier to navigate.
Always check to make sure you have your sidebar positioned in a place that works best for you whether you are right or left-handed. Here’s how:
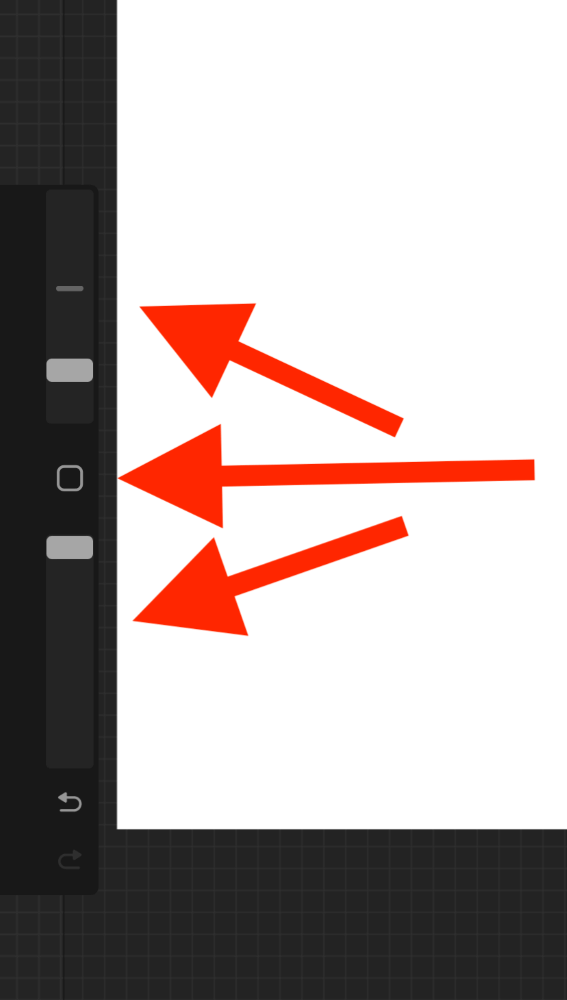
You can move your sidebar up/down on your canvas by holding on to the square icon in the middle of the sidebar and dragging it out until it expands. Keep holding down on it and move it up or down. Once you’re happy with the placement, release your hold to confirm the change.
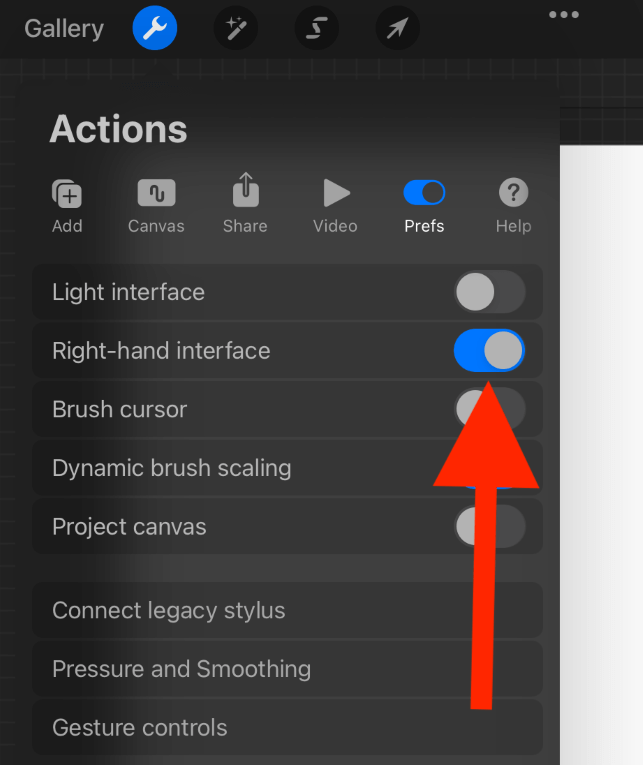
To change your interface from Left-Handed to Right-Handed or vice versa, open your Actions tool by tapping on the wrench icon. Open the Prefs menu and scroll down to the Right-hand Interface toggle. Turn it on or off depending on your preference.
Tip #2: Practice Every Day
The most common thing that people want to improve on in Procreate is their drawing ability. This can be improved but it is 100% dependent on how much time you dedicate to it. The muscle memory in your hand needs to be exercised and used on a daily basis.
If you’re not sure what to practice, here are a couple of things I do. I like to try to practice drawing from real life by observing an object in front of me and sketching it onto my canvas in Procreate to help me work on composition and the feeling of my hand on the screen.
When I find an artwork I like and admire, I will try to replicate it myself using Procreate. And when I get to a part of the artwork that I don’t know how to emulate, I will research how to do so online so I can keep adding to my skills and knowledge while also practicing my painting.
Tip #3: Familiarize Yourself With Important Functions
It’s easy to get carried away with your basic skills when you first get started, but it’s important to keep challenging yourself and using some of the important functions that Procreate has to offer. The more you know, the more professionally curated work you can create.
Below are a few of the best functions to ensure you’re comfortable with that will soon become a part of your everyday routine but will naturally enhance the quality of the artwork.
QuickShape Tool
This is the best way to quickly draw straight lines and symmetrical shapes during the drawing process. After you draw a line or shape, keep holding down on your canvas until it automatically corrects your drawing to a mechanical shape, and then release your hold.
QuickMenu
Using three fingers, swipe down on your canvas to activate your QuickMenu. You can personalize this to best suit your needs to create a smoother drawing process for yourself in the future.
Alpha Lock
Always Alpha Lock your layers when you’re finished with them. This will prevent any unwanted errors like dots or strokes that you might create accidentally when moving from layer to layer. These unwanted errors can be hard to find and fix down the road.
Tracing
If you want to learn to draw a specific object or facial feature, practice tracing this shape over and over again. You can do this by importing an image into your canvas and creating a new layer on top of it. This will help you to learn how to draw that specific shape or object.
Use Layers
I highly recommend creating a new layer every time you add a new drawing to your canvas. You don’t want to put all your eggs in one basket by only using one layer for your entire project. This makes it almost impossible to make changes or fix errors after the fact.
Final Thoughts
These are my top three tips for improving your drawing on Procreate but there are many ways you try too. All of the technical functions can be easily searched online and learned within minutes. But drawing skills can only be improved over time with plenty of practice.
By following these three tips, you will be able to get better at Procreate. I started from scratch and within weeks I was comfortable using the app to create content and professional graphic designs. I just had to dedicate a lot of time to the process. So if I can do it, you can too.
Have you tried any of these tips for getting better at Procreate? Let me know in the comments section below.