
There are many tools you can use to color skin in PaintTool SAI. From portraits to anime, you can color skin in a few steps using PaintTool SAI’s various brushes, blending modes, and more. With little time and effort, you will be a pro.
My name is Elianna. I have a Bachelor of Fine Arts in Illustration and have been using PaintTool SAI for over seven years. As a freelance character designer, I use PaintTool SAI to create my pieces and have explored various techniques to bring them to life.
In this post, I will show you a few methods to color skin in PaintTool SAI in various styles such as realistic and anime, utilizing reference images, tools such as the Pencil, PaintBrush, Select Pen, Airbrush, and rendering techniques like blending and cel-shading along the way.
Let’s get into it!
Table of Contents
Key Takeaways
- Consider the lighting, undertones, and texture of the skin you would like to render
- Gather reference images as a visual aid to ensure the best results.
- Color pick straight from reference if you struggle with color.
- Anime skin often includes only two colors: base and shadow.
- Cel-shading is a rendering technique often used in anime, manga, and western cartoons in which flat colors and shadows create the illusion of depth in an image instead of a shading gradient.
Things to Consider When Coloring Skin in PaintTool SAI
Coloring realistic skin in PaintTool SAI can be achieved with a variety of brushes, but it is truly the shadow and lighting techniques you use that will bring your character’s skin to life. Therefore before we start rendering, here are a few factors to consider before coloring skin.
Lighting
Lighting is the single most important factor to consider before rendering any drawing, especially skin. The time of day, light temperature, and intensity of light will affect not only the color appearance of your skin but also the contrast.
Collect reference images before you begin rendering to get a good idea of how these factors impact your piece.
Undertones
Skin undertones also affect the color/hue of the skin greatly. There are endless combinations of skin undertones, but most can be divided into warm or cool categories. Red, yellow, purple, and even green can be present as undertones on the skin.
Observe your references closely to recreate this effect.
Shadows
Shadows provide depth to your skin. The most common type of shadow you will find on your character’s face is a cast shadow. Cast shadows are “cast” by objects blocking light in front of them.
In the face, these cast shadows can be caused by the nose, eyelids, lips, and hair. Pay close attention to the shapes and colors of these shadows to ensure authenticity.
Texture
Skin texture can vary greatly from freckles to wrinkles and more. You can add texture to your skin using shadow, or a combination of various brushes and brush textures.
Now, let’s get into it!
How to Color Realistic Skin in PaintTool SAI
Follow the steps below to color realistic skin.
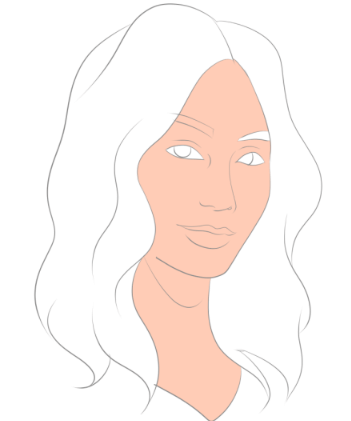
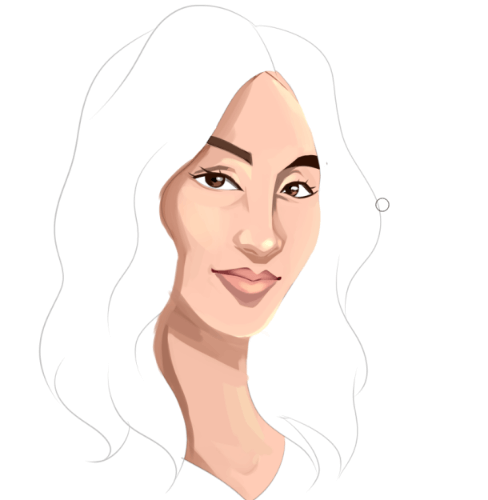
Step 1: Open your document in PaintTool SAI and create a new layer. Name it Skin.

Step 2: Use the Selection Pen and Magic Wand to define the area in which you will be rending your skin. Fill it in with your Base color using the Paint Bucket. Alternatively, you can simply color in the area with a brush of your choice.
Step 3: Select the Preserve Opacity icon.
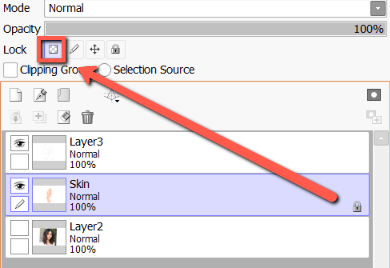
Step 4: Using reference or intuition, select a darker color with the color wheel or eyedropper tool for your shadows. Draw them into your skin layer.
Step 5: Use the Brush to blend the colors together.
Step 6: Create a new layer. Name it Highlights. Select the blending mode Shade/Shine and set the opacity to 33%. Check Clipping Group.
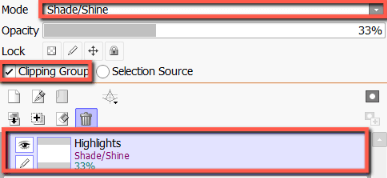
Step 7: Select white or yellow color on the Color Wheel. Using the Airbrush color in your highlights.
Step 8: Create a new layer and name it Undertones. Select the blending mode Multiply.
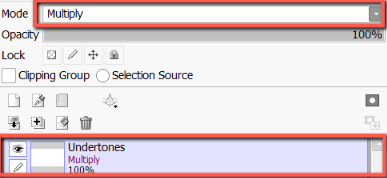
Step 9: Use red, green, yellow, purple, or a combination of all, rending in your undertones with the Airbrush.
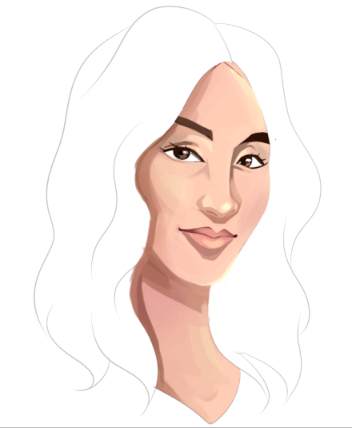
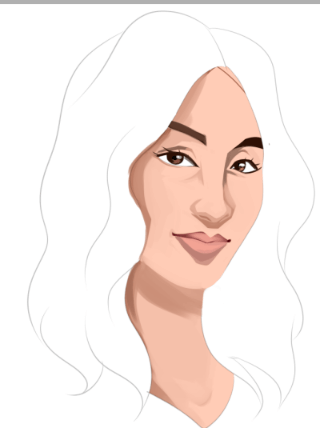
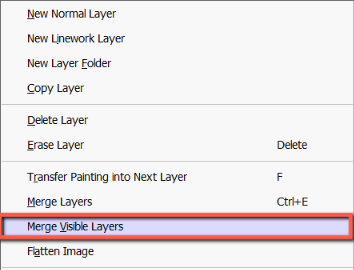
Step 10: Merge all of your layers together using Layer > Merge Visible.
Step 11: Use the Brush, Airbrush, and Pencil to clean up your drawing as desired.

To see another method of coloring skin in PaintTool SAI, watch this video:
How to Color Anime Skin in PaintTool SAI
You can also color skin using two or three colors in PaintTool SAI using cel-shading to create anime/manga-style skin.
As mentioned in my post How to Color Hair in PaintTool SAI: Cel-shading is a rendering technique often used in anime, manga, and western cartoons in which flat colors and shadows create the illusion of depth in an image instead of a shading gradient.
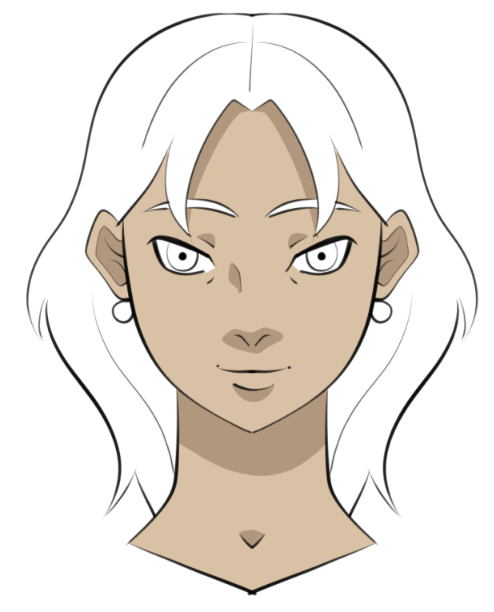
For this tutorial, I have already created a color palette using a reference image of Edward Elric from Fullmetal Alchemist. Reference images can not only save you frustration but also time if you struggle with color.
Here is the palette I created:
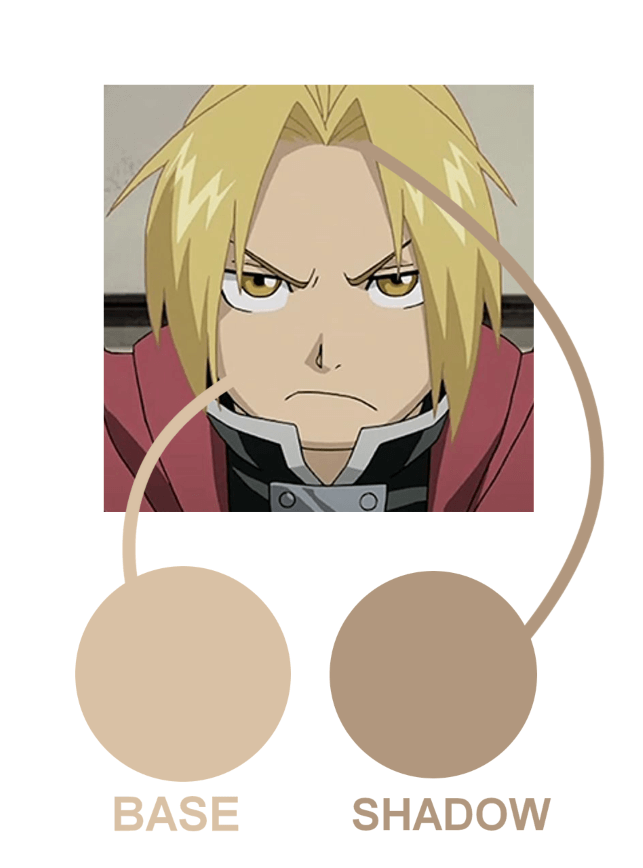
Notice that there are only two colors: a base color and a shadow. In most anime designs, these are the only two colors used skin and clothes. Hair is an exception which can sometimes include a highlight color. This is because the more colors that are added, the most costly an animation production will be.
That being said, consider the use of your characters also before designing.
Step 1: Open your character design document and click on your sketch or linework layer.
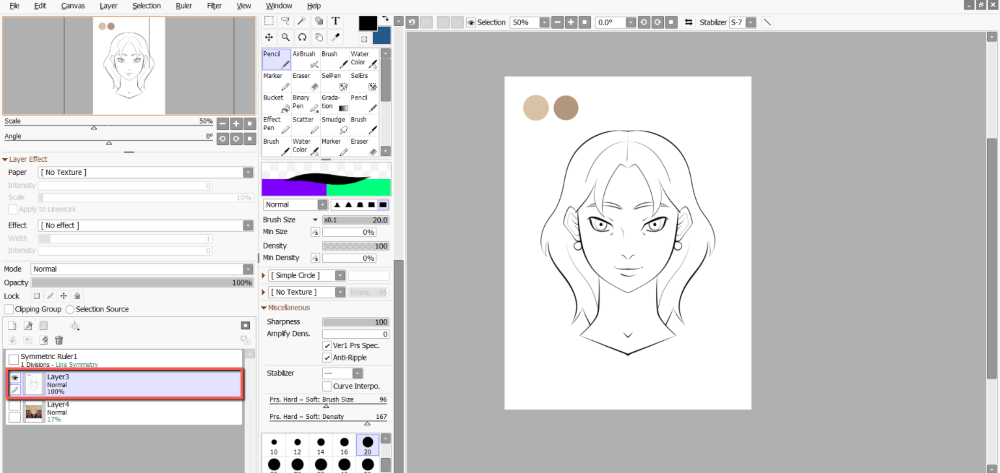
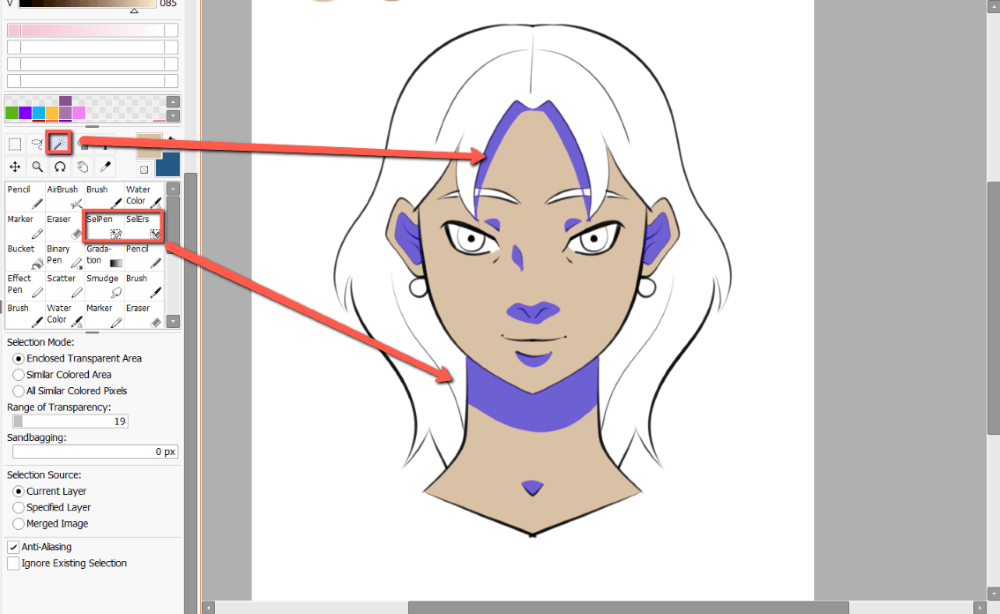
Step 2: Using the Selection Pen, Magic Wand, or a combination of both, select the area of skin you will be coloring.
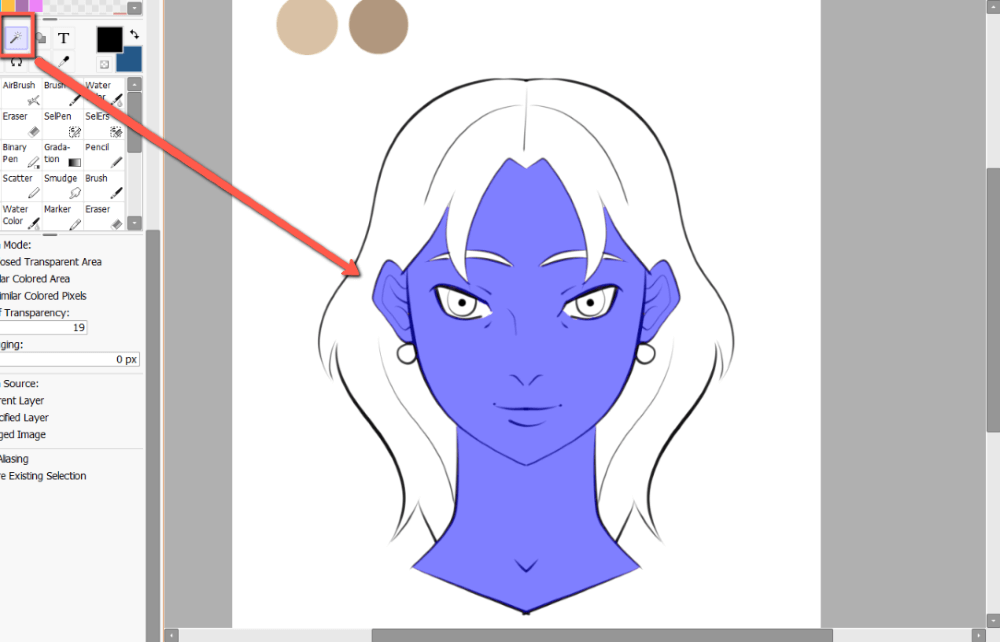
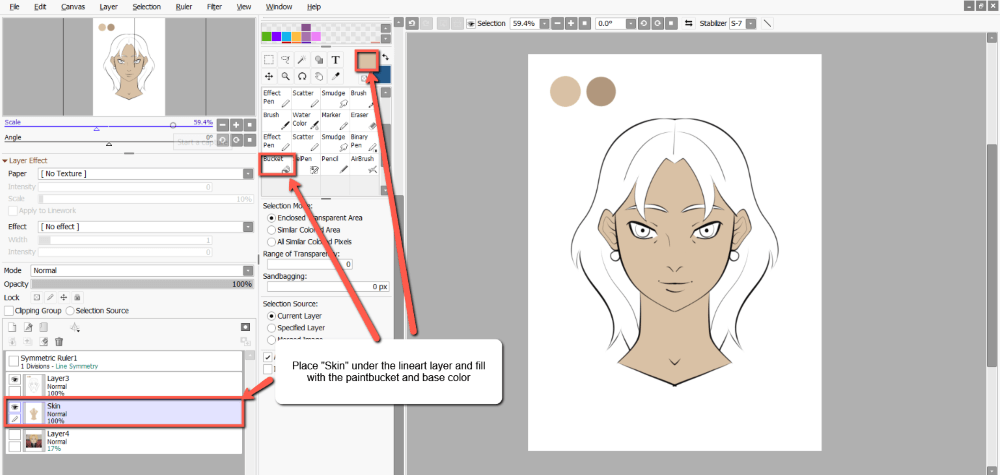
Step 3: Create a new layer under your linework and name it Skin. Using the Paint bucket, fill this layer in with your character’s skin base color.
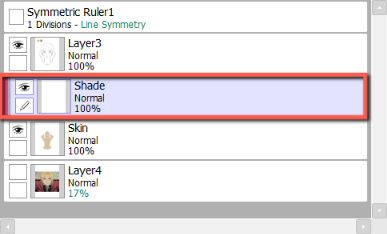
Step 4: Create a new layer above your Skin layer and name it Shade. Check the Clipping Group box.
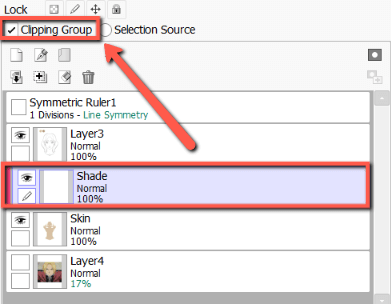
Step 5: Click back on your Linework Layer.

Step 6: Use the Select Pen and Magic Wand Tool to select the areas in which you would like to place your shadows. For this example, I am selecting under the nose, bottom lip, neck, and hair, as well as on top of the eyelids.
Step 7: Click back on your Shade layer.
Step 8: Using the Paint Bucket tool, fill in the active selection with your Shade Color.
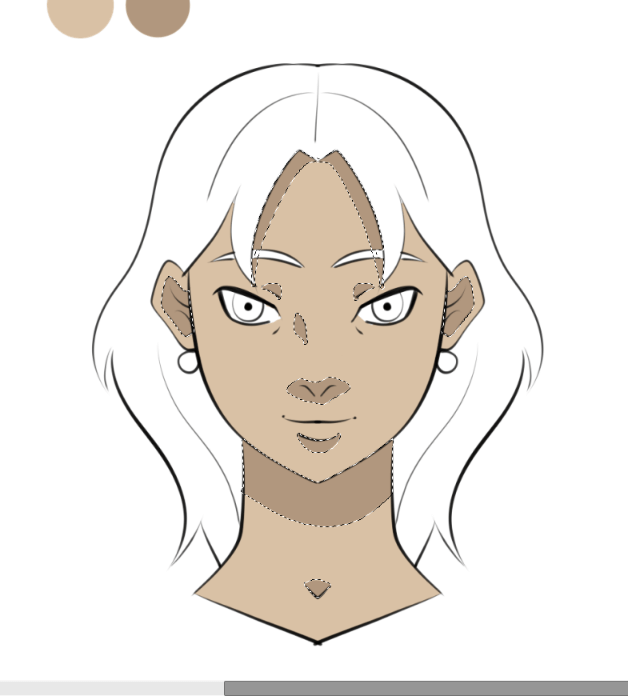
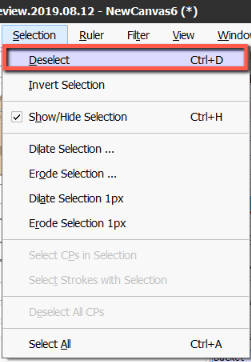
Step 9: Hit Ctrl + D on your keyboard to Deselect the selection. Alternatively, you can use Selection > Deselect.
That’s it.
Final Thoughts
Coloring skin in PaintTool SAI is easy using its various brushes and selection tools. You can achieve illustrative, photorealistic, and animated styles using different techniques such as blending and cel-shading.
Anime skin is simple and often involves only 2 colors and can often be achieved with only the Selection and Paint bucket tools. Renderings Photorealistic skin can involve multiple colors, blending modes, and brushes. Experiment with both styles to figure out which works best for you.
How did your skin come out? Do you like photorealistic or anime styles? Let me know in the comments below!