
Ensure your background is deactivated in your Layers menu. Insert a photo of the paper texture you would like to use. Adjust the Blend Mode from Normal to Hard Light. Add a new layer below your texture. Begin drawing to see the texture effect.
I’m Carolyn and I’ve been creating digital artwork in Procreate for over three years so when it comes to adding textures to a canvas, I am well-versed. Running a digital illustration business means I have a wide variety of clients with a wide variety of needs.
This is such an awesome feature of the Procreate app and I am very excited to share it with you. This allows you to create artwork that appears to be drawn onto paper which gives users a huge scope of design techniques and options for creating different ranges of work.
Note: Screenshots are taken from Procreate on iPadOS 15.5.
Table of Contents
Key Takeaways
- This is a great way to create a natural paper effect on your digital artwork.
- Once you apply the texture, everything you draw under it will have a paper texture effect and anything you draw over it will not.
- You must choose the paper texture you want to use first and download it as a photo or a file on your device.
- You can adjust the intensity of the texture by using your Adjustments tool to adjust the sharpness and saturation of the texture layer.
How to Apply a Paper Texture in Procreate – Step by Step
Before starting this process, you must choose the paper texture you want to use and have it saved as a file or a photo on your device. I used Google Images to find the texture I wanted and saved it as an image in my Photos app. Now you are ready to start:
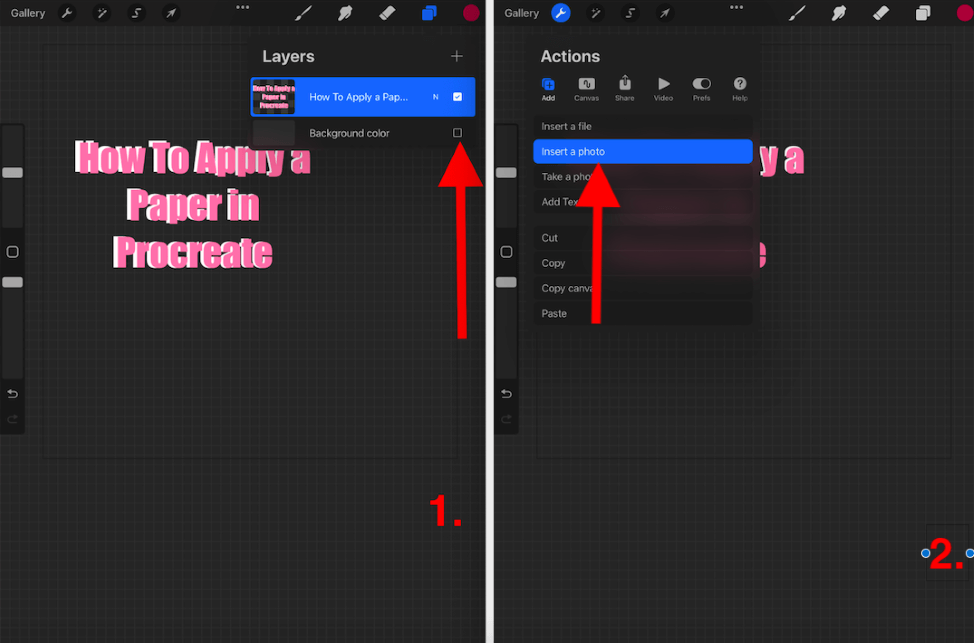
Step 1: In your canvas, ensure you have deactivated the background in your Layers menu. You can do this by opening the Layers menu and unticking the Background Color box.
Step 2: Tap on your Actions tool (wrench icon) and select the Add option. Scroll down and select Insert a Photo.
Select the photo of your paper texture and it will automatically load as a new layer in your canvas. Use your Transform tool (arrow icon) to fill the canvas with your inserted image if necessary.
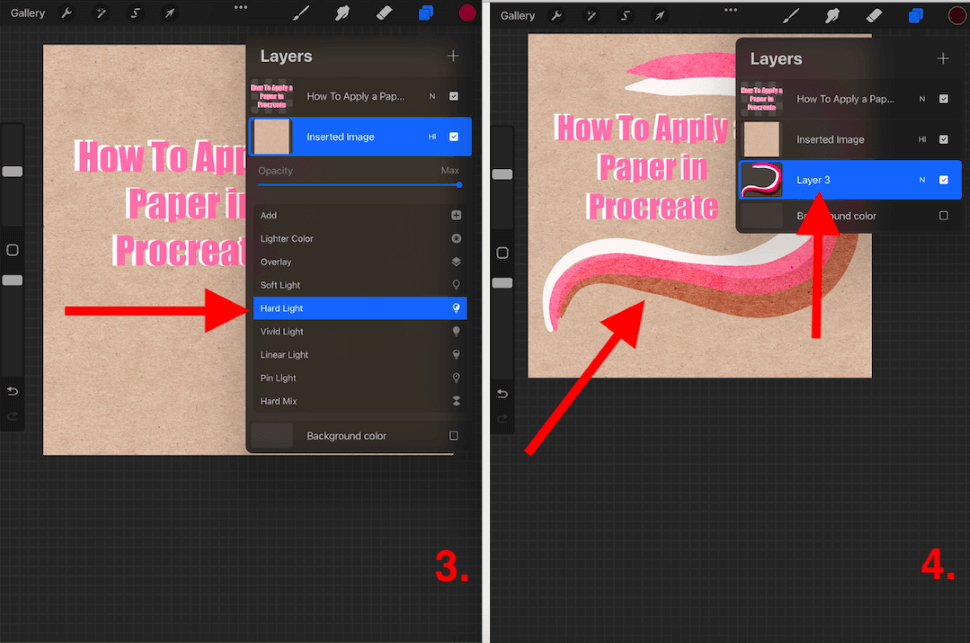
Step 3: Adjust the Blend Mode of your paper texture layer by tapping on the N symbol. In the drop-down list, scroll down until you find the Hard Light setting and select it. Once you have done this tap on the layer title to close the menu.
Step 4: Add a new layer underneath your paper texture layer and begin drawing. Everything you draw on this layer will mimic the texture of the layer above it.
Things to Note When Applying Paper Texture in Procreate
There are a few small things to note when using this method in Procreate. Here they are:
- All layers underneath the texture layer of your canvas will show the paper texture. If you want to create a drawing without the texture but on the same canvas, you can add layers above the texture layer to do so.
- Adding a white or black background layer can eradicate the texture effect.
- If you want to soften the texture, you can change the opacity of the texture layer using the Blend Mode menu.
- If at any point you decide you don’t like the texture or want to see what it would look like without it, simply untick or delete the texture layer from your canvas.
- Your colors may appear differently when using texture because they are mixed with the original color of the texture layer. You can adjust this by changing the Saturation level of the texture layer in your Adjustments tool.
- If you want the texture to appear more defined, you can use your Adjustments tool to increase the sharpness of your texture layer by tapping on Sharpen.
FAQs
I have selected a few of your frequently asked questions and briefly answered them below:
How to import a texture in Procreate?
You can follow the same method as shown above for almost any texture you may want to use in Procreate. Simply save a copy of your chosen texture as a photo or file on your device, add it to your canvas and adjust the Blend Mode to Hard Light.
How to make the paper look in Procreate?
Find the paper texture you like and add it to your canvas as either a photo or file. Then follow the steps above, adjust the Blend Mode to Hard Light and begin drawing on a layer beneath the texture layer you have created.
Where to find Procreate paper texture free download?
The good news is, you don’t have to find a free download to get the paper texture on Procreate. You can find the texture you like by taking a photo or using an image from Google Images and manually adding it to your canvas for free.
How to apply paper texture in Procreate Pocket?
Like many other Procreate Pocket similarities, you can follow the exact same method shown above to add a paper texture layer to your Procreate Pocket canvas. Just tap on the Modify button if you need to access the Adjustments tool.
Where is the Paper Brush Tool in Procreate?
You can use the method above to create a paper texture on any of the Procreate brushes. Alternatively, you can download a paper texture brush additionally online.
Conclusion
I absolutely love this feature on Procreate and I just find the outcomes are limitless. You can create a really beautiful natural paper texture effect with very little effort. This can turn an artwork from flat to timeless in a matter of seconds.
This feature is definitely worth spending some time getting to know, especially if you’re into designing book covers or children’s book illustrations as you can create a really lovely style in your work without having to think too hard about it.
Do you have any questions or need more information about adding a paper texture to your canvas? Leave your questions in the comment section below.