
If you read my previous post about how to format an external drive for Mac, you know that I bought a 2TB Seagate Expansion external hard drive and managed to create two partitions on the disk — one for Mac backup purposes, and the other for personal use.
In this article, I’m going to show you how to back up your Mac data to an external drive. You should back up your Mac on a regular basis, especially if you’re planning to perform macOS updates. I did this several weeks ago while preparing my MacBook Pro for a system update.

Please note that the backup tool that I used is Time Machine, a built-in app provided by Apple. If you want to back up your Mac data without using Time Machine, there are also other third-party Mac backup software worth considering.
Table of Contents
Where is Time Machine on Mac?
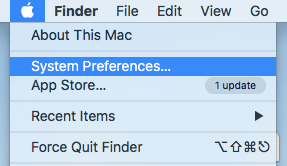
Time Machine is a built-in app within macOS ever since OS X 10.5. To find it, click on the Apple logo on the top left corner of your screen, then select System Preferences.
In the Preferences pane, you’ll see the Time Machine app located between “Date & Time” and “Accessibility”.
What does Time Machine Backup?
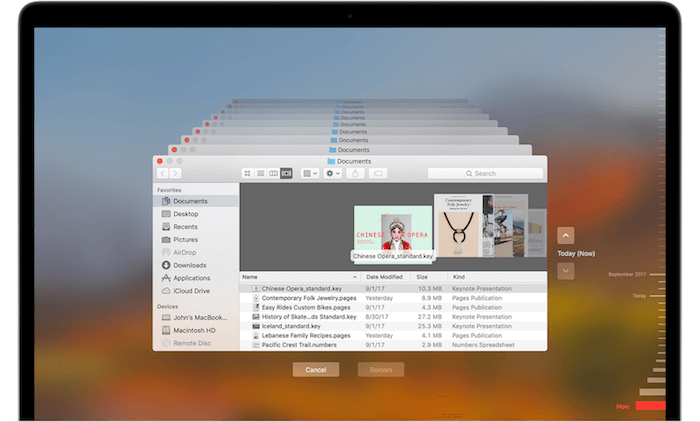
Time Machine is the easiest way to back up Mac. And the app is created and recommended by Apple. Once you have a timely backup, it’s incredibly easy to restore all or part of your data in case of accidental deletion or a hard drive crash.
So, what kind of data does Time Machine backup? Everything!
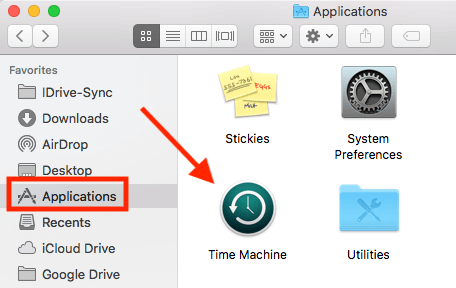
Photos, videos, documents, applications, system files, accounts, preferences, messages, you name it. They all can be backed up by Time Machine. You can then restore your data from a Time Machine snapshot. To do so, first open Finder, then Applications, and click on Time Machine to continue.
Be aware that the recovery process can only be conducted when your Mac can start up normally.
Backing up Mac to an External Hard Drive: Step-by-Step Guide
Note: the screenshots below are taken based on an older macOS. If your Mac is running a newer version of macOS, they will look slightly different but the process should be similar.
Step 1: Connect your external hard drive.
First, use the USB cable (or USB-C cable if you’re on the newest Mac model with Thunderbolt 4 ports) that comes with your external drive to connect that drive to your Mac.
Once the disk icon shows up on your desktop (if it doesn’t, open Finder > Preferences > General, and here make sure you’ve checked “External disks” to let them show on the desktop), move on to Step 2.
Note: if your external drive can’t show up on Mac or macOS hints the drive is not supported, you’ll have to re-format it to a Mac-compatible file system before continuing the following steps.
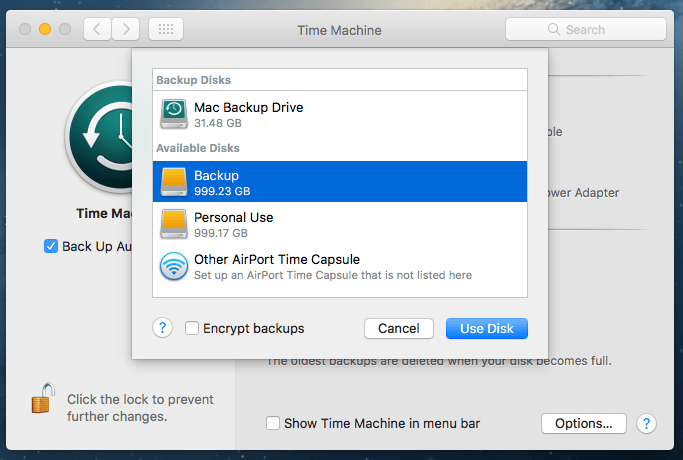
Step 2: Select the disk for backup.
Now open Time Machine (I tell you how above) and select the disk you want to use. I have partitioned my Seagate drive into two new volumes, “Backup” and “Personal Use”, as you see from the screenshot. I chose “Backup”.
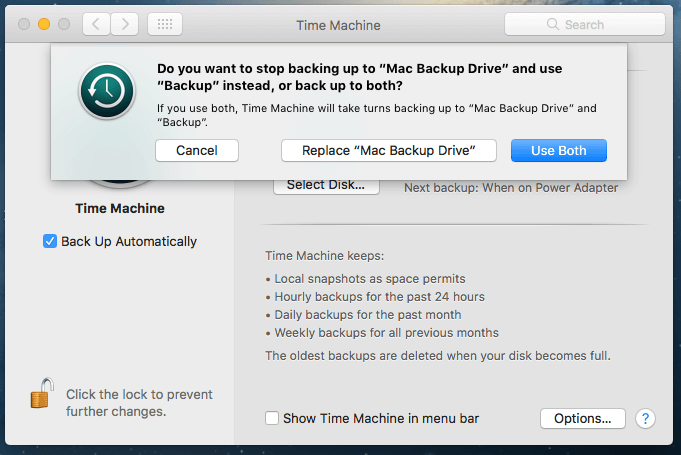
Step 3: Confirm backup (optional).
If you have used another disk for backup before, Time Machine will ask you whether you want to stop backing up to the previous disk and use the new one instead. It’s up to you. I selected “Replace”.
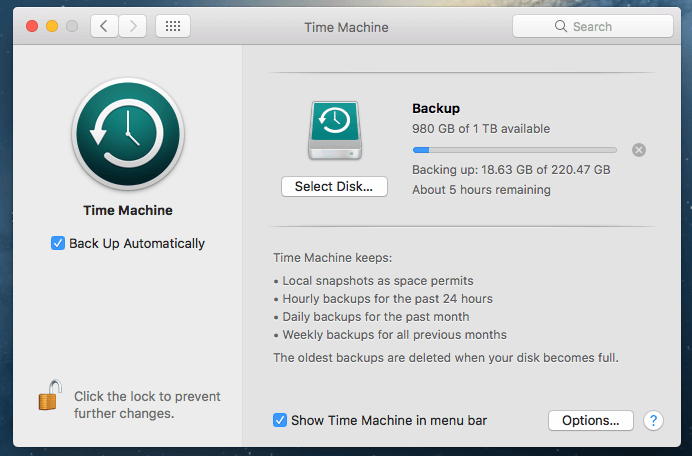
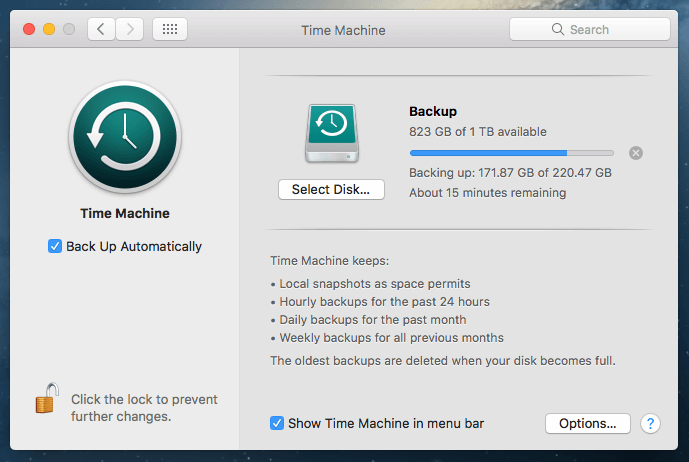
Step 4: Wait until the process is complete.
Now Time Machine will start to backup all your data. The progress bar gives you an estimate of how much time is left before the backup is complete.
I found it a bit inaccurate: Initially, it said “About 5 hours remaining”, but it only took two hours to finish. It’s worth noting that the remaining time may vary from case to case depending on the write speed of your external hard drive.
Step 5: Eject your external drive and unplug it.
When the backup procedure is completed, don’t rush to disconnect your device as this could cause potential disk problems.
Instead, go back to the main desktop, locate the volume that your external hard drive represents, right-click and select Eject. Then, you can safely unplug the device and put it in a safe place.
Final Tips
Like any other hardware device, an external hard drive will fail sooner or later. It’s best to make a copy of the data on your external drive — as they say, a “backup of your backups”!
One good option is to use cloud storage services like iDrive which I’ve been using and I really like the app because it’s super easy to use, and it also allows me to download Facebook photos automatically. Backblaze and Carbonite are also popular options in the market, though I am yet to give them a try.
I hope you find this tutorial helpful. I can’t emphasize enough the importance of data backup these days. Without a proper backup, it’s really hard to restore data. Although you could try a third-party Mac data recovery software, chances are they won’t get all your lost data back.
The main takeaway here is to back up your Mac with Time Machine or another app, and create a second or third copy of those backups if you can.
Hi, I have just plugged in a Lacie Hard Drive to use as a Time Machine on my MacBook Air M2. When I plug it in two drives appear. A drive called Time Machine (what I expected) and another called Backups of MacBook Air. Why are there two drives and can I remove the Backups of MacBook Air Drive? I have tried unmounting both a number of times and the drive has been erased.
Hello,
My question may be stupid, and I have already done 5 backups with my Adata.
But this time every time I try to open Time Machine I end up on the page with all my backups stored and I do not get to the application itself and all its preferences etc.
From the image under section “what does Time Machine Backup?”, how do I do?
Thank you in advance !
If you have previously set up Time Machine, then the way to open and edit is to go to Sustem Preferences > Time Machine.
Hi,
The automatic backups on my iMac (os Mojave ) have stopped working. A message comes up after every attempted backup, as follows:
“Time Machine could not create a local snapshot to back up from because there was insufficient free space on the source volume(s).”
It looks as though I have 300 GB left on my 2TB Time Machine. The Time Machine is set to delete oldest backups when the disk becomes full.
Any help on how to overcome this problem would be much appreciated, Thank you.
Henry
I don’t like having to lug around my external hard drive (La Cie) wherever I use my laptop. Can I just plug it in periodically and open up Time Machine?
Hi – all very interesting, thanks for the comments. I have a 1TB macbook pro and want to do a complete time machine backup to a 4TB external hard drive – but there’s too little room left on the mac to start this…. I wanted to do a complete back up before deleting a ton of old photos. I’ve dragged the Photos file/app on to the hard drive separately, not anything to do with Time Machine, and also put other files directly on the hard drive. Question: if the mac says I don’t have enough space on the mac to do a time machine backup, is there any way I can get this done BEFORE deleting some images from Photos to create more space (after the backup) – or should I drag something massive across to the hard drive outside of time machine, delete it on the mac, and THEN do the time machine backup, just keeping the original photos (or music) separate? (Does that make sense?!) Thanks for any suggestions and much appreciated!
Hi all!
A couple of questions regarding Encrypting during back up using Time Machine…
Do you have to encrypt? I checked the Encrypt Backups check box during the process but it is taking for ever to complete.
Can I interrupt the process? The reason I am backing up the system is because I have to reset the system to reinstall the OS and start a new image. But, not sure if I should interrupt encryption.
Thanks in advance!!
My iMac 2017 OS (MAC OS Catalina 10.15.6) was replaced due to the beachball issue for all my apps. My entire computer was backed up on a Seagate Basic 1Tb drive. How do I get the folders that were originally saved to my computer in Outlook (for Mac) now that they are only on the external drive? I can’t find an .olm file anywhere. Are they saved a different way and how do I import them to my Outlook?
I’ve backed up my Mac on a regular basis using this wonderful Time Machine. So now my 9 year old MacBook Pro has died and I have a new one. So am I able to transfer the files I want back onto the new Mac? No way! Everywhere on the internet experts explain how to back up, but not a word on how to retrieve the files. My old Mac used Lion, but I regularly updated the system. The new Mac uses Catalina. Of course I can still go into the Time Machine to see the files and I can copy a single file and export it as a JPEG. If I click on a file I am unable to drag it onto my computer’s desktop. Any ideas about what I can do; the answer is often crushingly simple. Regards Mark
Hi,
Once I’ve backed up my computer, how do I access the files on my hard drive? When I select ‘photos’ for instance, I get a notification that the application cannot be opened because “it is in a time machine backup”
I have followed all the directions to back up my MacBook Pro, to a 500gb verbatim external drive and there has been no action in a number of hours. The time machine window has been “preparing backup” for hours now. I’m extremely frustrated with this process. I even talked to an Apple tech earlier this afternoon,,and had me do the exact same thing that I’m doing now. I see not current status.. I see no timeline indicator… I just don’t know… I’m not a tech… any advice?
Thanks
I have formatted new WD My Book 3TB external HD using your excellent instructions, but my iMac will not back up to it; backing to my 3 TB Time Machine works fine.
The error message says: Unable to complete backup. An error occurred while creating the backup folder. Latest successful backup: May 18, 2020
Can I help by creating the missing backup folder; there is nothing on the Backup partition now. Could it be that the system will only back to one at a time and will take care of all of these after the current backup is done? If so, how can I set a recurring backup to the WD drive?
Hi JP,
Thanks for the article.
I actually work mostly off Google Drive files that I access directly in Finder through Google’s Backup and Sync (B&S) app.
I want to create a backup of these Google Drive files on a local drive (the opposite of what most people want to do), but it doesn’t appear my B&S files are backing up to Time Machine.
Might you have any insight on why this is, and how I could get around it?
Really appreciate any help!
Best,
Leo
what happens if my iMac 2011 desktop crashes and i’ve backed up everything on timemaching and maybe iDrive. i suppose i will have to replace the hard drive or buy another mac. that’s very expensive. could i buy another brand pc and download documents to a pc? i really am no a techie at all. i don’t know what i’m doing. i’ve had 4 imacs crash taking all my artwork, everything with it. the authorized mac repair shop said impossible to fix. buy another refurbished. that’s what i’m working on now and it’s making popping/crackling sounds. probably dying. covid-19 has all apple stores closed. i’m between a rock and a hard place. any suggestions?
My MacBook Pro w retina screen will not back up to TimeMachine. It was “preparing for update” and nothing ever happens. I get the beachball all the time. It is also becoming hard to start up the computer. I went to the Apple store 5 times about this. They replaced many parts and my MacBook Pro still has all these problems. This is extremely frustrating.
Dear JP thank you for the instructive tutorial. I am in the process of updating my OS system for my 2010 macbook. Currently still using snow leopard (10.6.8) I need to do two upgrades; the first to El Capitan, the second to High Sierra.
Would a backup via time machine be sufficient for me to keep my work during these upgrades? Would my documents, photos etc be compatible with the new systems? Also would you recommend installing an SSD card to help run things efficiently? Many thanks.
I have followed all of the steps, but my external hard drive does not pop up as an option under ‘Available Disk’. Why is this happening. I can’t find any answers online. This external hard drive has been used with a Mac before so it should be compatible. Someone please help.
I already have Time Machine on my MB Pro, but it shows a different (previously used) Seagate device.
Can I add another Seagate device? (I left my device at home, so purchased another, in order to back up while I’m away.)
Thank you!
Hi, may I ask if I back up my macbook on an external hard drive repeatedly like every month (the system always prompts you) and for example my hard drive is 1TB and my macbook storage is 250GB then I can only back up 4 times on this hard drive? Thanks
No, you probably can back it up many more times. Because Time Machine is incremental, the first time it will back up everything. The second time (and the 3rd time, etc.) it will only back up the file changes you made.
Hi. I’ve backed up my photos on a seagate bakup plus hard drive from my MacBook Air, but now when I try to access the photos from the hard drive, it says the following:
You can’t open the application “Photos” because it is in a Time Machine backup.
Any suggestions on how to resolve this issue?
Hi, my question is about once I have an external hard drive with a backup on it, what can I do to free up disk space on my Mac?
Here’s my dilemma. I used an external hard drive as backup with existing files on it. Then when I used it as a backup drive, I am not sure if my existing files in the external hard drive are deleted because of the backing up. Can I still access these files despite the fact that it is now my backup?
Hi! Thank you for this valuable tutorial. I have a question, what is the difference between backing up everything with the time machine and without it?
thanks again,
thank you it is really helpful.
How do I retrieve from my backup?
Hi good a.m.. Can you help me regarding my ADATA HV620 Hard Disk 3TB, i can’t use it to my Macbook Air and before i can used it as an extended drive for my mac. What shall i do? Thank you so much.
Make sure you’ve formatted your external drive to a Mac-compatible format, I’ve covered this in another article here.
It appears that Time Machine involves an interaction with Apple that requires connection to the internet when backing up. I’d prefer a method of backing up that can be done without being so connected. There is a wikihow article entitled “How to back up a Mac without Time Machine”. I followed the instruction to their sixth step at which point the “recovery screen” was supposed to appear with a spinning globe. Suffice it to say the recovery screen never came up. Instead I got a message asking whether I wanted to reinstall High Sierra. Disappointing.
I had tried Time Machine previously. The backup of my hard drive started and the time calculation to complete was originally 1 hour, then 2 hours, then 27 hours. I figured from the rate the update was taking that it would have taken at least a month. I saw someone suggest that maybe my wireless was slowing things down and that I should connect my MBPro directly through the Thunderbolt port. If I can’t find a method to backup without Time Machine I suppose I might try his suggestion.
Hi JP,
In the “Step by Step” section, in the parenthesis, you refer to a “USC-C” Cable. You may wish to edit this as I believe you mean USB-C.
Ana
Thanks Ana! Corrected.
I think my question or point was, I HOPE a clean install will work. If not, I will purchase a new Mac or IMAC, but want to explore all options first . Spent a lot on my Mac book pro Retina in May 2013. 750SSD and 16 G of Ram
I thing it is ridiculous that it only lasts 5 years!
I had the same issue, Sally. We are currently working on purchasing a new iMac bc of this. The RAM is full and we get Beachball for EVERYTHING! So slow!!! I think it has to do with the updates. Remember how Apple got in trouble for forcibly slowing down the iphones? Yeah, pretty sure it’s the same thing in their computers.
Hi JP
I have a Mac Book Pro retina that I purchased in May 2013. Ever since I updated to Os SIERRA ( not High SIERRA) I have been getting the beachball. Constantly! So I reboot and sometimes it goes away, sometimes I turn it off completely for an hour. I never had this problem with Yosemite. Anyway, I use time machine to back it up and about 6 months ago, I started cloning my machine in Sierra. I also have a clone of my machine when it was Yosemite. But I don’t want to go backwards. I am presently copying all my docs, music, pictures, etc, to even another external drive, as I am thinking of wiping my computer clean and doing a clean install of High Sierra. They say the beachball is a sign that one of the programs is hanging up, but I have yet to determine which it is. Even with ALL PROGRAMS closed , Finder has produced beachball as well. I admit I have probably moved some files to places they don’t normalky go over the 5 years I have had the Mac. I DONT USE the cloud(too paranoid) haha. I have been getting help from a MAC guru and so I have been getting lazy about doing things myself, and I want to get back to doing it myself . As I sit her waiting for the copying to be completed AT WHAT SEEMS LIKE A SNAILS PACE, I am just googling stuff and found your Blog. It is so annoying when the MAC slows down! It was just nice to read your article making it all sound so easy. I knew my PC backwards and forwards and could do ANYTHING on it and knew how all worked, but it had its issues always fighting with the virus software. I just realized I don’t even know why I am writing to you, as I did have a question when I first started this message. However I can’t renember it now.
I also use iDrive and can highly recommend it.
I have a more specific question about backing up Mac files.
How do I copy a Mac screen shot to an external drive?
I do NOT want a huge backup, JUST the screen shots I’ve taken and saved to the Mac desktop.
Nothing more … nothing less.
Thanks!
Hi Chris, to copy screenshots you’ve already taken to an external drive, just drag them over. You should see the name of the drive on the left panel, and you can just drive them there if you like.
If you’d like to automatically save your screenshots to an external drive, you may find this YouTube tutorial helpful: https://www.youtube.com/watch?v=lZFyWtAByz0
Hello,
I have performed a complete back up of my Mac once back in September.
I am now struggling with subsequent back ups.
The back up actually runs and is dated appropriately, but there are folders and files that are not on the Seagate External Hard drive that are on my Mac. Any thoughts on why this might be? I haven’t excluded anything (to my knowledge) in the back up.
Does not work. I am tired of this Mac Pro who can’t do a simple task without an error. Time Machine could not create a local snapshot to back up from because there was insufficient free space on the source volume(s).
I have a new empty 120 GB USB and still failure. I think I give up, buy a simple Windows PC instead.
Did you ever figure out how to solve this issue? I am having the same problem.
Transferring a backup drive from an external device to a new MacBook Pro is also very, very important. Where are the articles which describe how to accomplish this, as well as the pitfalls along the way?